POD
- Create an NGINX Pod
kubectl run nginx --image=nginx
- Generate POD Manifest YAML file (-o yaml). Don't create it(--dry-run)
kubectl run nginx --image=nginx --dry-run=client -o yaml
To get the pods with labels
kubectl get pods --same-labels
DEPLOYMENT
- Create a deployment
kubectl create deployment --image=nginx nginx
- Generate Deployment YAML file (-o yaml). Don't create it(--dry-run)
kubectl create deployment --image=nginx nginx --dry-run=client -o yaml
NOTE
kubectl create deployment does not have a --replicas option. You could first create it and then scale it using the kubectl scale command.
Save it to a file - (If you need to modify or add some other details)
kubectl create deployment --image=nginx nginx --dry-run=client -o yaml > nginx-deployment.yaml
We can then update the YAML file with the replicas or any other field before creating the deployment.
SERVİCE
- Create a Service named redis-service of type ClusterIP to expose pod redis on port 6379
kubectl expose pod redis --port=6379 --name redis-service --dry-run=client -o yaml
(This will automatically use the pod's labels as selectors)
or
kubectl create service clusterip redis --tcp=6379:6379 --dry-run=client -o yaml
(This will not use the pods labels as selectors, instead it will assume selectors as app=redis. You cannot pass in selectors as an option. So it does not work very well if your pod has a different label set. So generate the file and modify the selectors before creating the service).
- Create a Service named nginx-service of type NodePort to expose pod nginx's port 80 on port 30080 on the nodes
kubectl expose pod nginx --port=80 --name nginx-service --type=NodePort --dry-run=client -o yaml
(This will automatically use the pod's labels as selectors, but you cannot specify the node port. You have to generate a definition file and then add the node port in manually before creating the service with the pod.)
EXAMPLES
Deploy a pod named nginx-pod using the nginx:alpine image
kubectl run nginx-pod --image=nginx:alpine
Deploy a redis pod using the redis:alpine image with the labels set to tier=db.
kubectl run redis --image=redis:alpine --labels=tier=db
Create a service redis-service to expose the redis application within the cluster on port 6379.
kubectl expose pod redis --name=redis-service --port=6379
Create a deployment named webapp using the image kodekloud/webapp-color with 3 replicas
kubectl create deployment webapp --image=kodekloud/webapp-color
kubectl scale deployment webapp --replicas=3
Create a new pod called custom-nginx using the nginx image and expose it on container port 8080
kubectl run custom-nginx --image=nginx --port=8080
Create a new namespace called dev-ns.
kubectl create namespace dev-ns
Create a new deployment called redis-deploy in the dev-ns namespace with the redis image. It should have 2 replicas.
kubectl create deployment redis-deploy -n dev-ns --image=redis
kubectl scale deployment redis-deploy -n dev-ns --replicas=2
Create a pod called httpd using the image httpd:alpine in the default namespace. Next, create a service of type ClusterIP by the same name (httpd). The target port for the service should be 80.
kubectl run httpd --image=httpd:alpine
kubectl expose pod httpd --port=80
Edit PODs and Deployments
Edit a POD
Remember, we CANNOT edit specifications of an existing POD other than the below.
spec.containers[*].image
spec.initContainers[*].image
spec.activeDeadlineSeconds
spec.tolerations
For example we cannot edit the environment variables, service accounts, resource limits of a running pod. But if you really want to, you have 2 options:
Run the kubectl edit pod <pod name> command. This will open the pod specification in an editor (vi editor). Then edit the required properties. When you try to save it, you will be denied. This is because you are attempting to edit a field on the pod that is not editable.
A copy of the file with your changes is saved as a yaml file in a temporary location.
We can then delete the existing pod by running the command: kubectl delete pod <pod name>
Then create a new pod with changes using the temporary file kubectl create -f <newly created yaml file with changes>
like kubectl create -f /tmp/kubectl-edit-ccvrq.yaml
The second option is to extract the pod definition in YAML format to a file using the command kubectl get pod <pod name> -o yaml > my-new-pod.yaml
Then make the changes to the exported file using an editor (vi editor). Save the changes vi my-new-pod.yaml
Then delete the existing pod kubectl delete pod <pod-name>
Then create a new pod with the edited file kubectl create -f my-new-pod.yaml
Edit Deployments
With Deployments we can easily edit any field/property of the POD template. Since the pod template is a child of the deployment specification, with every change the deployment will automatically delete and create a new pod with the new changes. So if we are asked to edit a property of a POD part of a deployment you may do that simply by running the command
kubectl edit deployment my-deployment
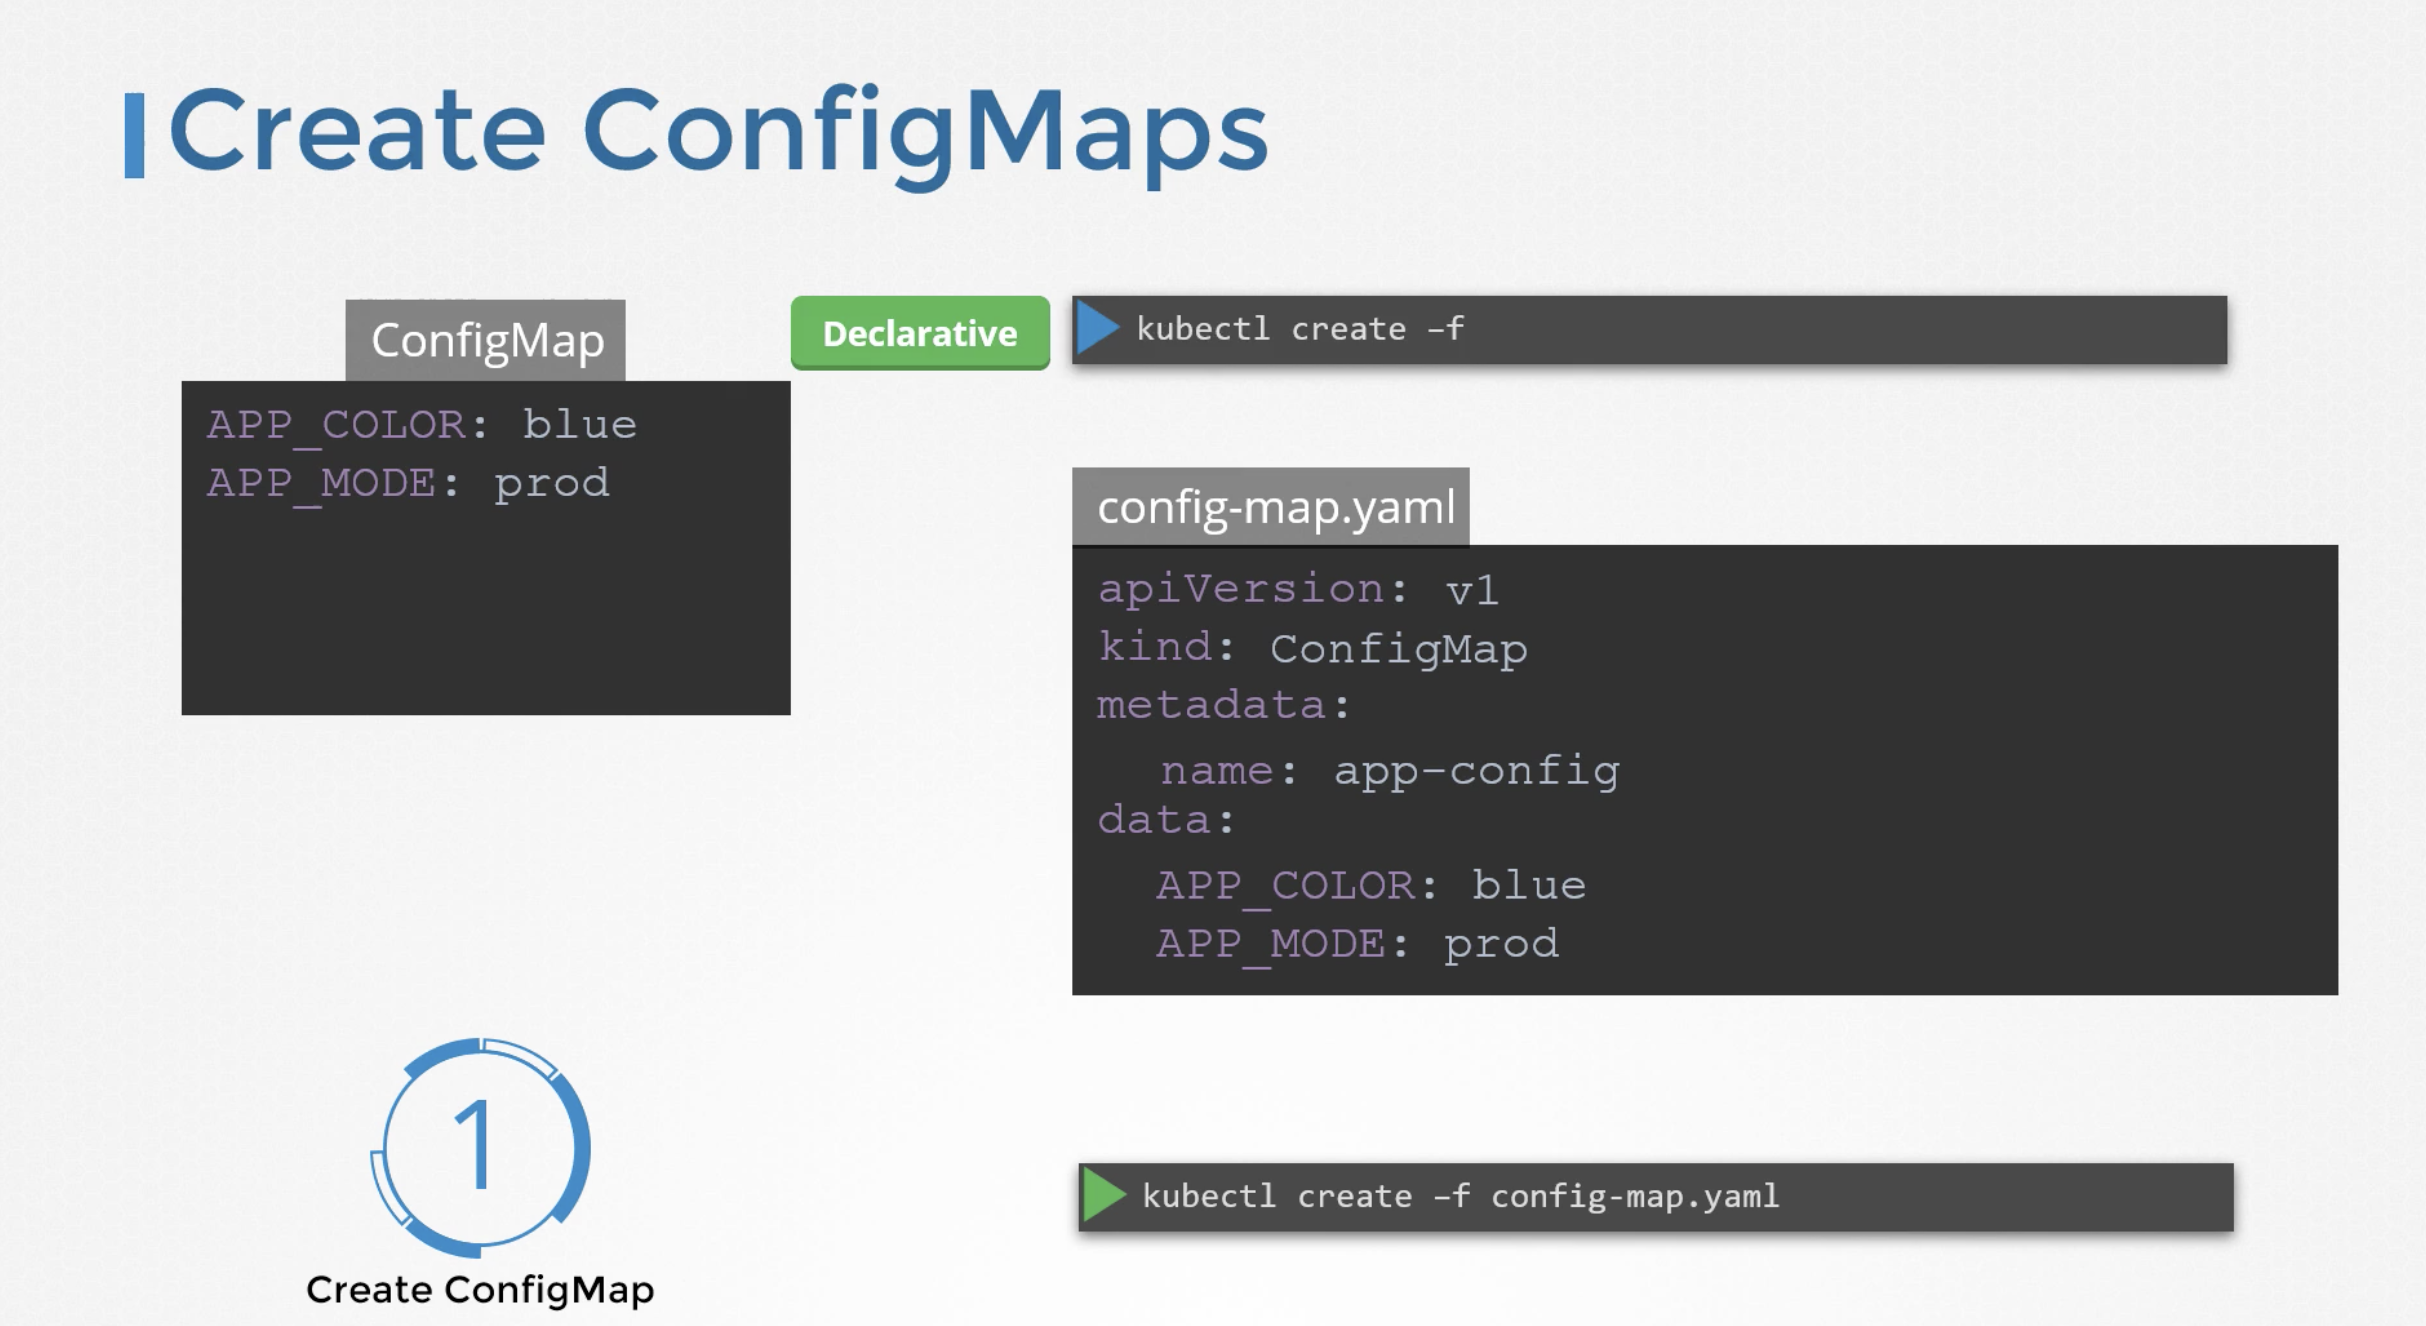
configMaps
When we have a lot of pod definition files, it will be difficult to manage the environment data stored within the various files. We can take this information out of the POD definition file and manage it centrally using the Configuration maps.
Config maps are used to pass configuration data in the form of key value pairs in kubernetes.
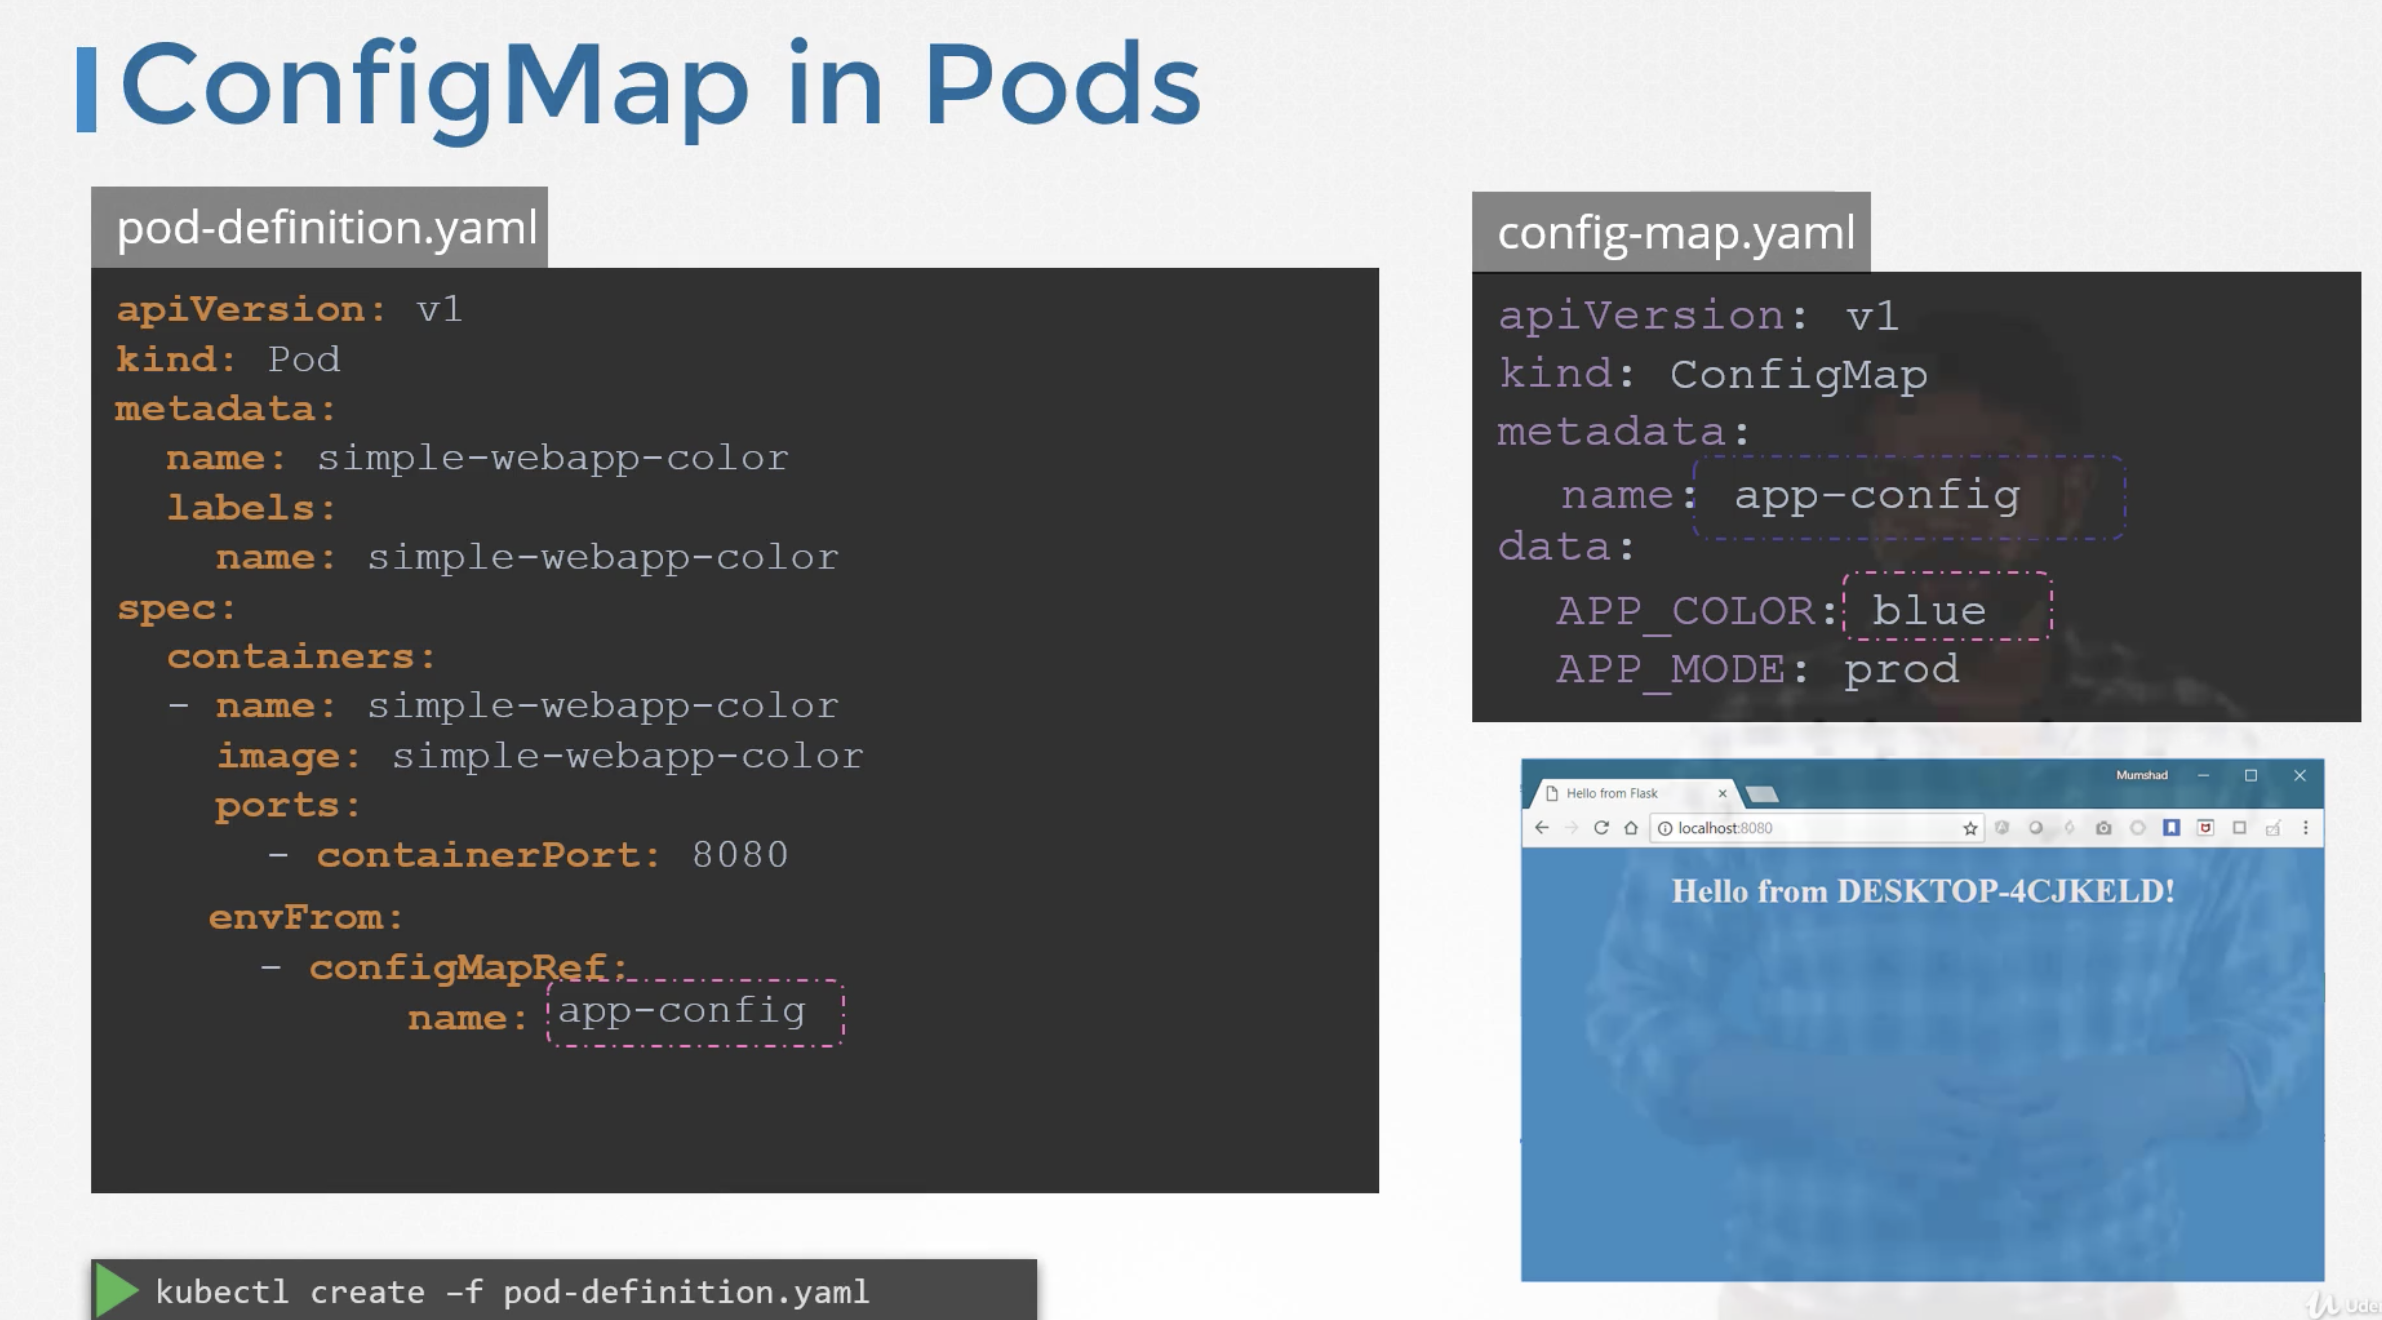
When a POD is created, inject the config map into the pod. So the key value pairs are avilable as environment variables for application hosted inside the container in the POD.
There are two phases involved in configuring configMaps.
* Create configMap.
* Inject into POD.
There are two ways of creating a configMap:
configmap
APP_COLOR: blue
APP_MODE: prod
Imperative way - kubectl create configmap
without using configmap definition file.
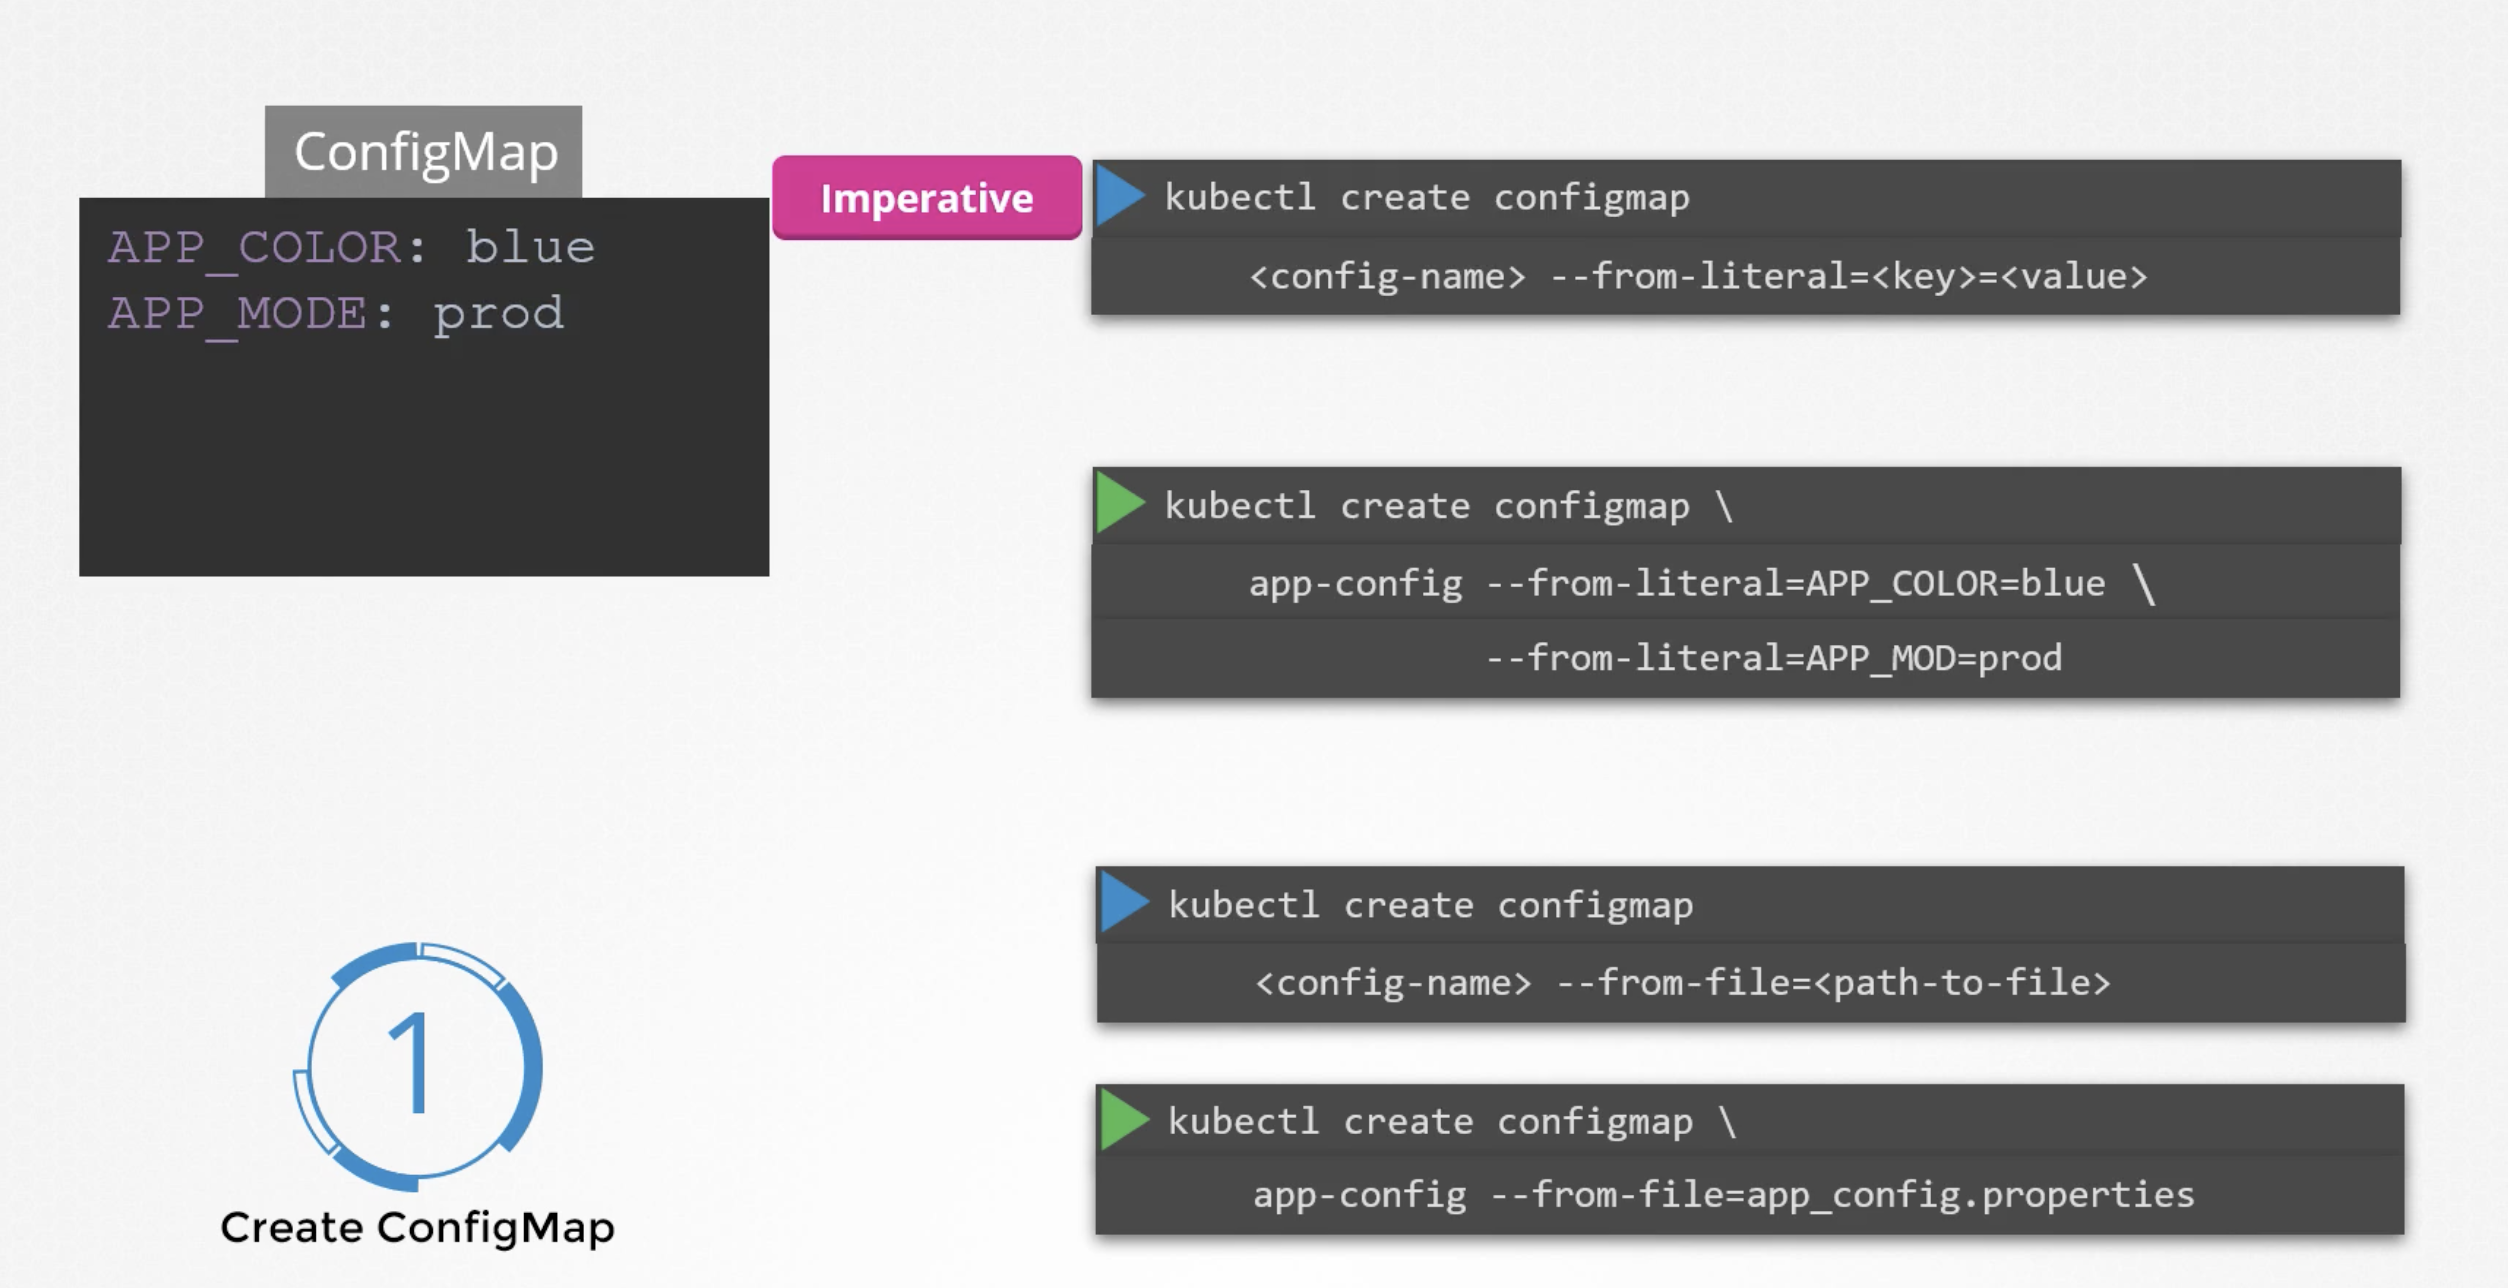
Declartaive way - kubectl create -f <filename>
using configmap definition file.
kubectl get configmaps
To list all the available configmaps
kubectl describe configmaps
This lists the configuration data.
ConfigMap in Pods
We have pod definition file and to inject an environment variable, add an new property to the container called envFrom. envForm property is a list and we can pass as many environment variables as required.
Each item in the list corresponds to a configMap item. Specify the name of the configMap we created earlier.

Title:
For example hardcoding host, username and passwords in th code is not a good idea.
One option for this is to move these data to a configmap. configMap stores configuration data in plain text format. It will be ok to move the Hostname and username to the config but it is definetely not the right place to move the passwords.
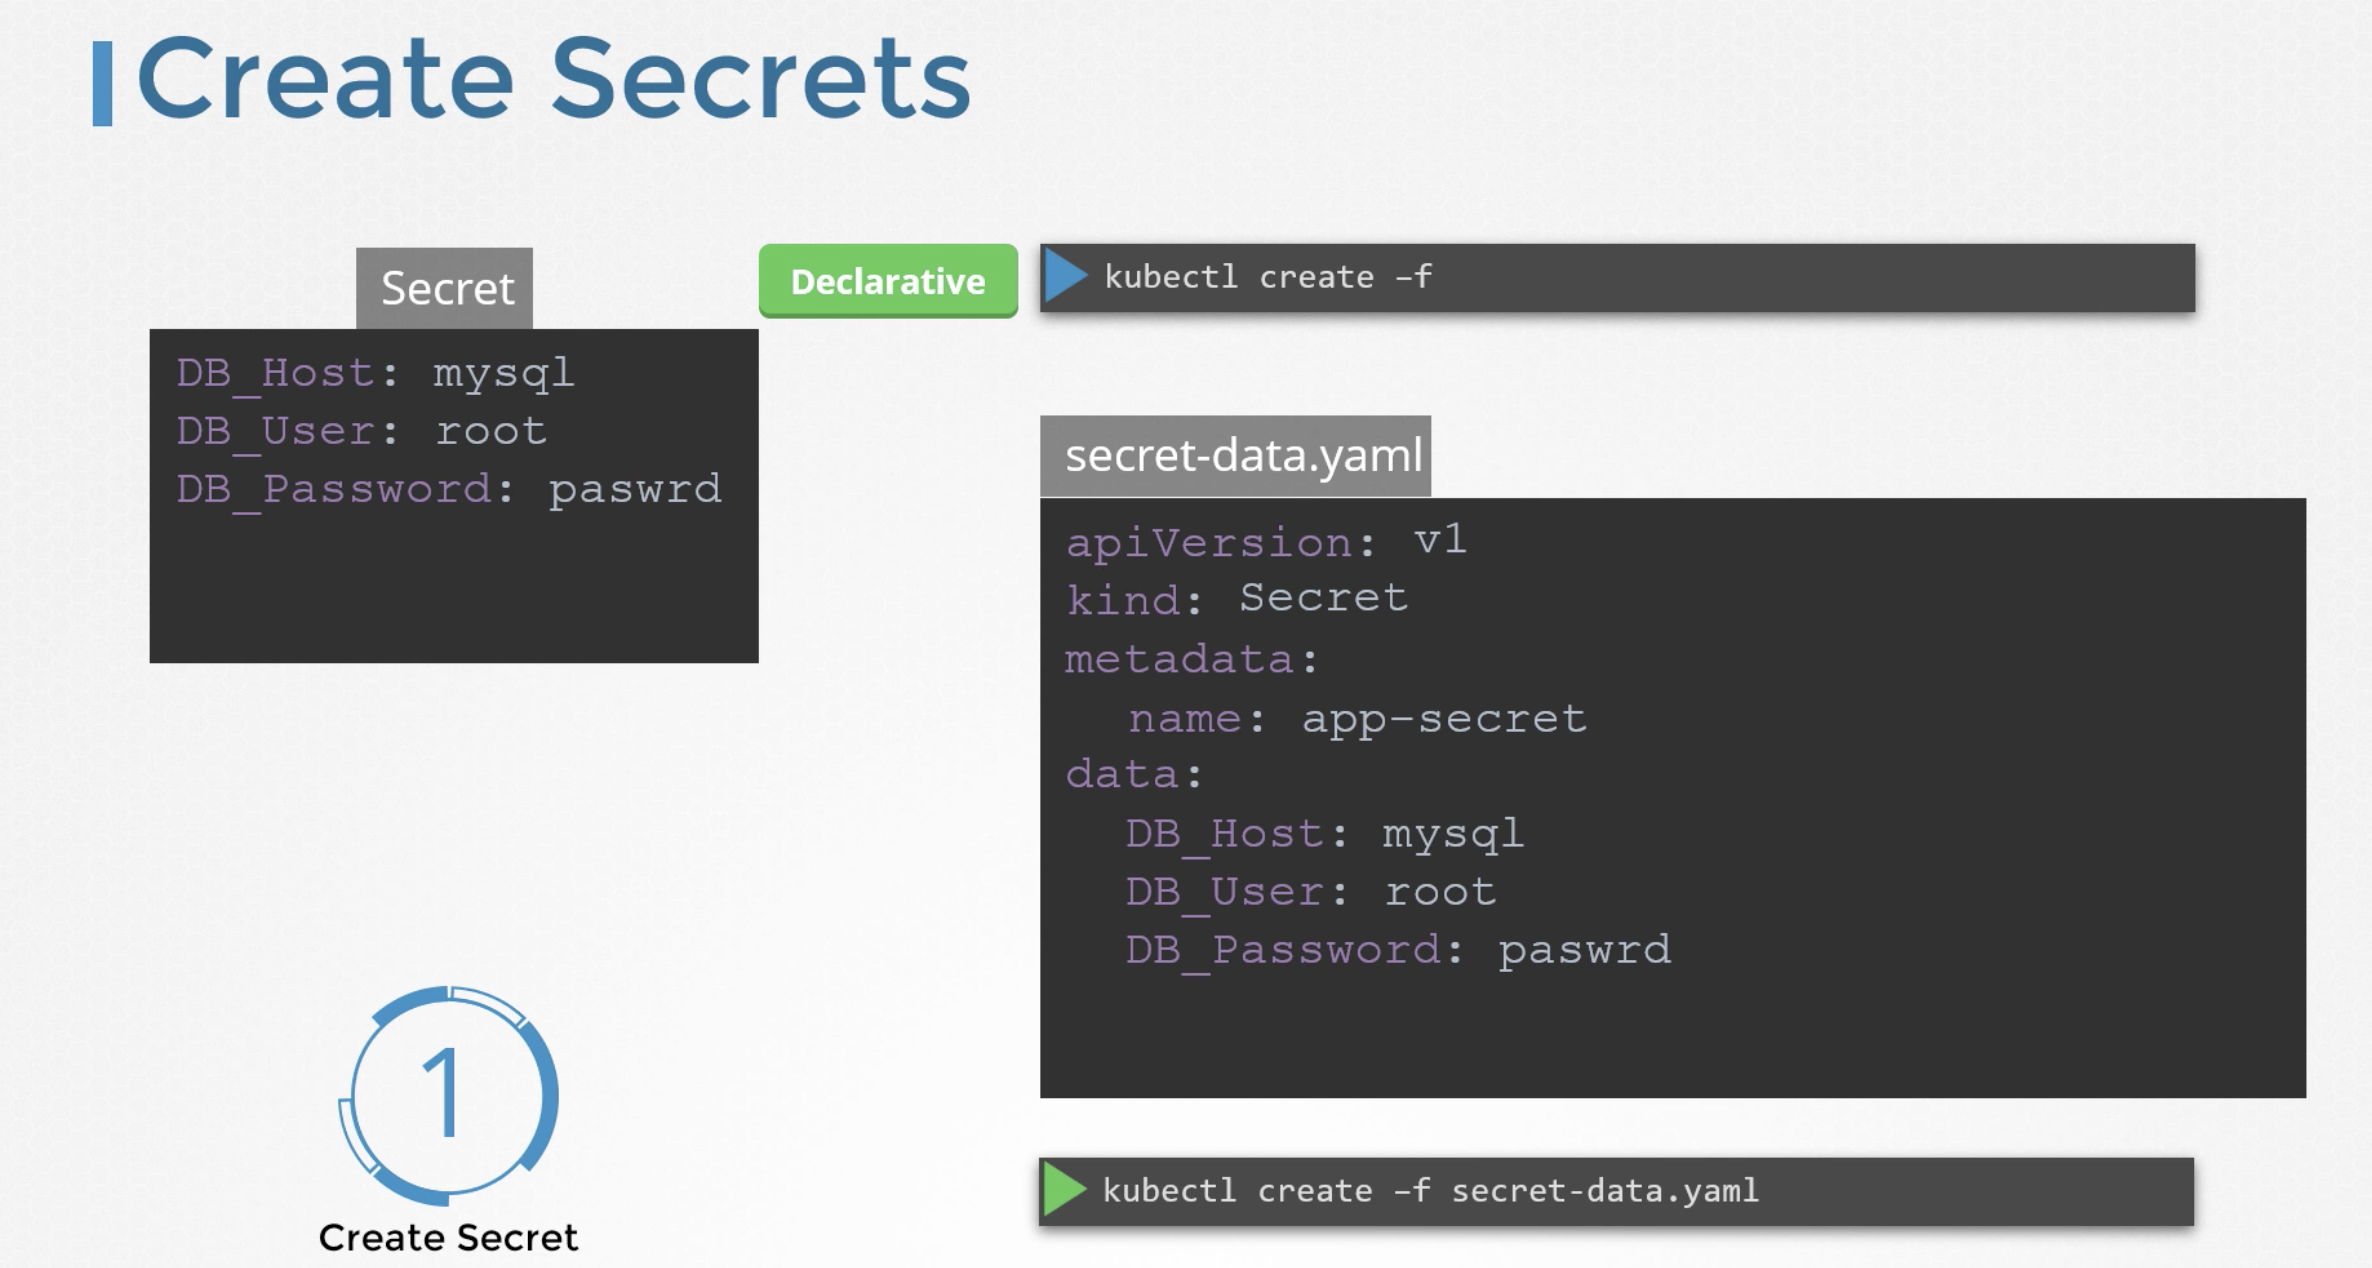
Secrets
Secrets are used to store sensitive information.
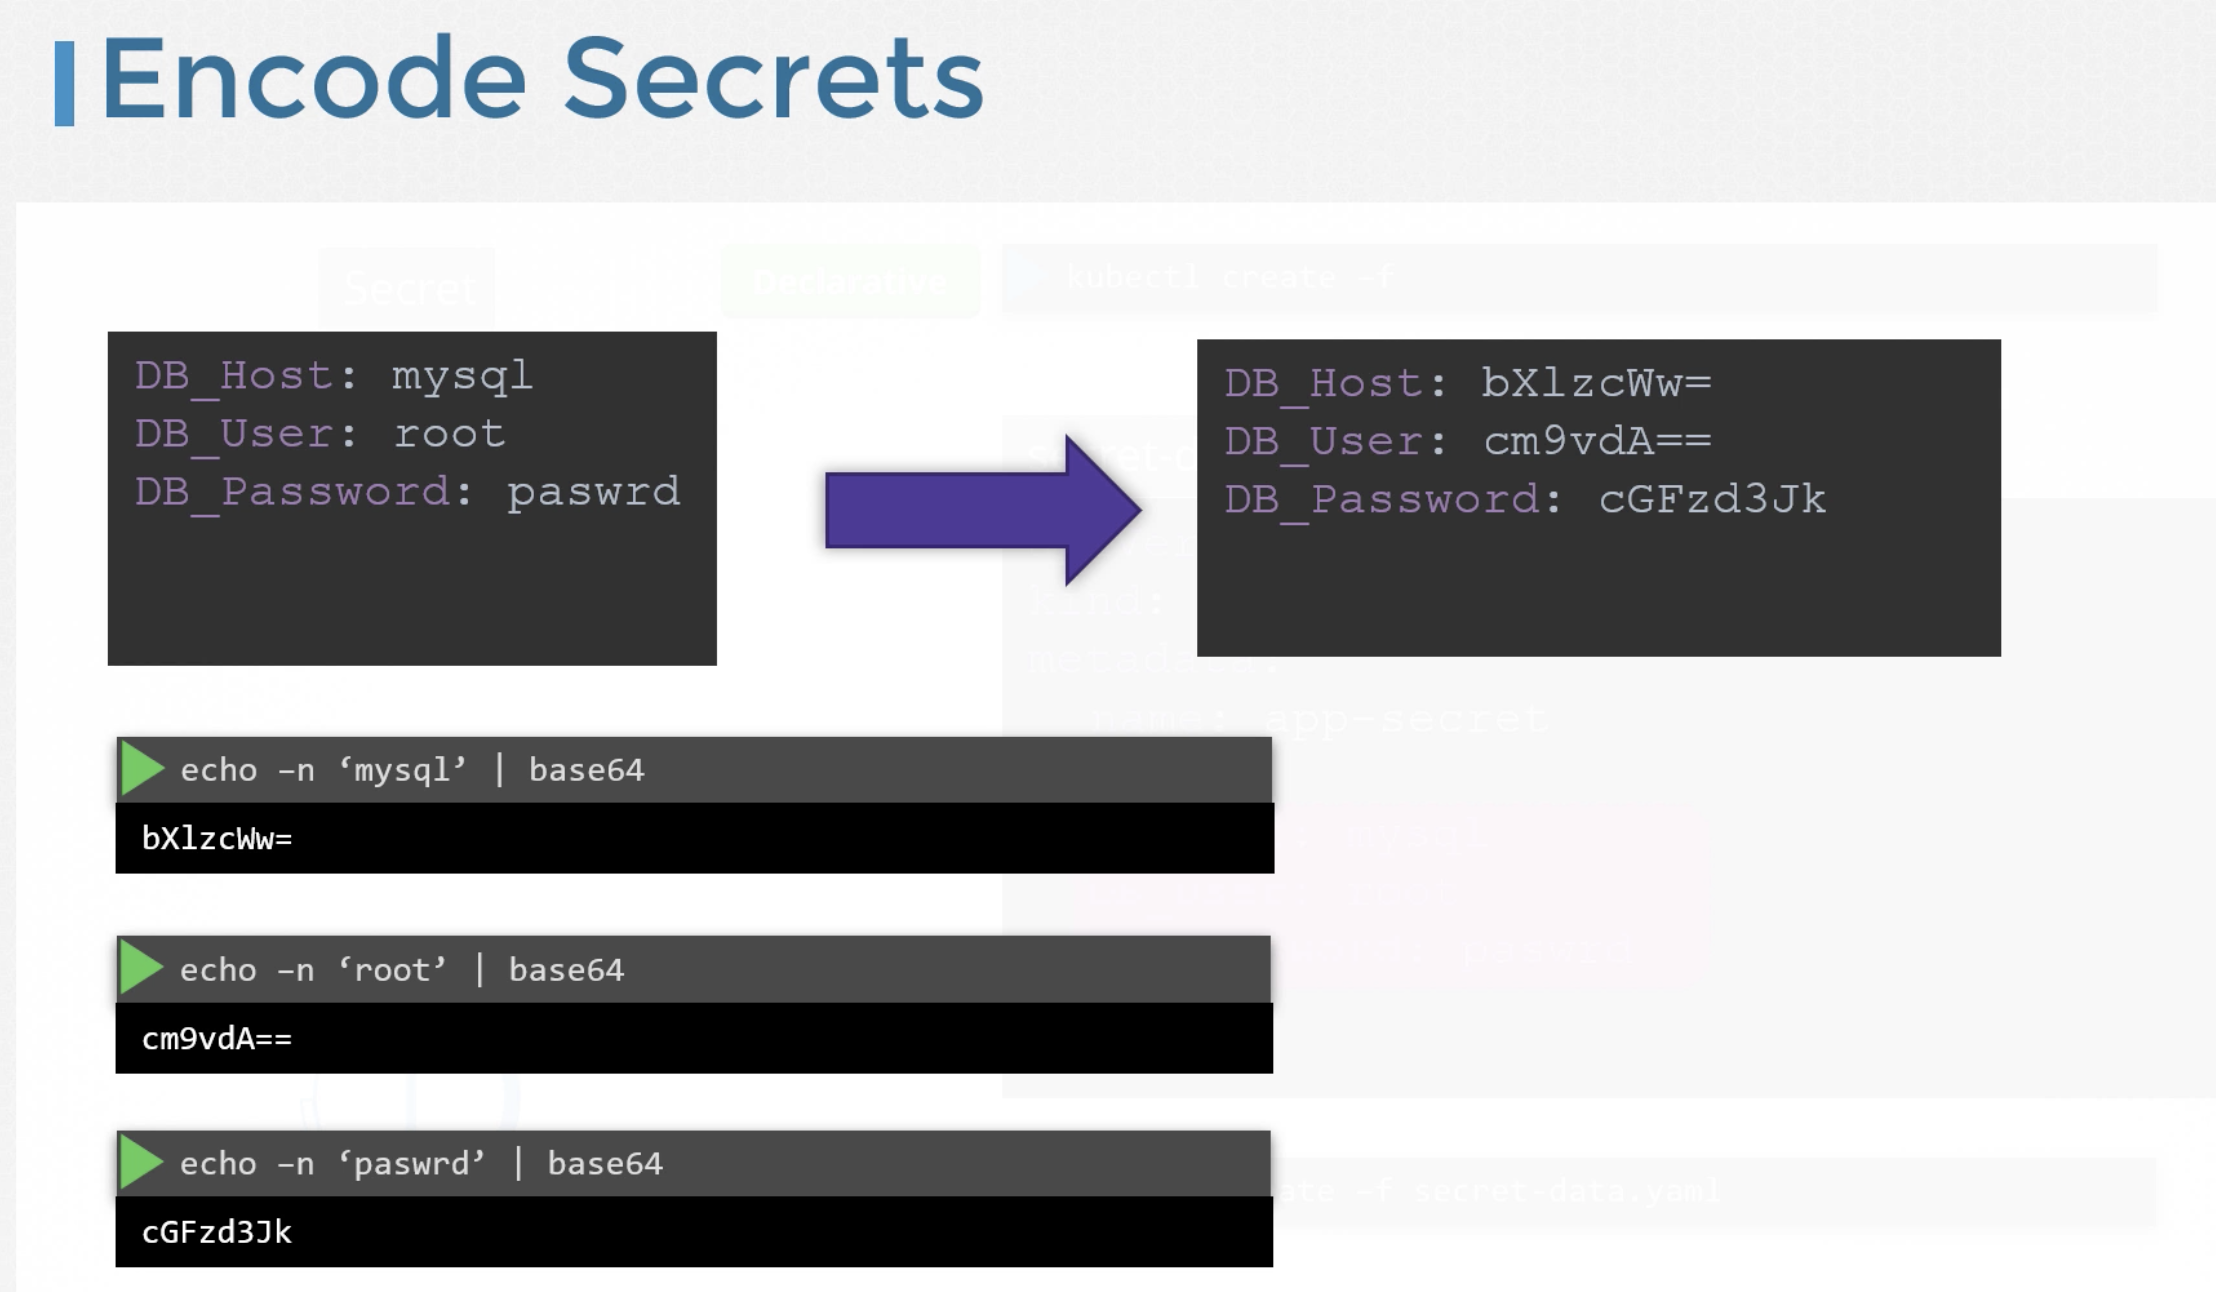
Secrets are similar to configMaps except that they are stored in an encoded or hashed format.
There are two steps involved in working with secrets.
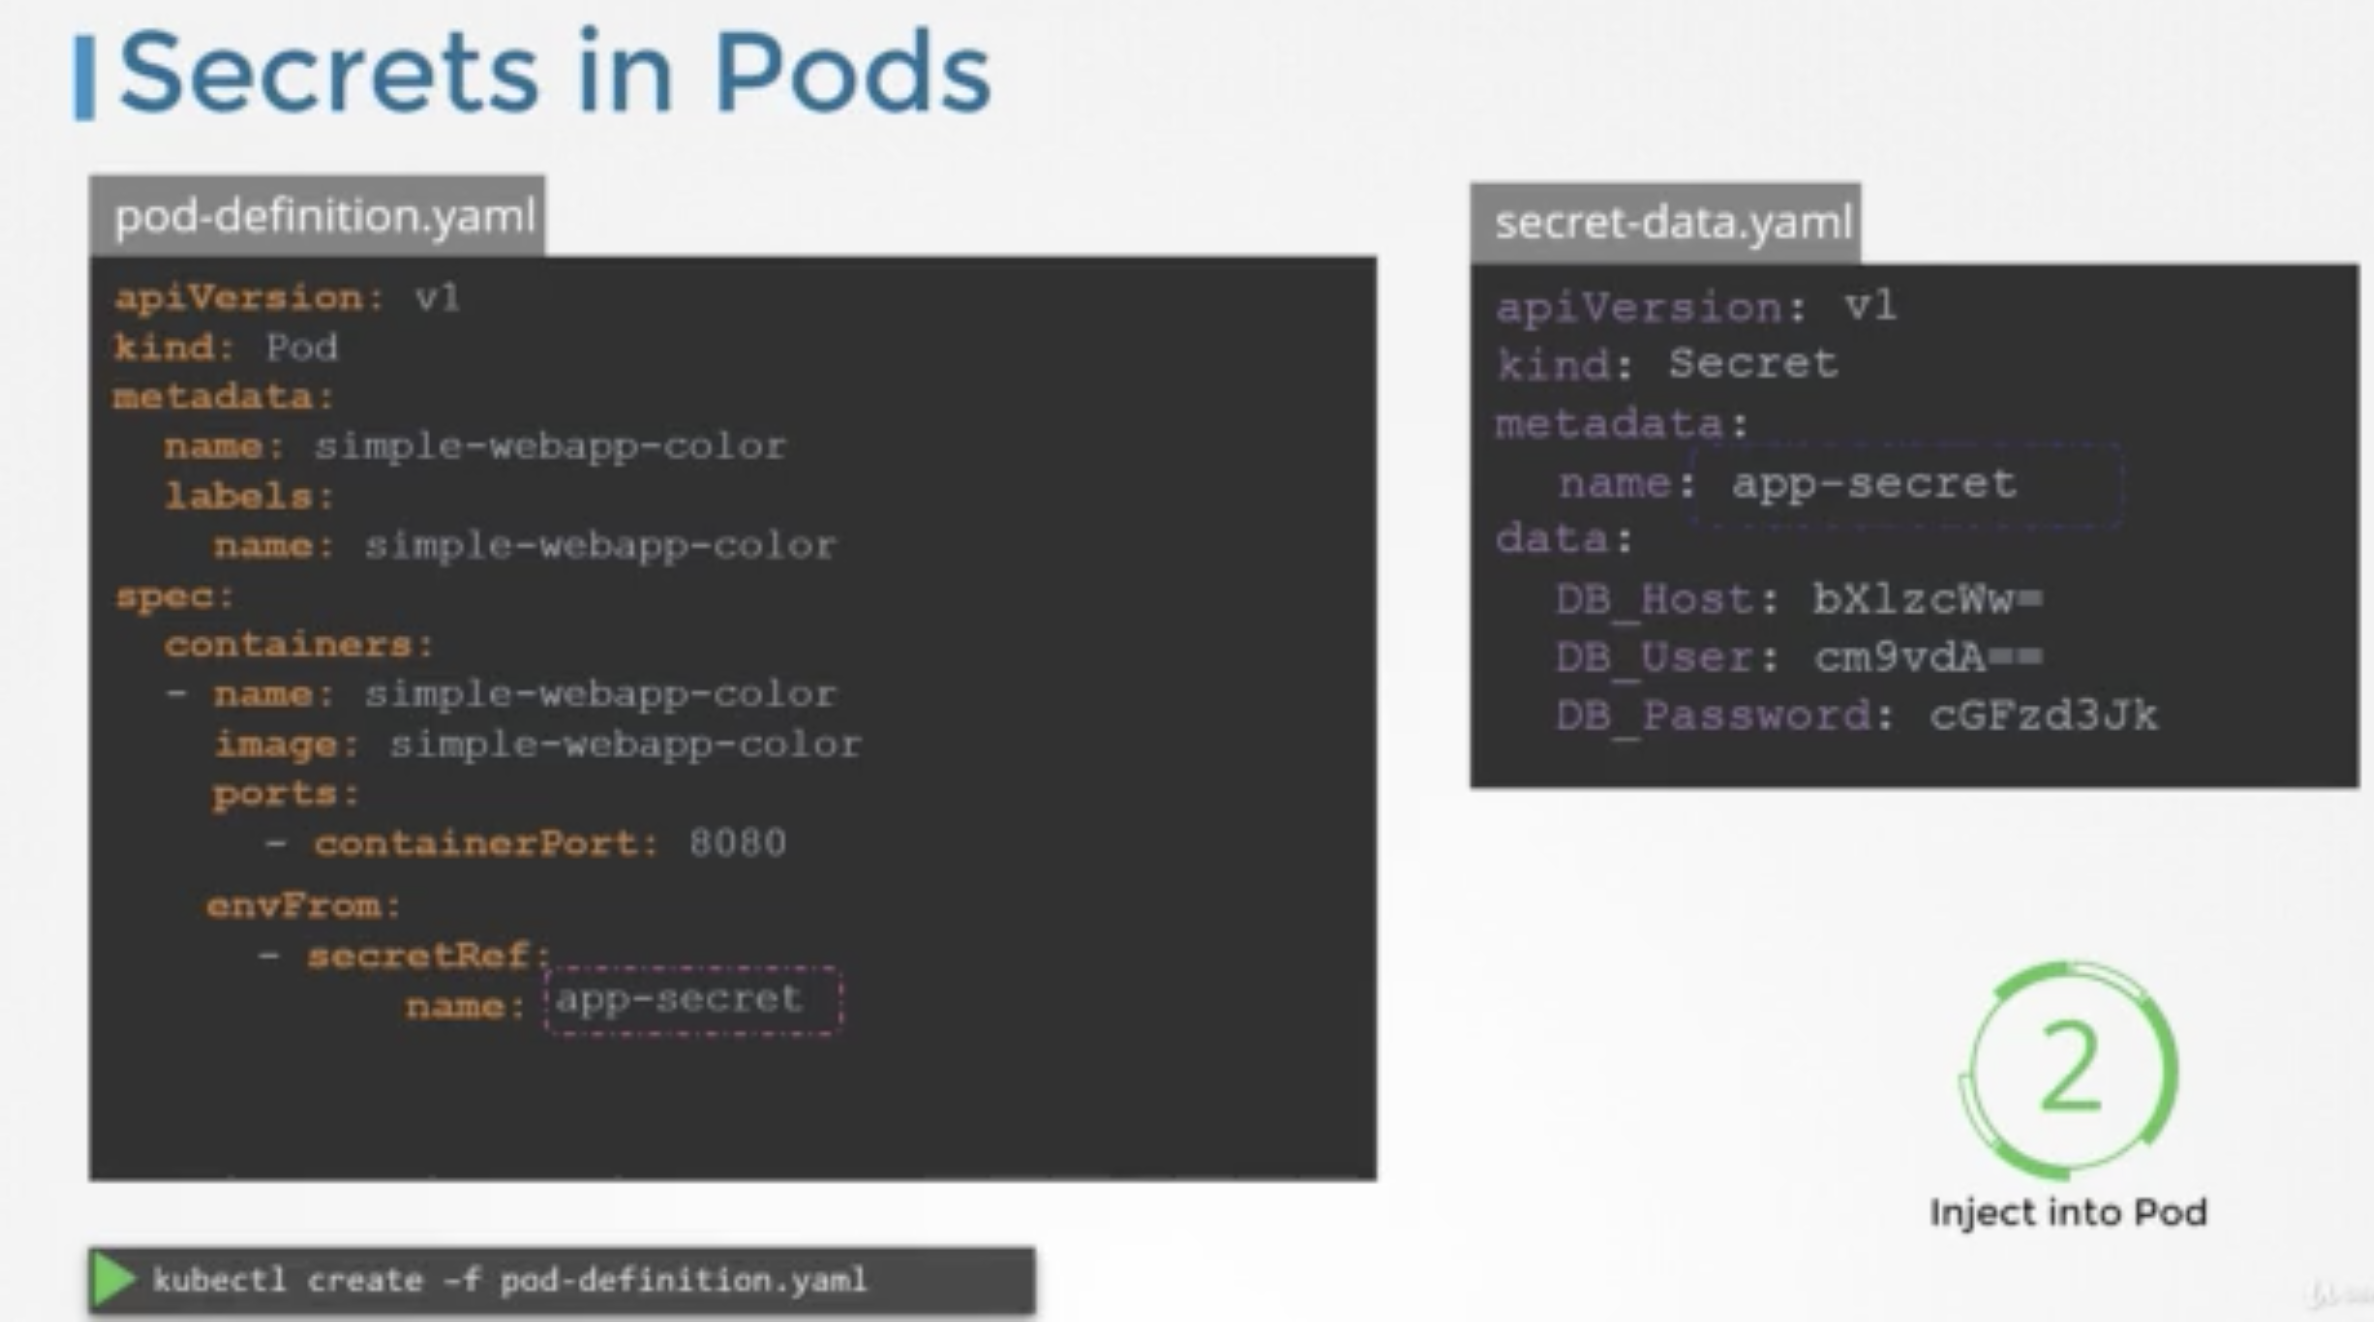
1. Create a secret
2. Inject into a POD.
Create a secret
There are two ways to create secrets.
* Imperative way - without using a secret definition file.
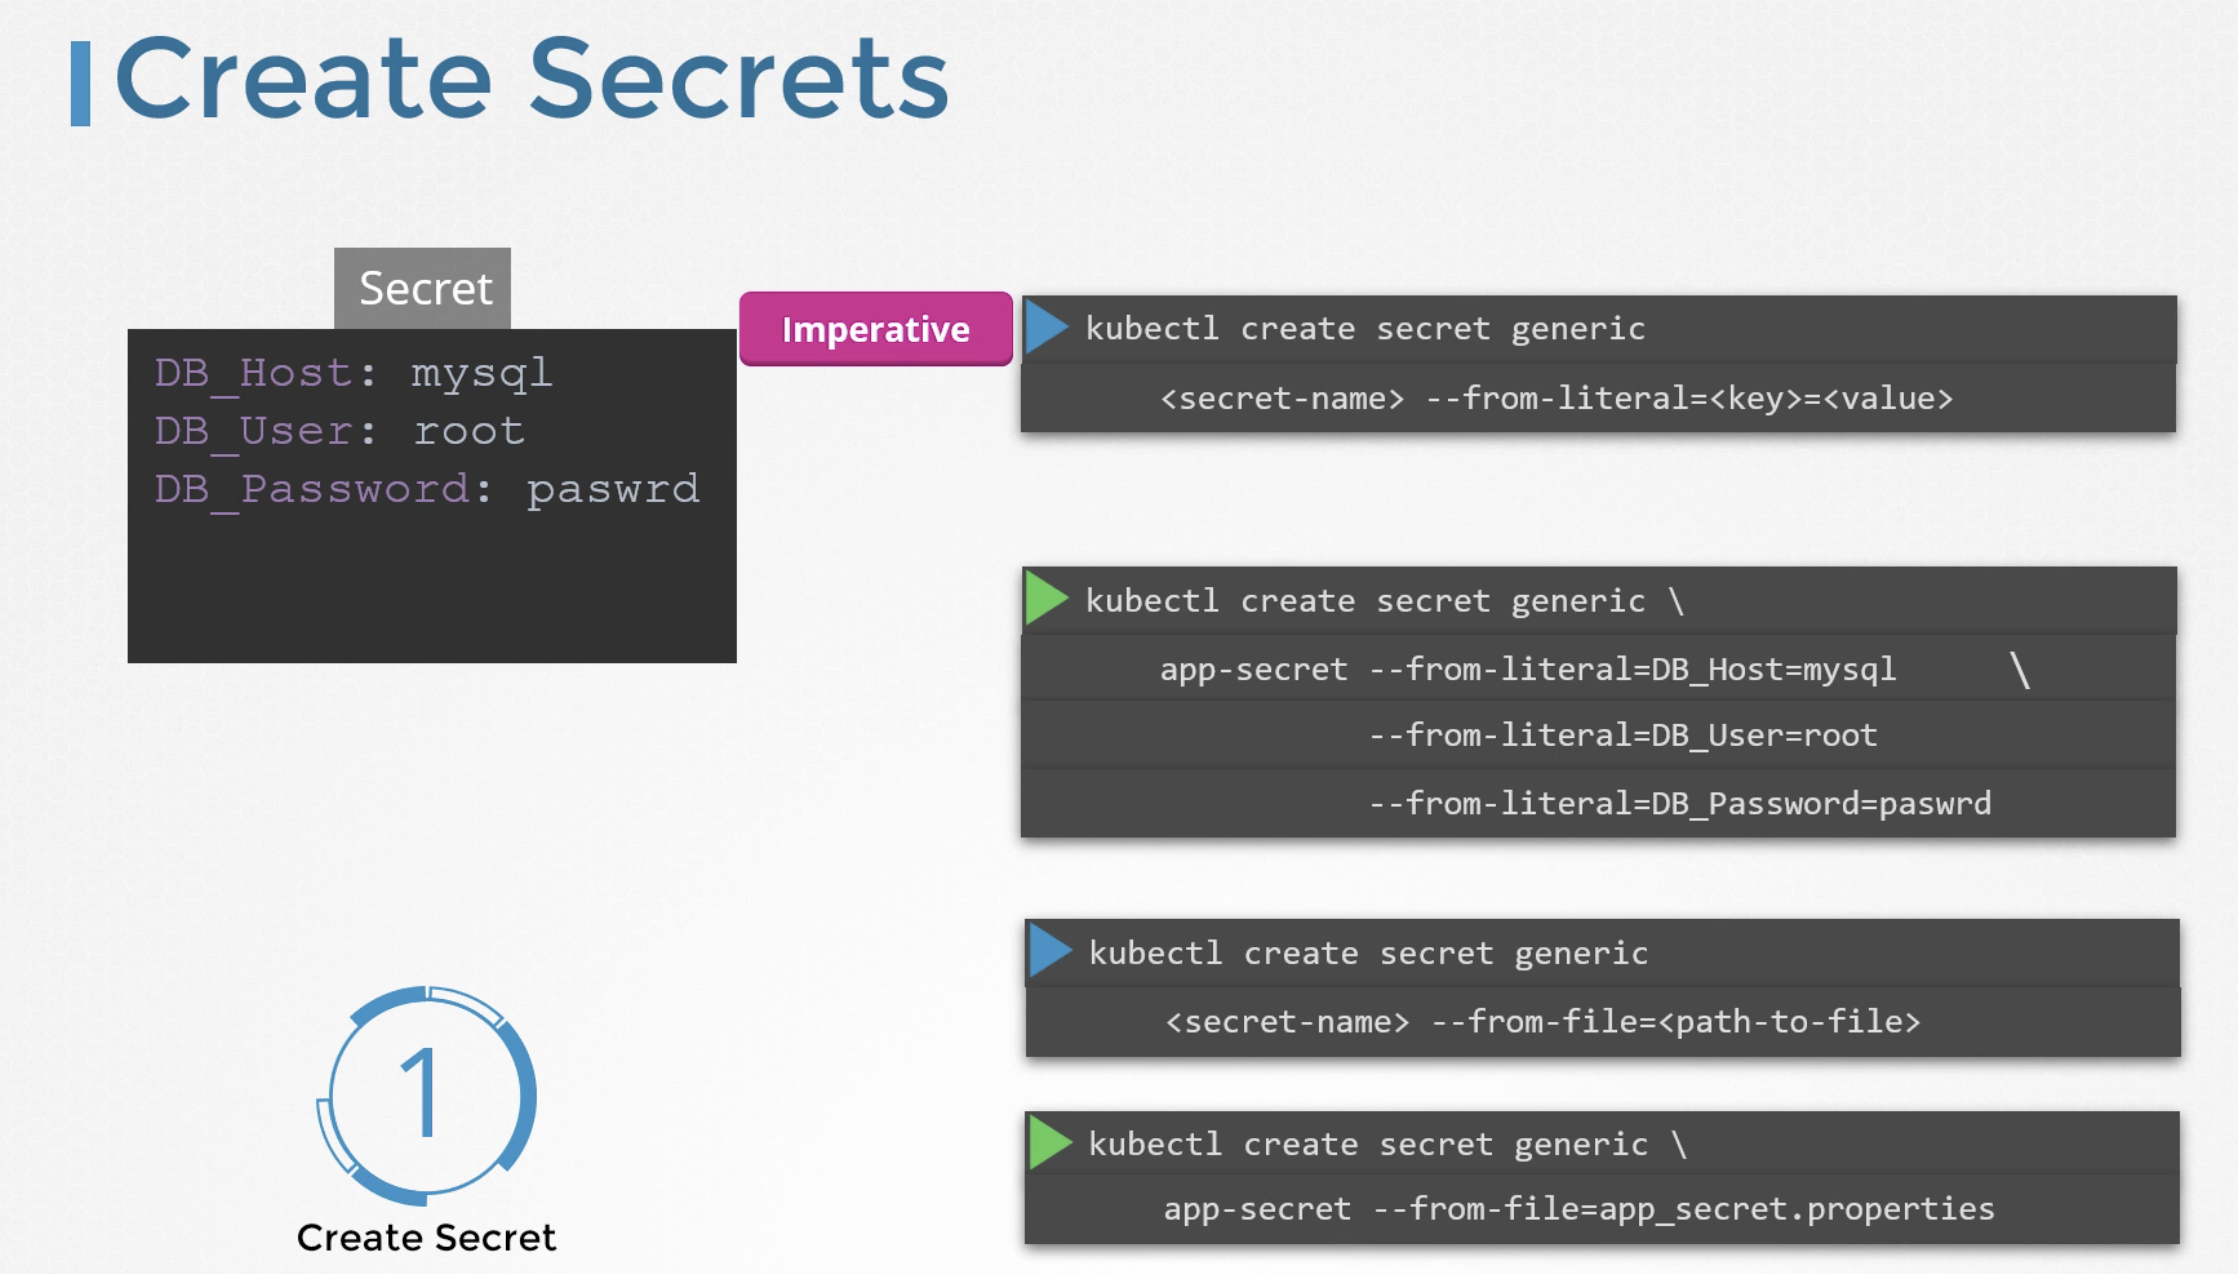
Declarative way - using a secret definition file.


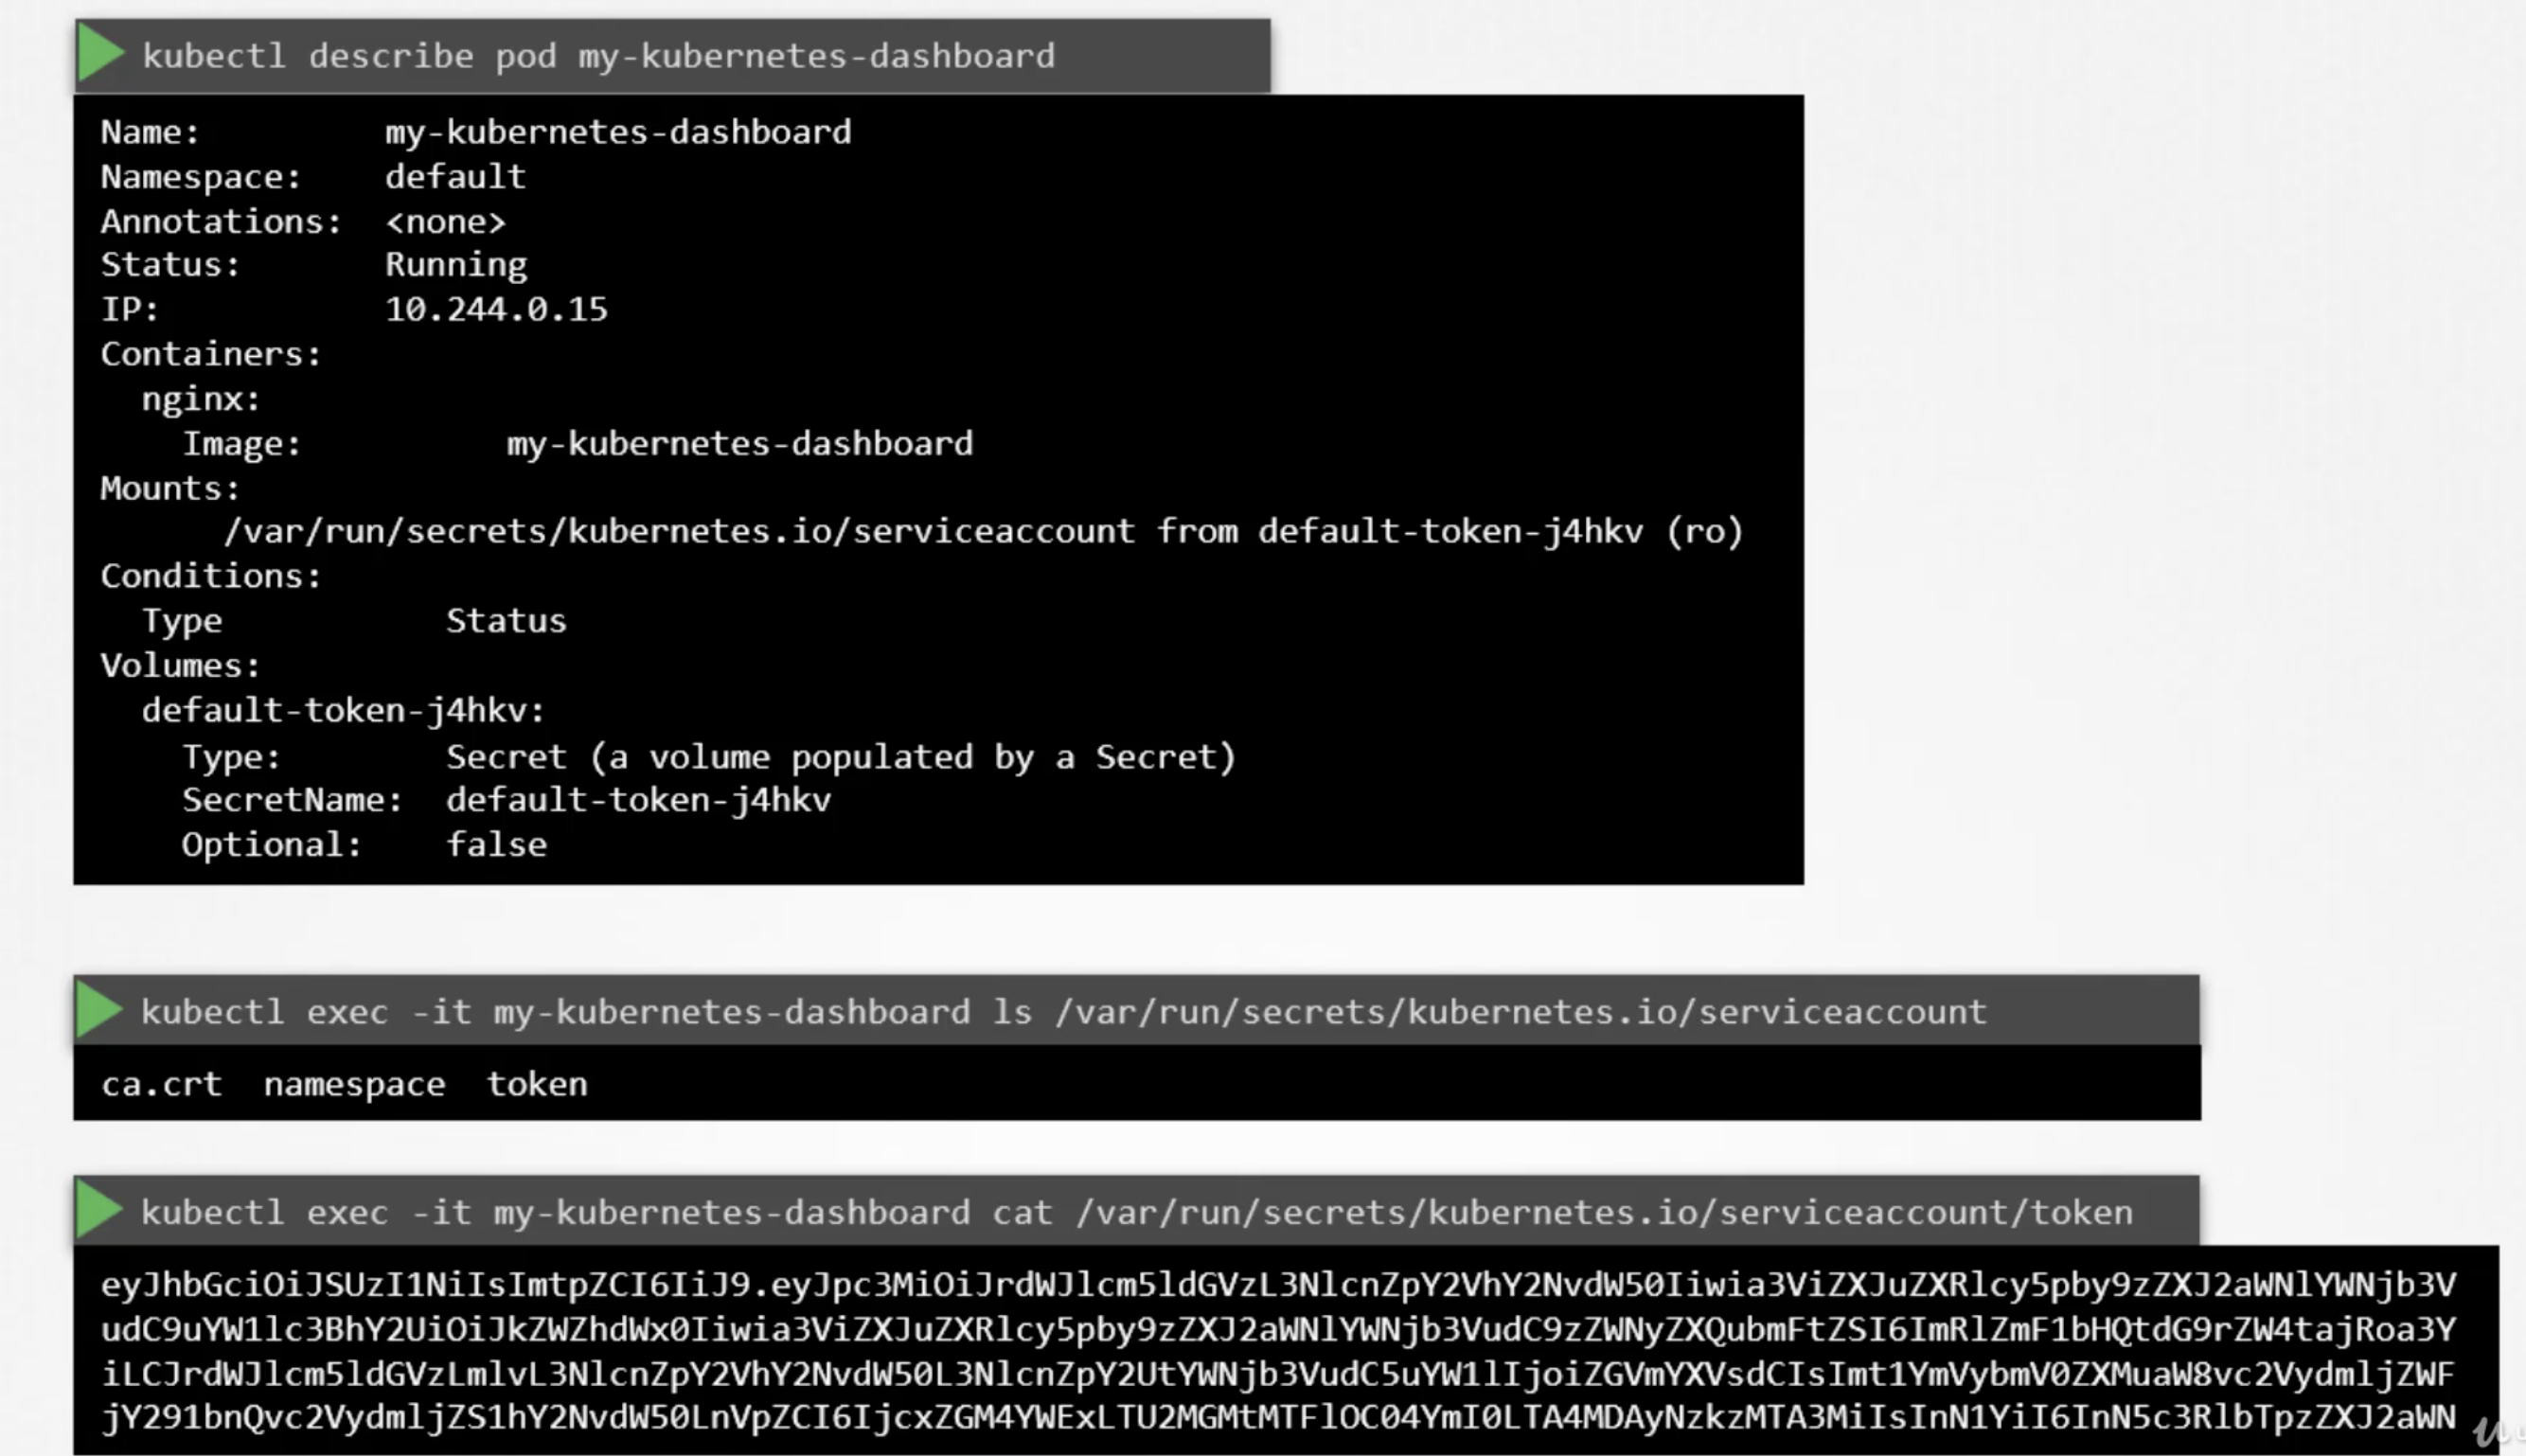
kubectl get pods --kubeconfig=/path/to/admin.conf


AUTHORIZATIONS
kubectl describe pod kube-apiserver-controlplane -n kube-system


RBAC ROLE BASED ACCESS CONTROL


kubectl get clusterroles --no-headers | wc -l


ps -ef | grep kube-apiserver | grep admission-plugins

create tls secret for webhook :

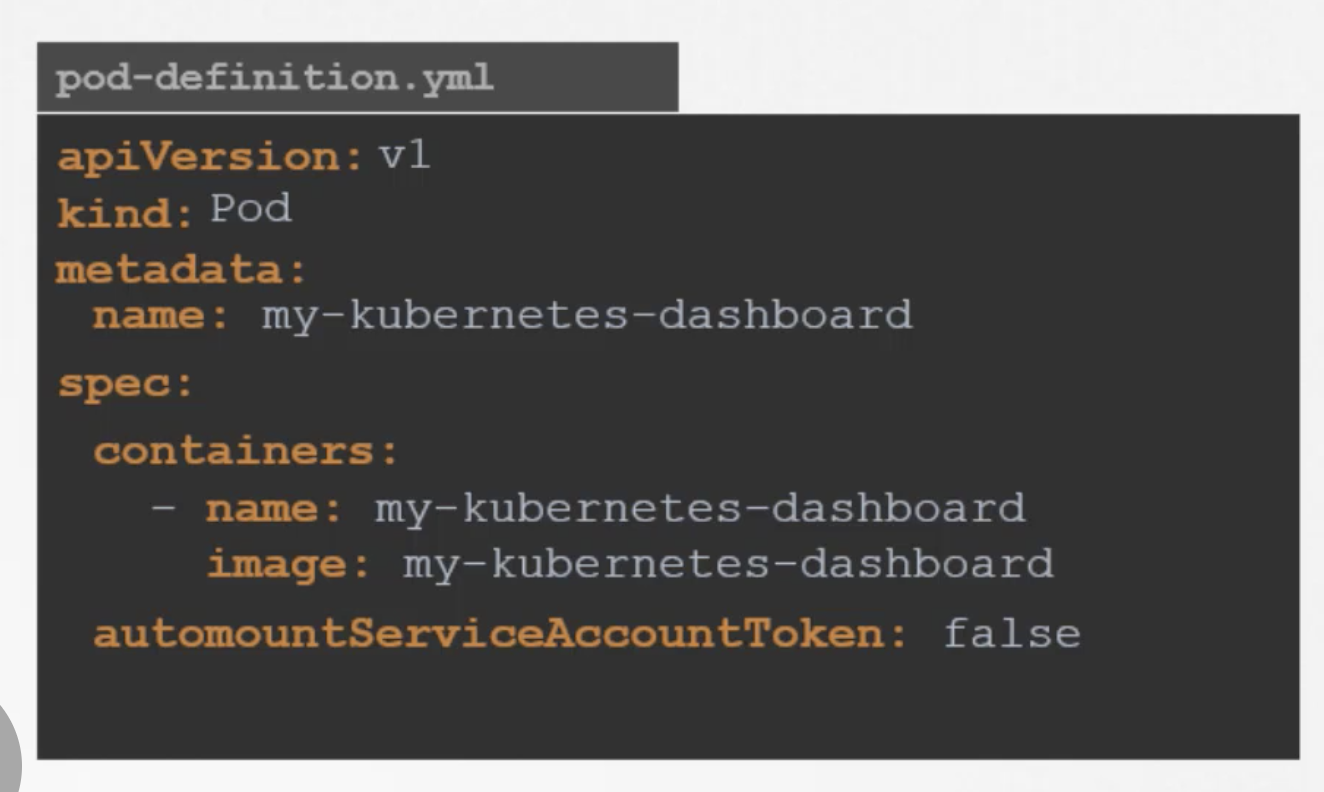
- kind: Pod
- metadata:
- name: web-pod
- spec:
- securityContext:
- # Setting the user
- runAsUser: 1000
- conatiners:
- - name: ubuntu
- image: ubuntu
- command: ["sleep", "3600"]
- apiVersion: v1
- kind: Pod
- metadata:
- name: web-pod
- spec:
- conatiners:
- - name: ubuntu
- image: ubuntu
- command: ["sleep", "3600"]
- securityContext:
- # Setting the user
- runAsUser: 1000
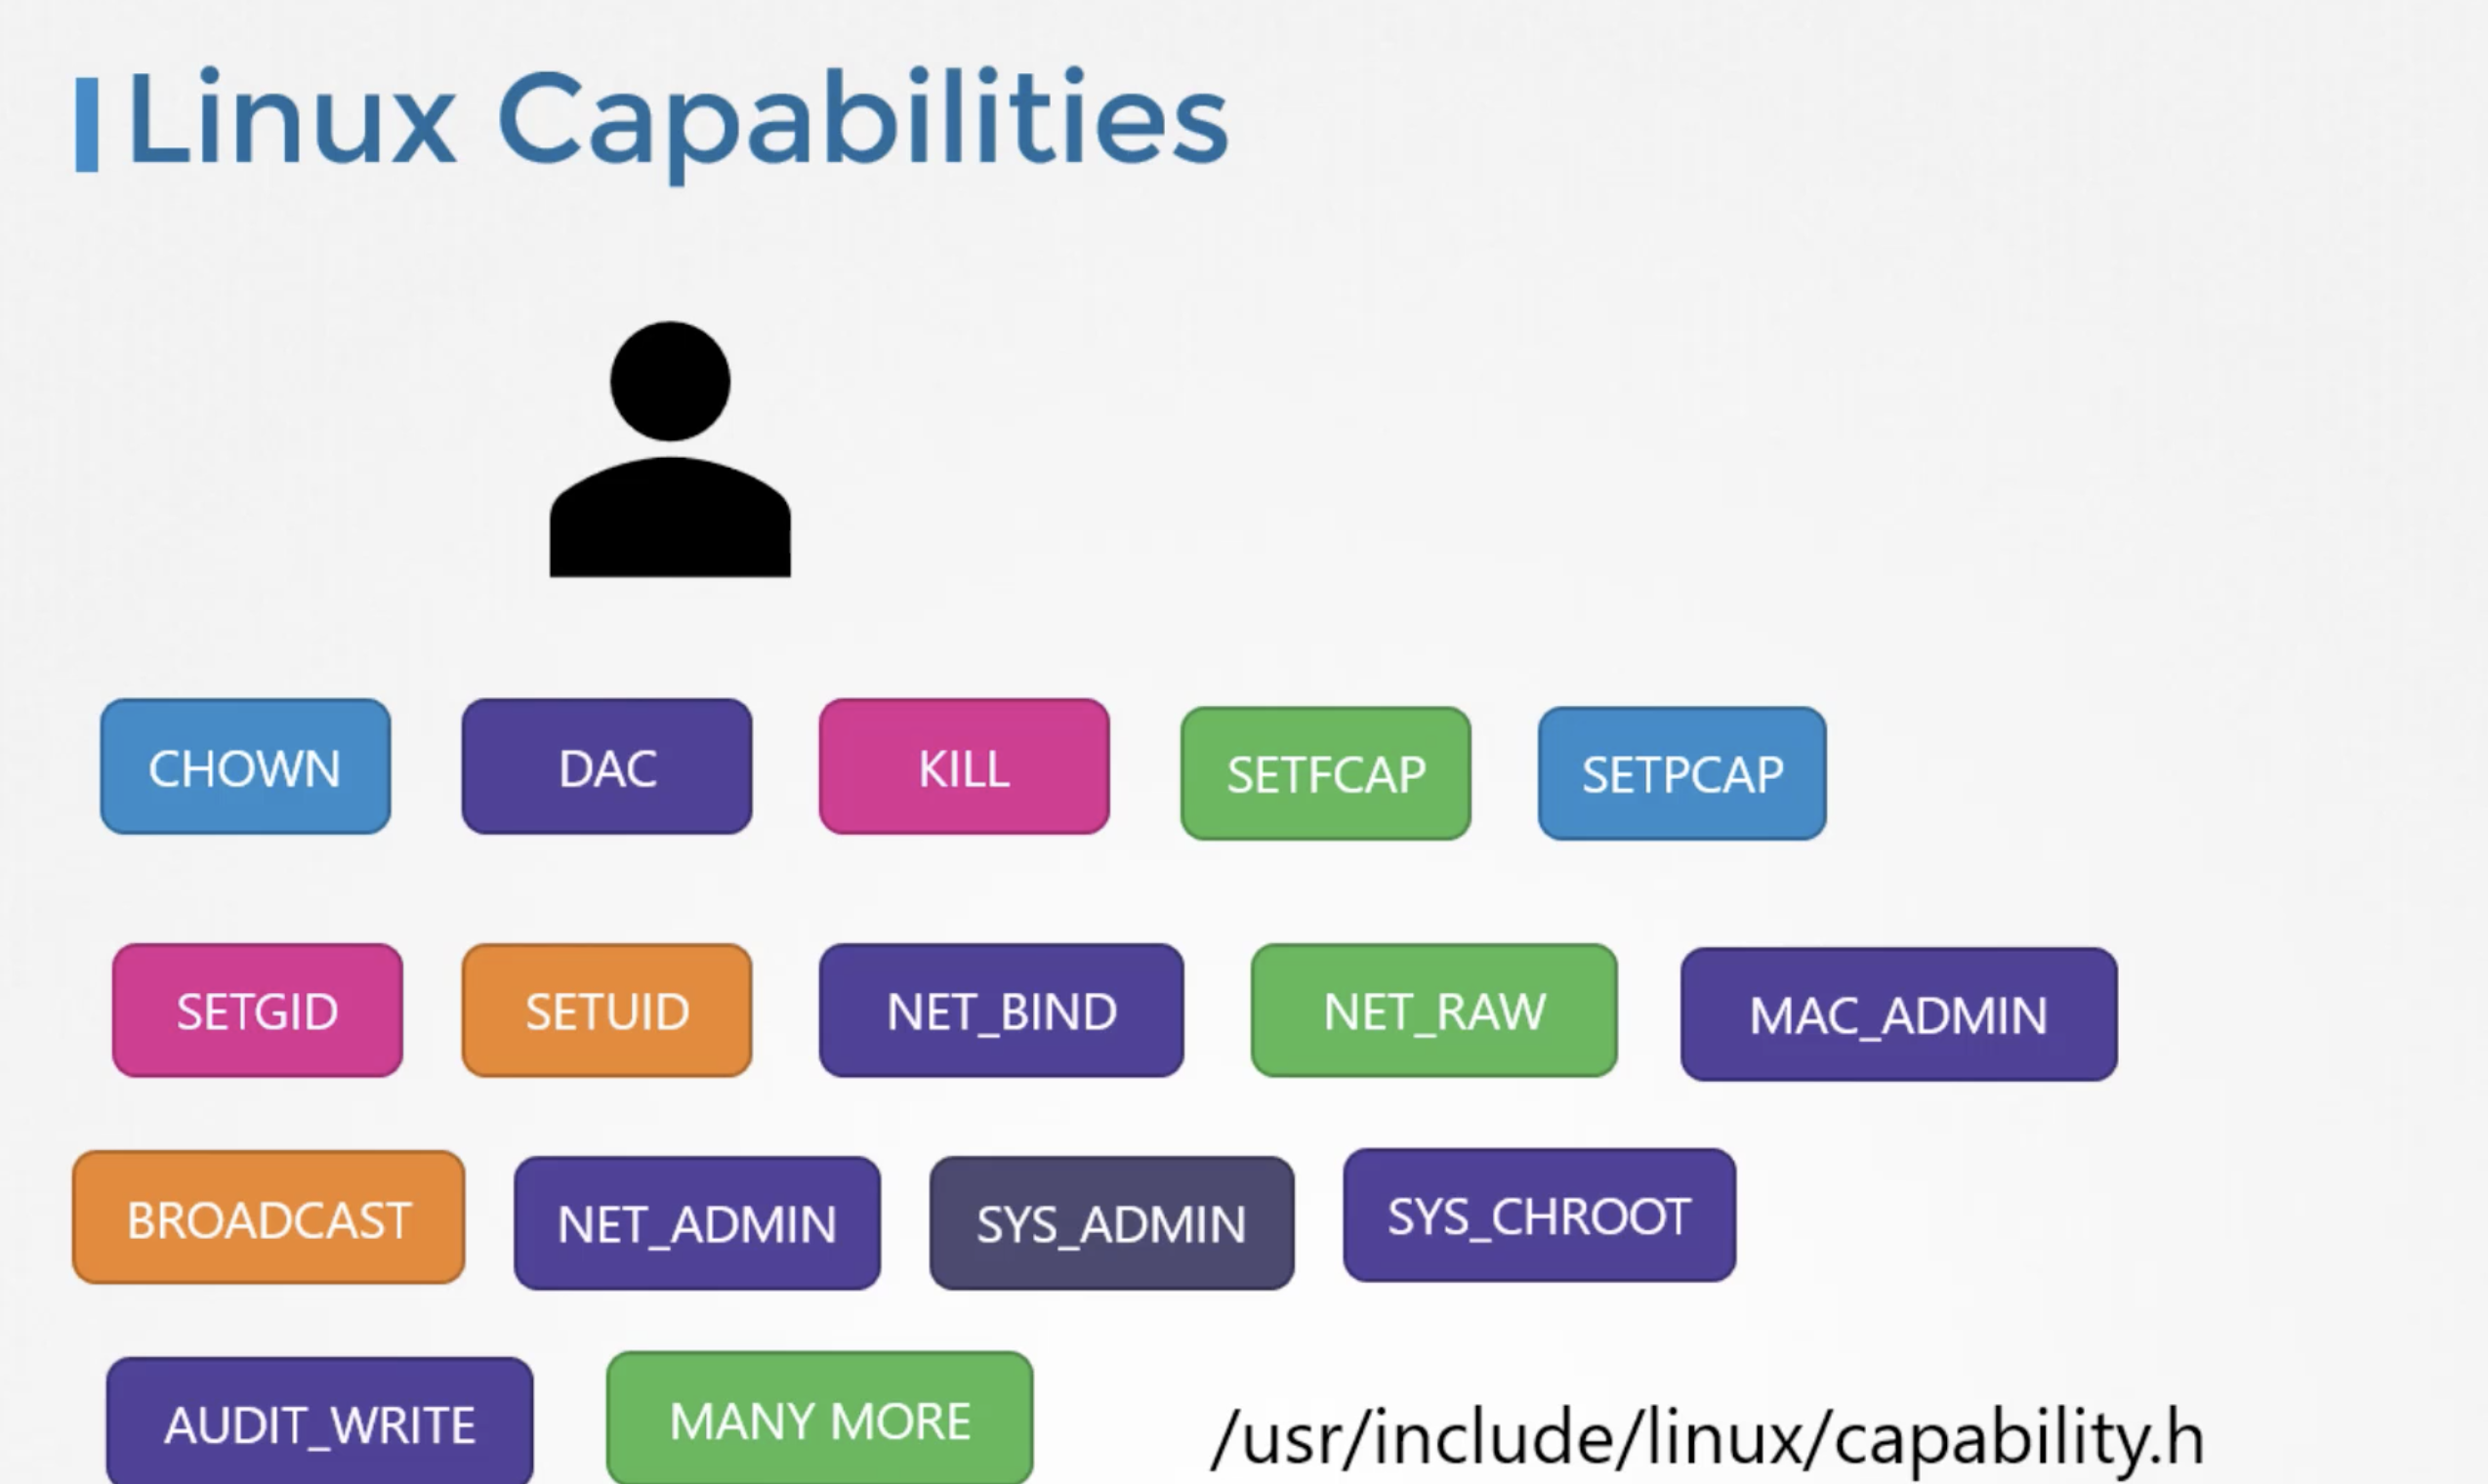
- capabilities:
- add: ["MAC_ADMIN"]


- 1 vCPU in AWS or
- 1 core in GCP or
- 1 core in Azure or
- 1 Hyperthread


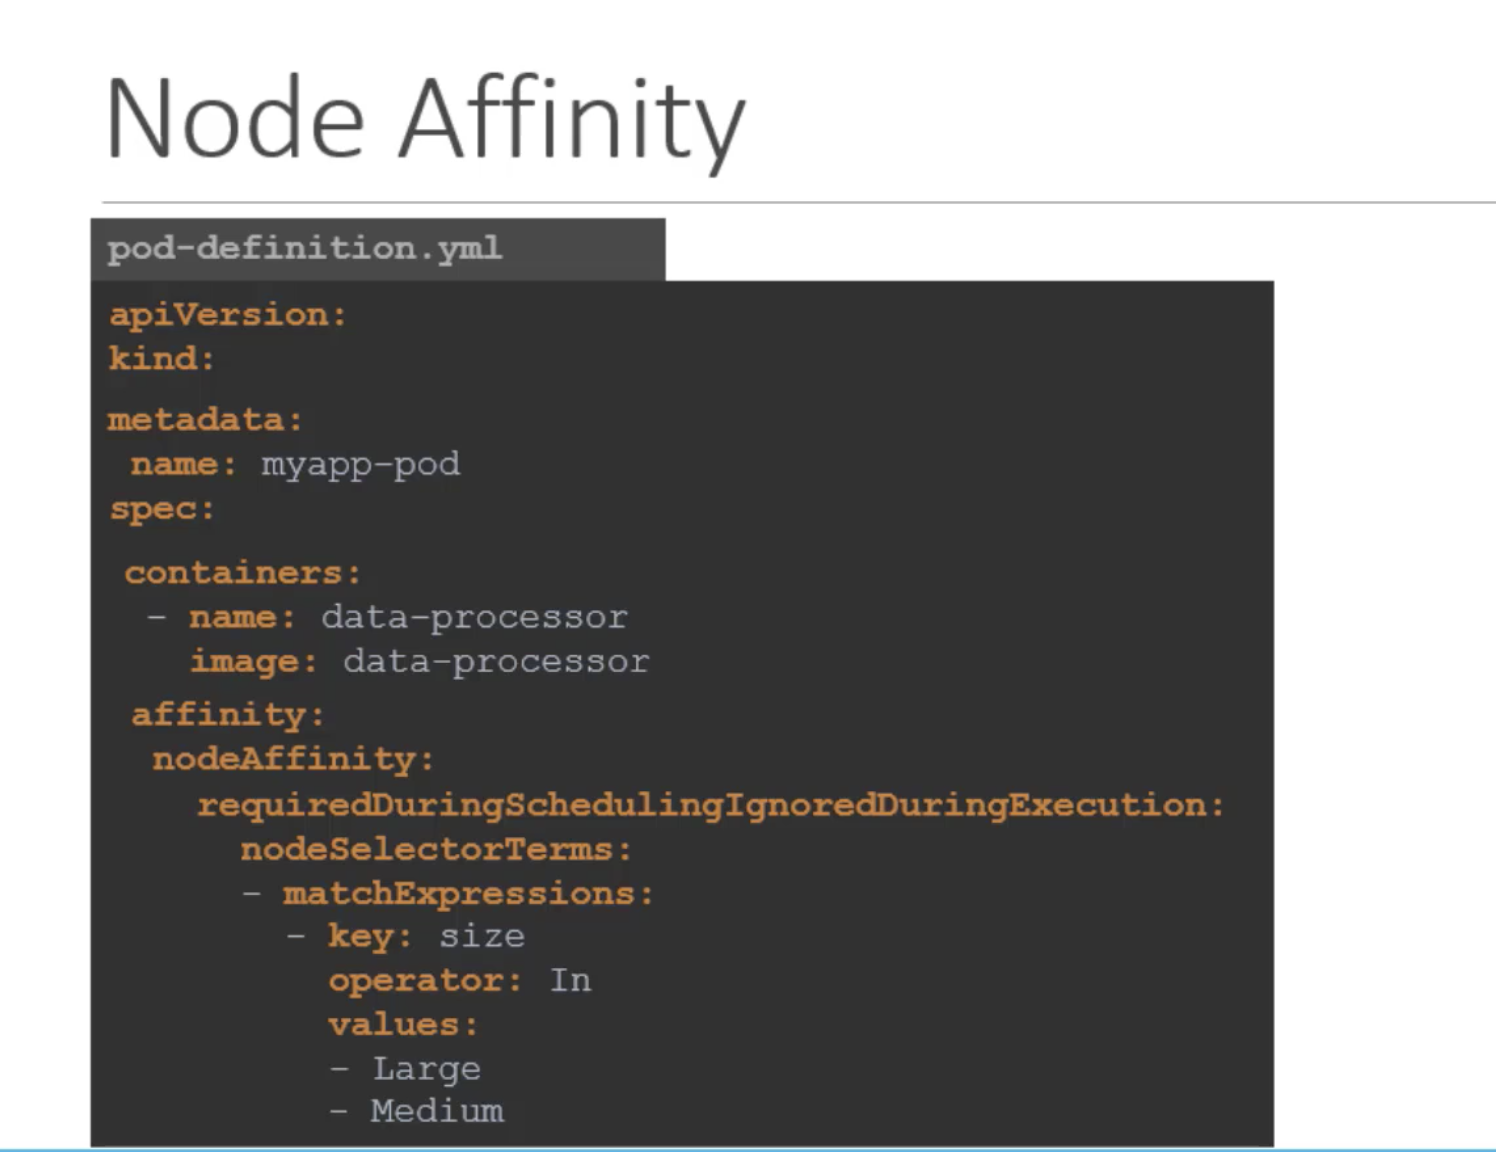

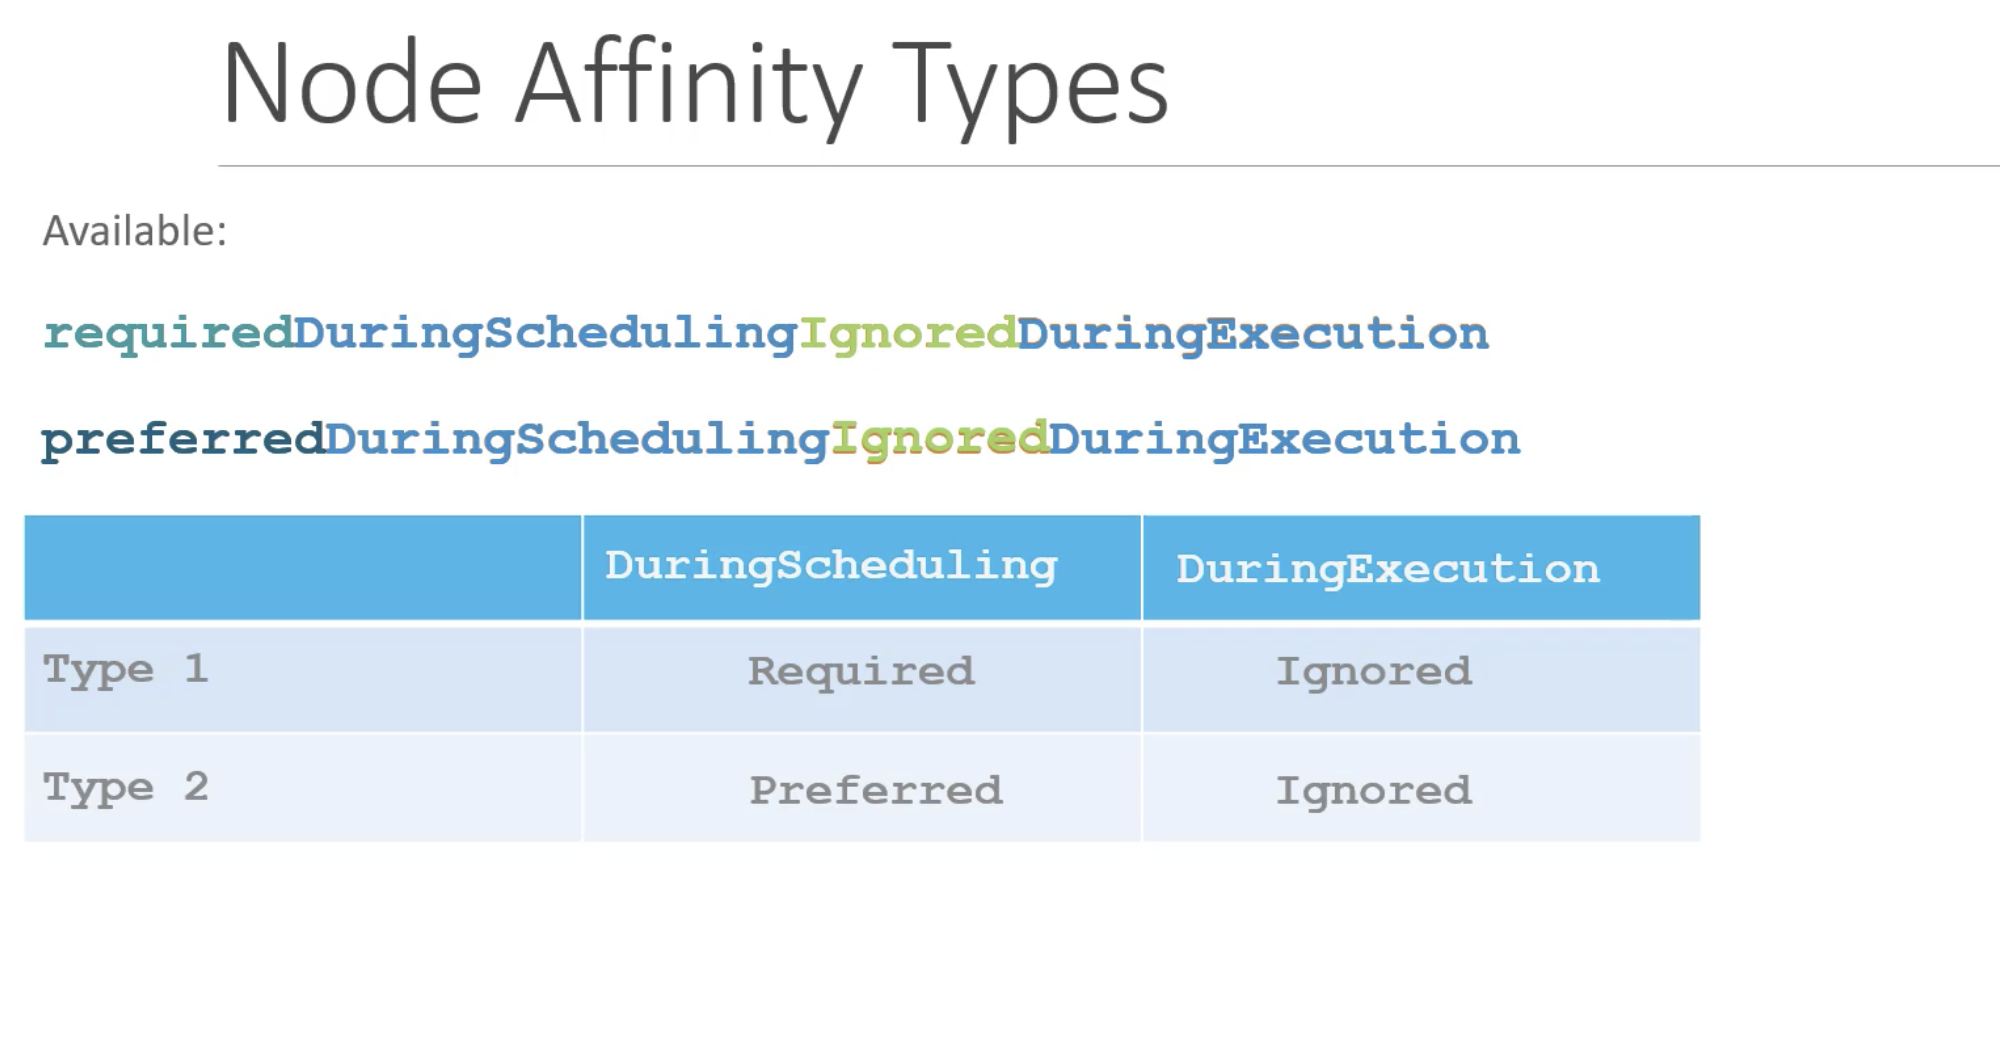
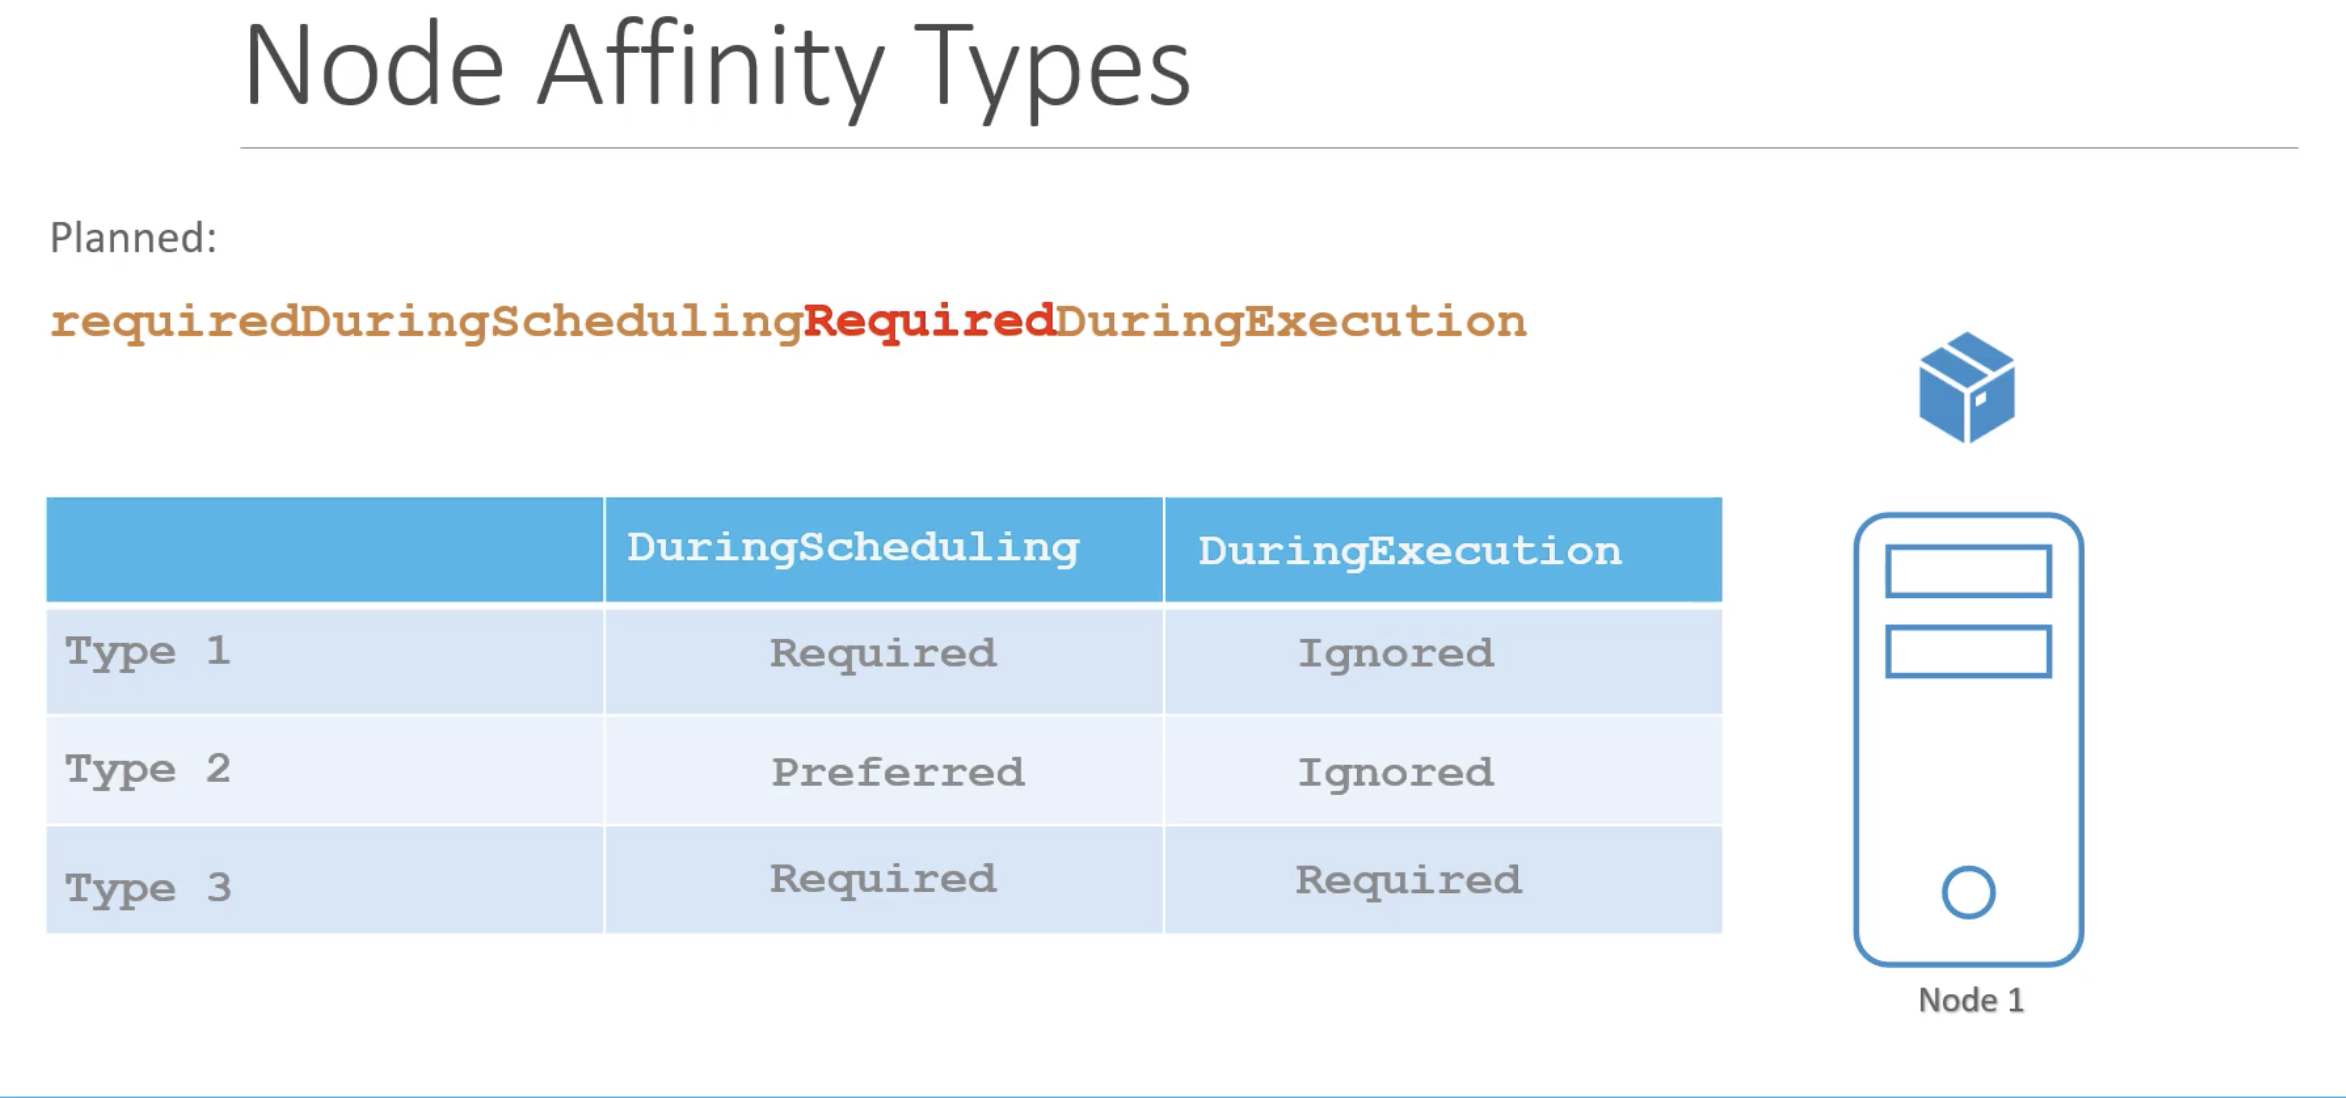
- requiredDuringSchedulingIgnoredDuringExecution
- preferredDuringSchedulingIgnoredDuringExecution


- Sidecar
- Ambassdor
- Adapter
When a POD is creating, it will be in a pending state, this is when the scheduler tries to figure out, where to place the POD.
If the scheduler cannot find a node to place the POD, it remains in the pending state.
To find out, why it's stuck in a pending state run
kubectl describe pod <podname>
Once the POD is scheduled, it goes to containerCreating status, where are the images needed for the application are pulled and the container starts.
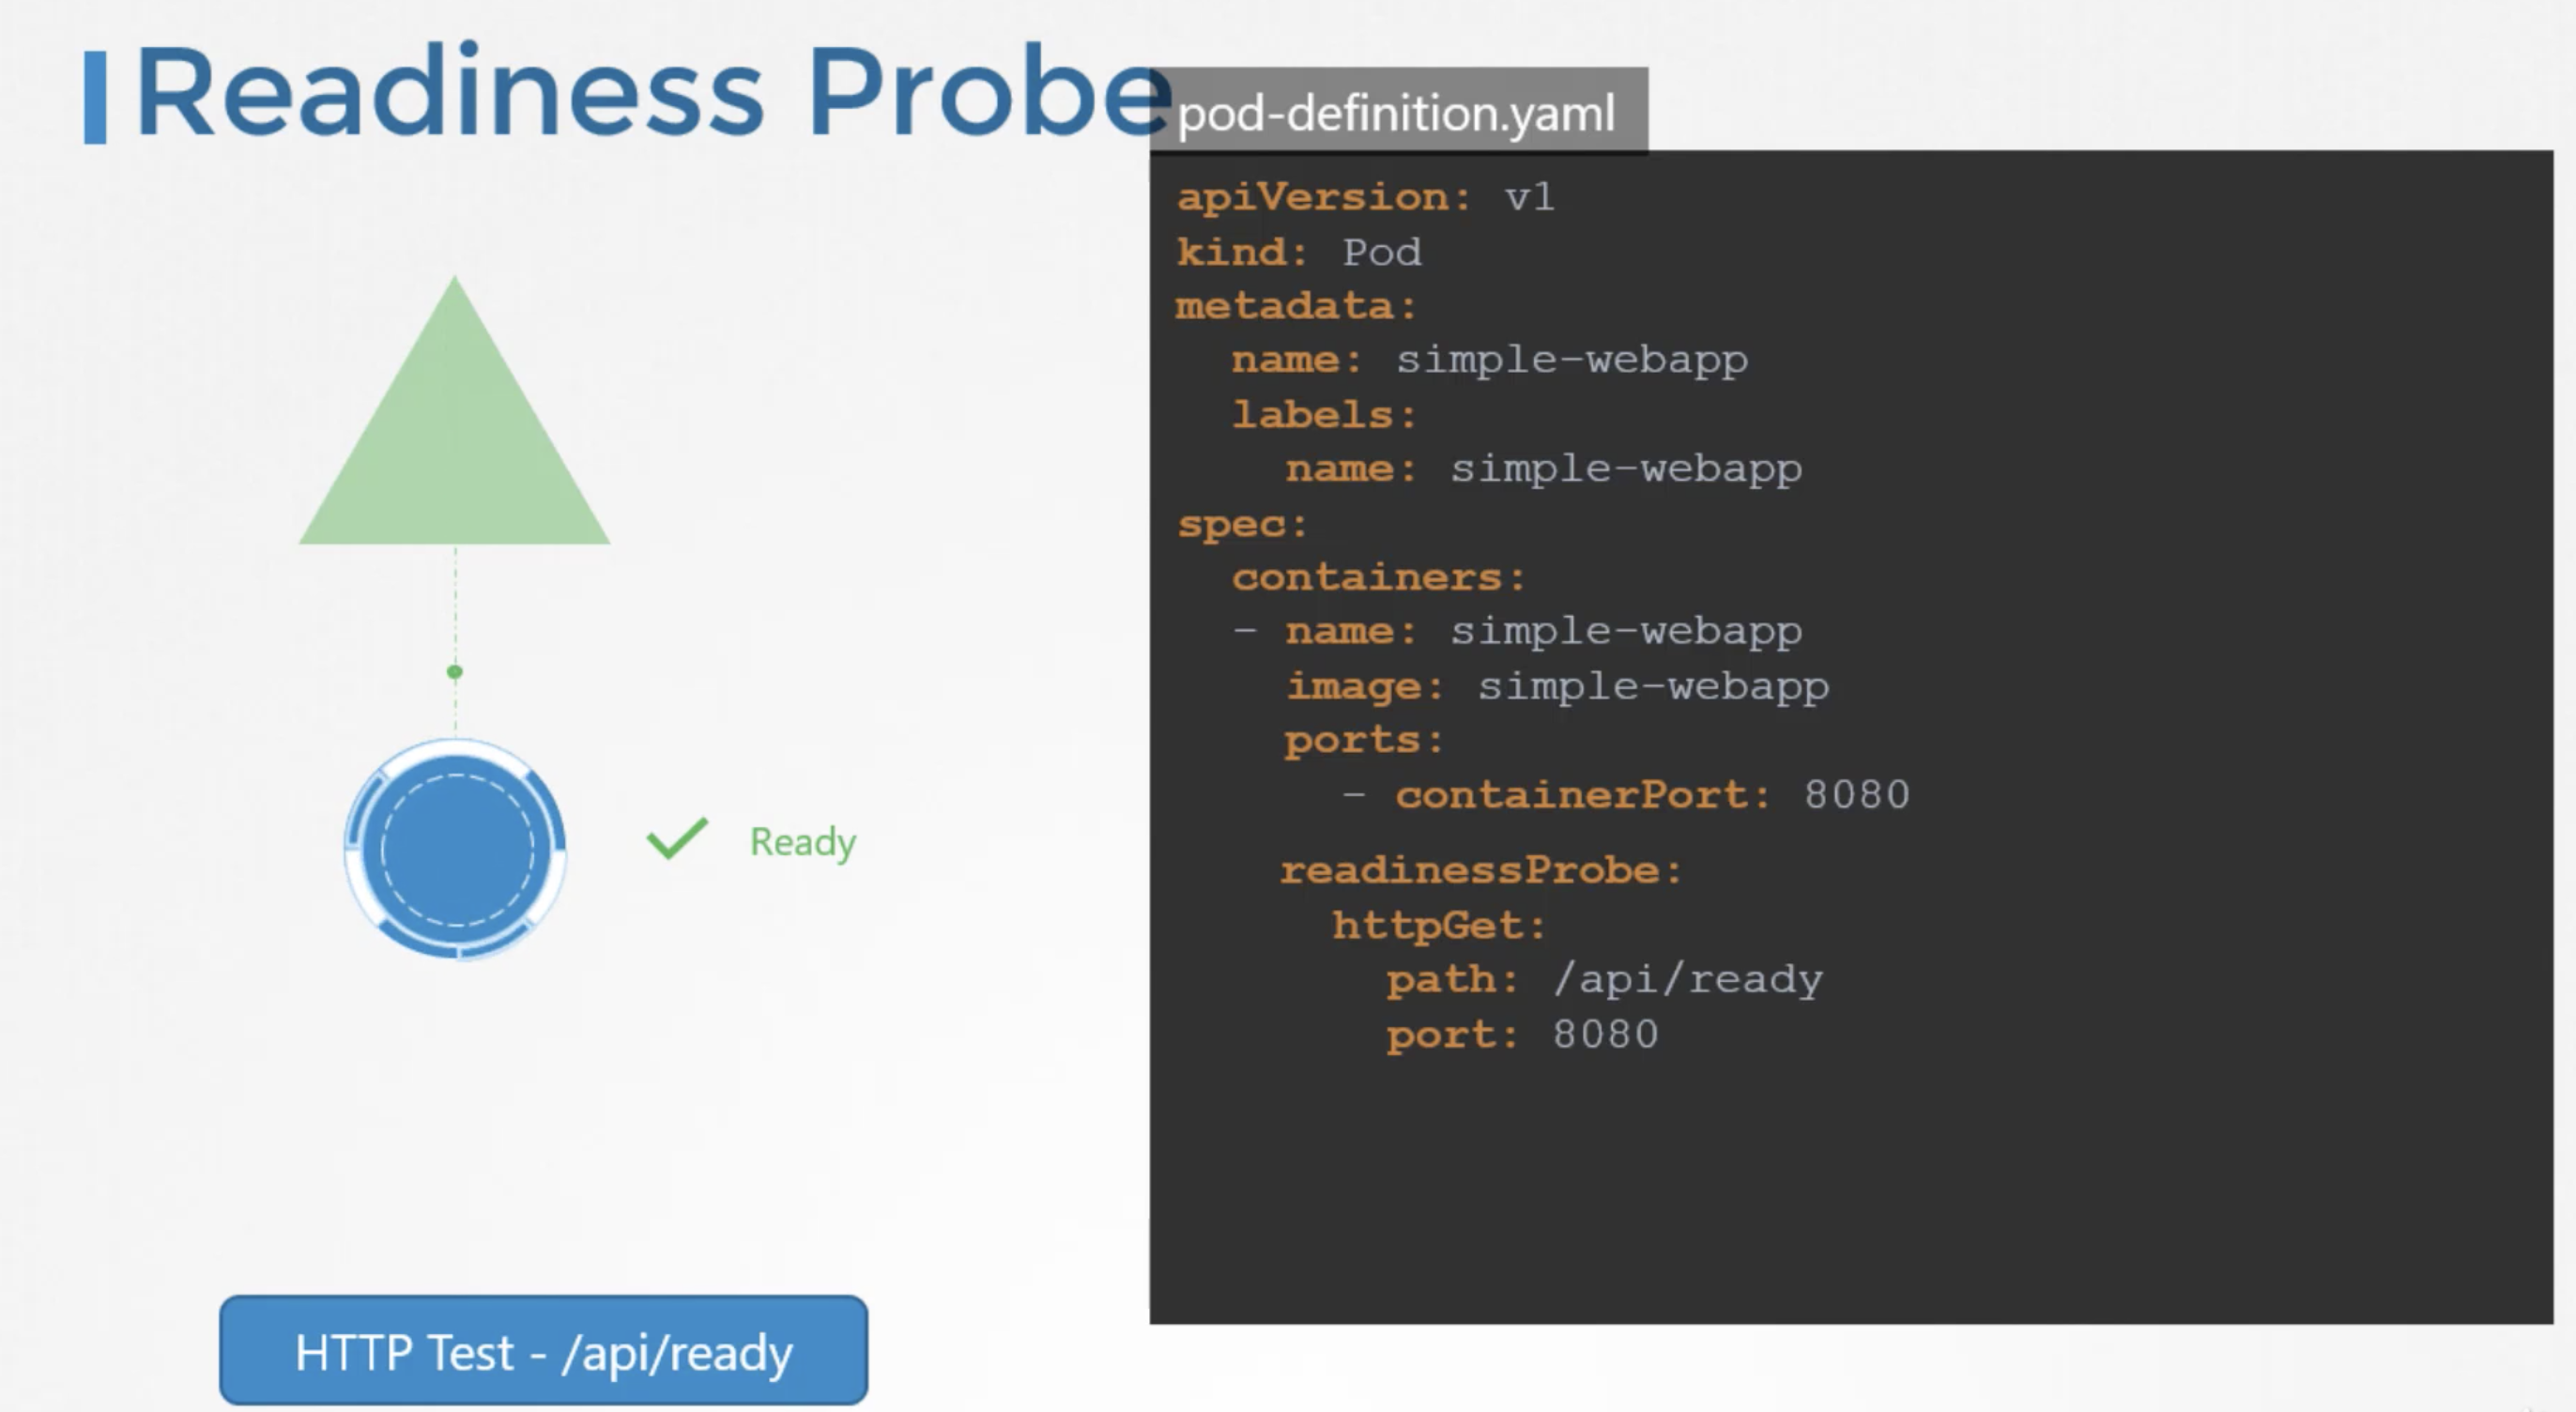
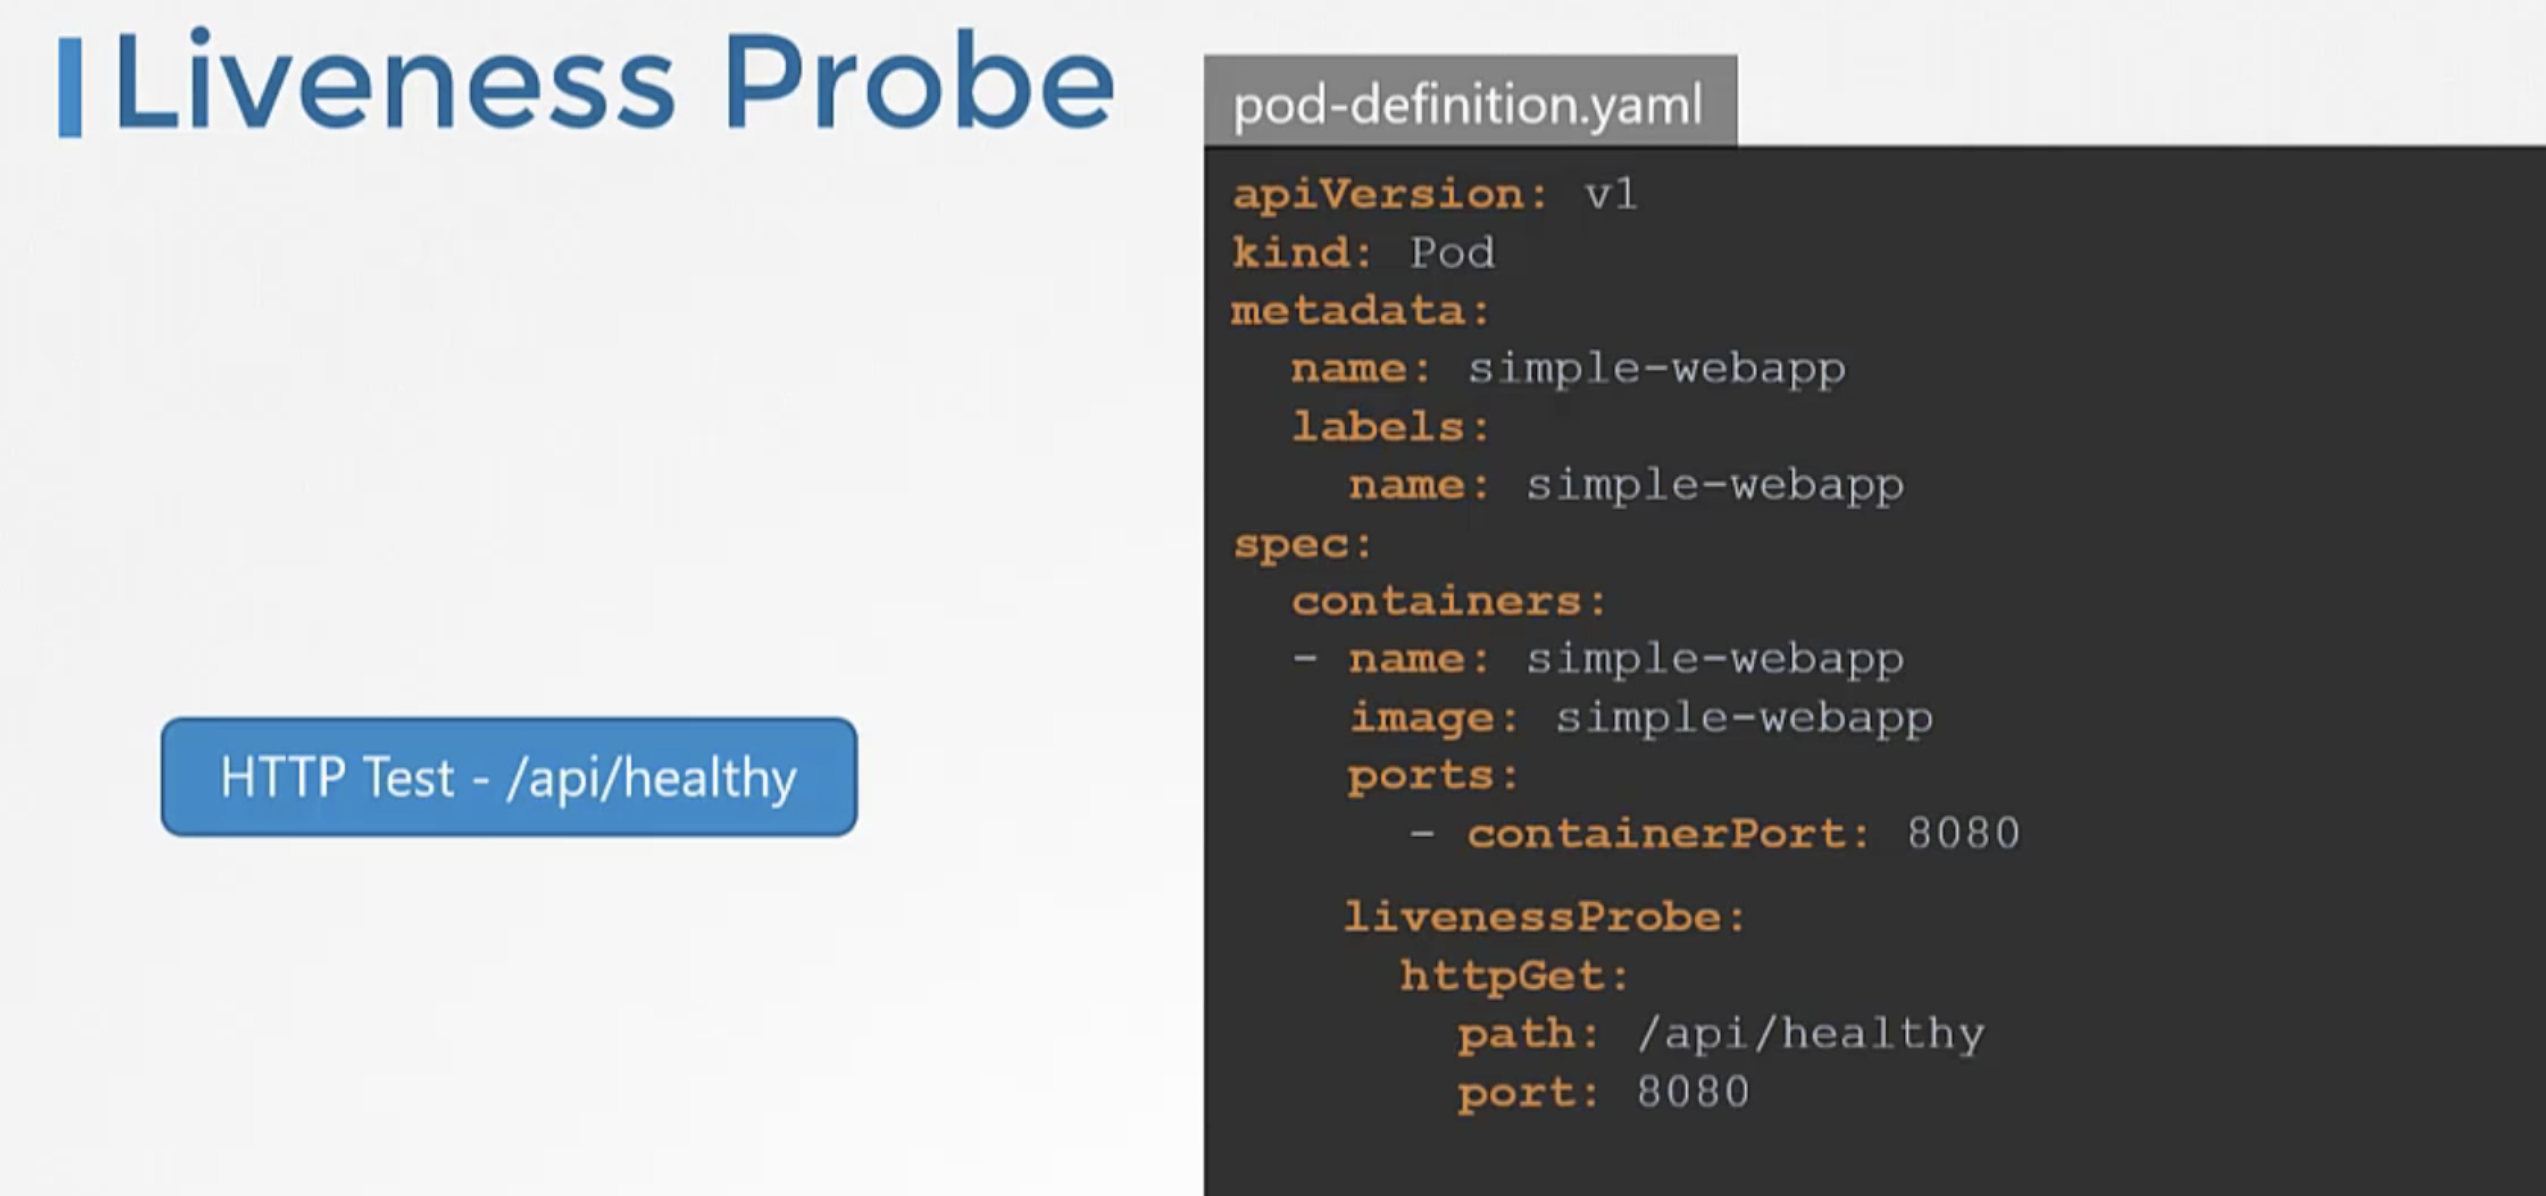
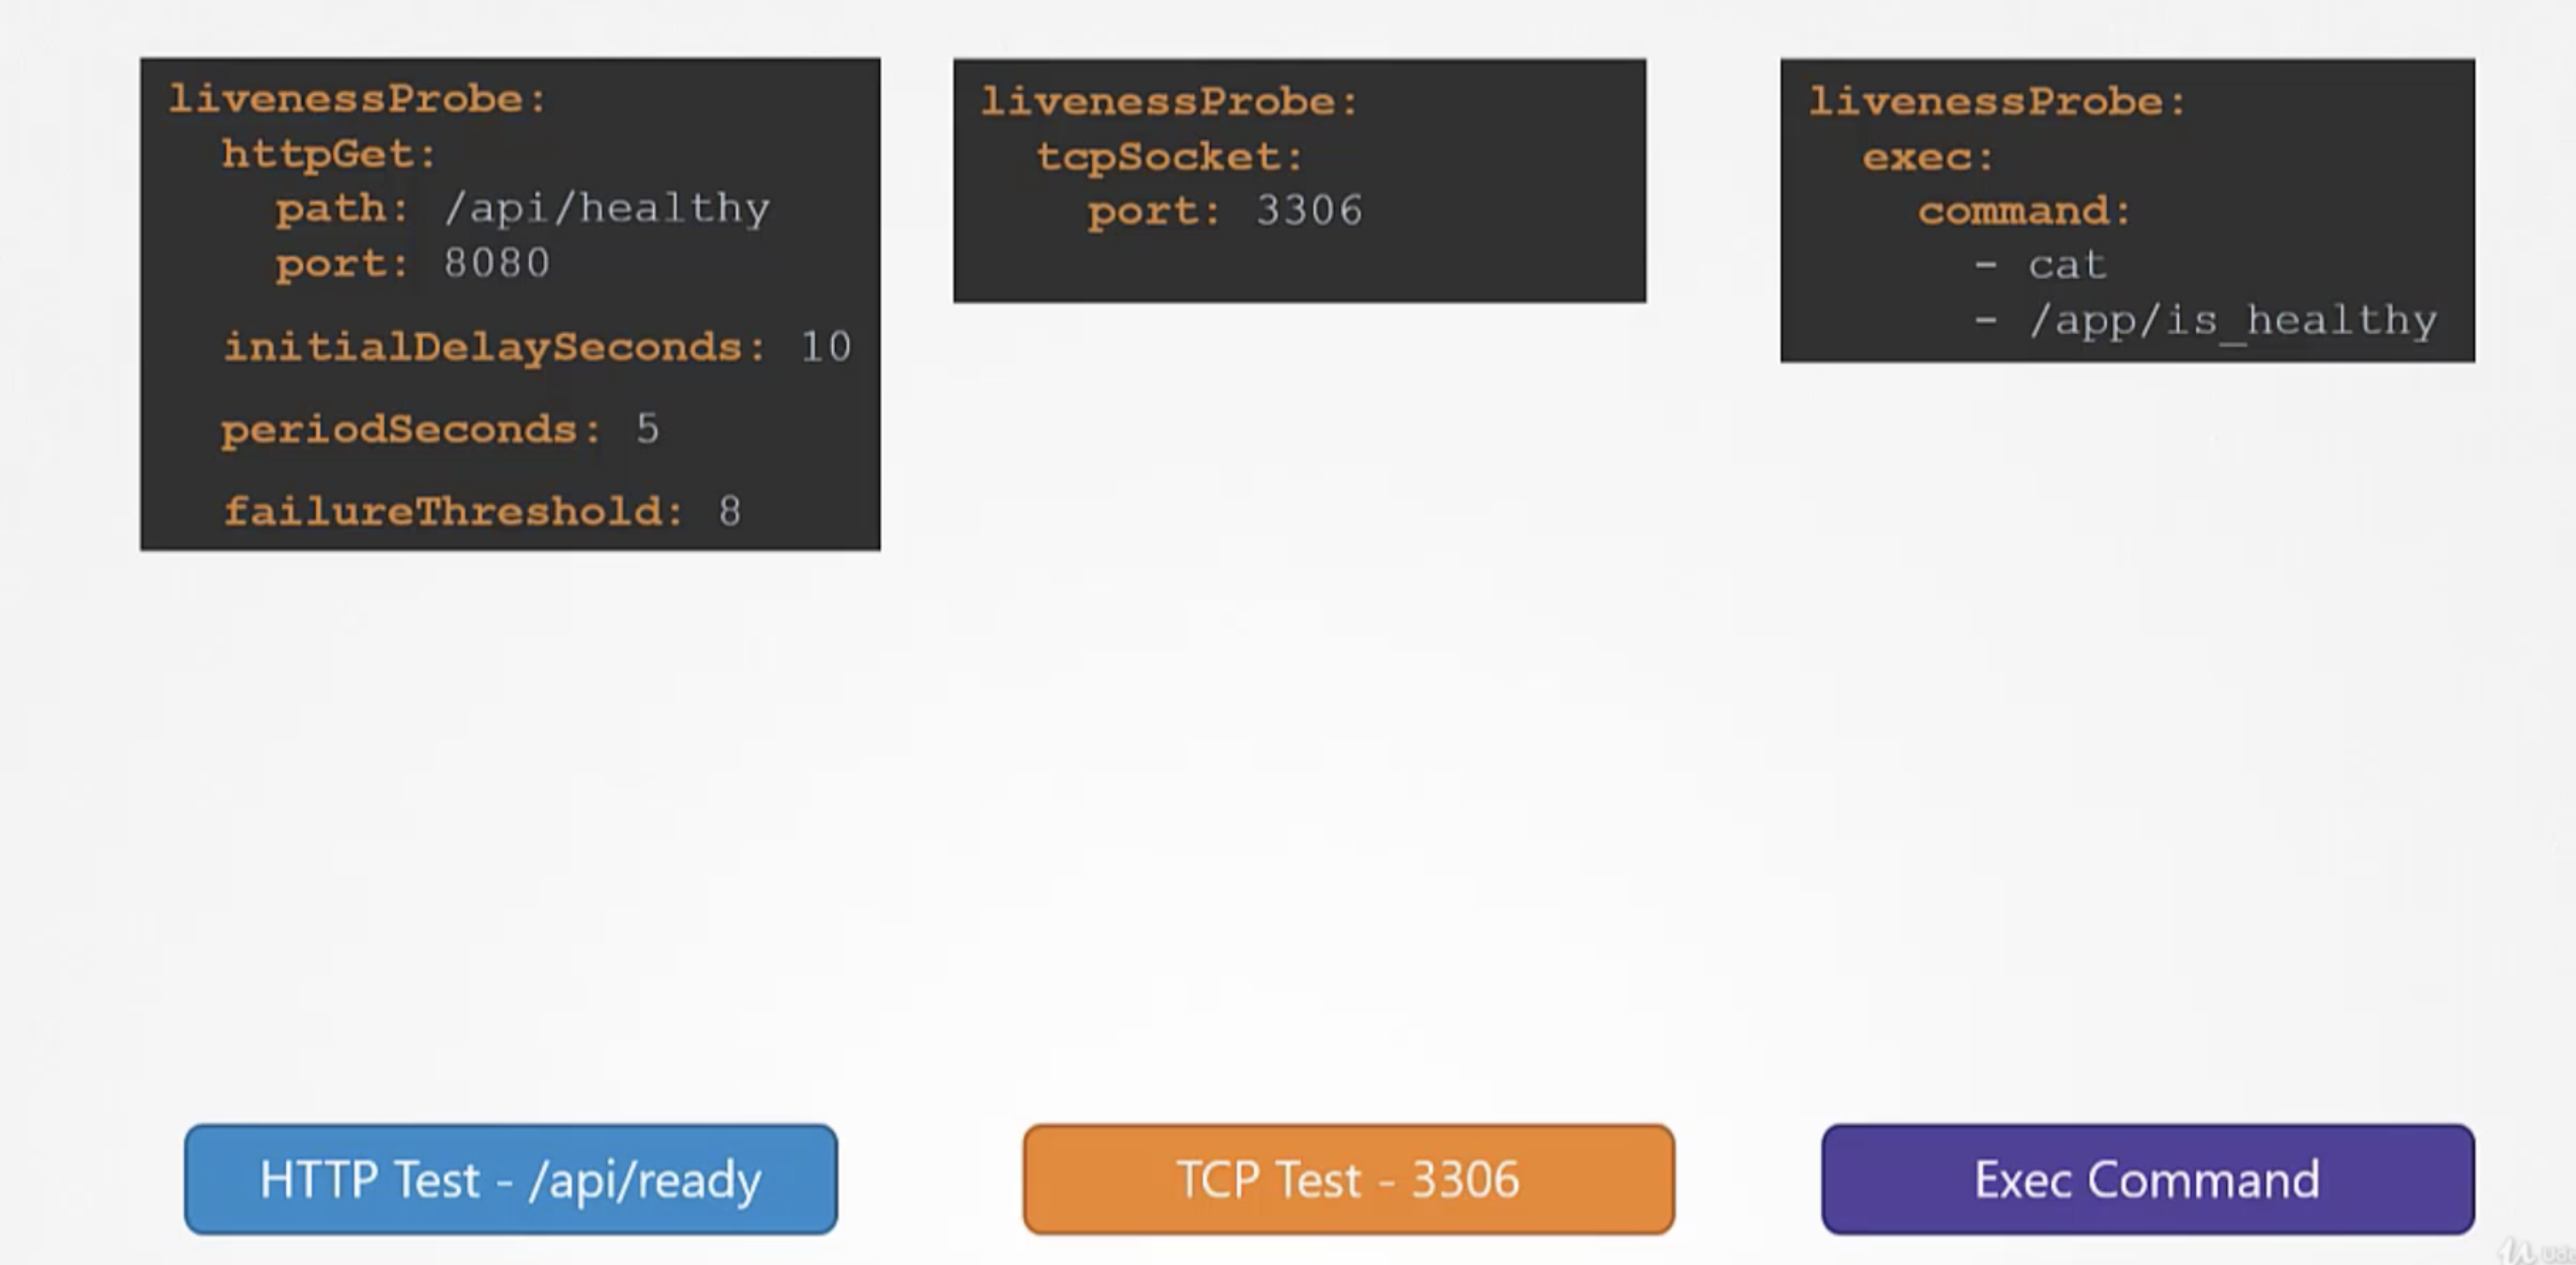
- In case of webservers - HTTP test - /api/ready
- In case of database - TCP test - particular TCP socket is listening or not
- customer script in the container that executes successfully when container is ready.

- In case of a webapplication - when an api server is up and running.
- In case of a database - a particular TCP socket is listening.
- Simply execute a command to perform a test.
We can check the status of each revision individually by using the --revision flagkubectl rollout history deployment <deploymentname> --revision=<number>
Normally, the change-cause field will be empty in the rollout history.
We can use the --record flag to save the command used to create/update a deployment against the revision number. kubectl set image deployment <deploymentname> <podname>=<newimage> --record
There are different types of workloads that a container can serve.
Workloads such as web servers continue to run for a long period of time, until manually taken down. There are other kinds of workloads such as batch processing, analytics or reporting, that are meant to carryout specific tasks and finish.
Example: Performing a computation, processing an image, performing an analytic task, sending an email etc,. These are meant for short period of time.
Let us first see how these workloads work in docker.
In Docker,docker run ubuntu expr 3+2 (performs a simple math operation)
In this case, docker container comes up, perform the simple operation, prints the output and then exists.
when we run docker ps -a command, we see the container in exit state.
In Kubernetes,

Though the container computes output and exits, kubernetes continues to restart the container and bring it up again. This continues to happen until a threshold is reached.
Kubernetes wants our applications to live forever. The default behaviour of pods is to attempt to restart the container to keep it running.
This behaviour is defined by the property restartPolicy set on the pod which is by default set to always. Therefore, the pod always recreates the container when it exits. We can overwrite this behaviour by setting this property to Never or Onfailure. Thus, the kubernetes does not restart the container once the job is finished.
pod-definition file
apiVersion: v1
kind: Pod
metadata:
  name: math-pod
spec:
  containers:
    - name: math-add
      image: ubuntu
      command: ['expr', '3', '+', '2']

  restartPolicy: Never
While replicaset is used to make sure a specified number of pods are running at all time, a job is used to run a set of pods to perform a given task to completion.
We create a job using a definition file.
job-definition file
apiVersion: batch/v1
kind: Job
metadata:
  name: math-add-job
spec:
  template:
  # pod-definition specification
    spec:
      containers:
        - name: math-add
          image: ubuntu
          command: ['expr', '2', '+', '3']
      restartPolicy: Never
To create a job kubectl create -f job-definition.yaml
To view the jobskubectl get jobs
The standard ouput of the container can be seen in container logskubectl logs <podname>
To delete the jobkubectl delete job <jobname>
Job with multiple pods
To run multiple pods we set a value for completions under the job specification.
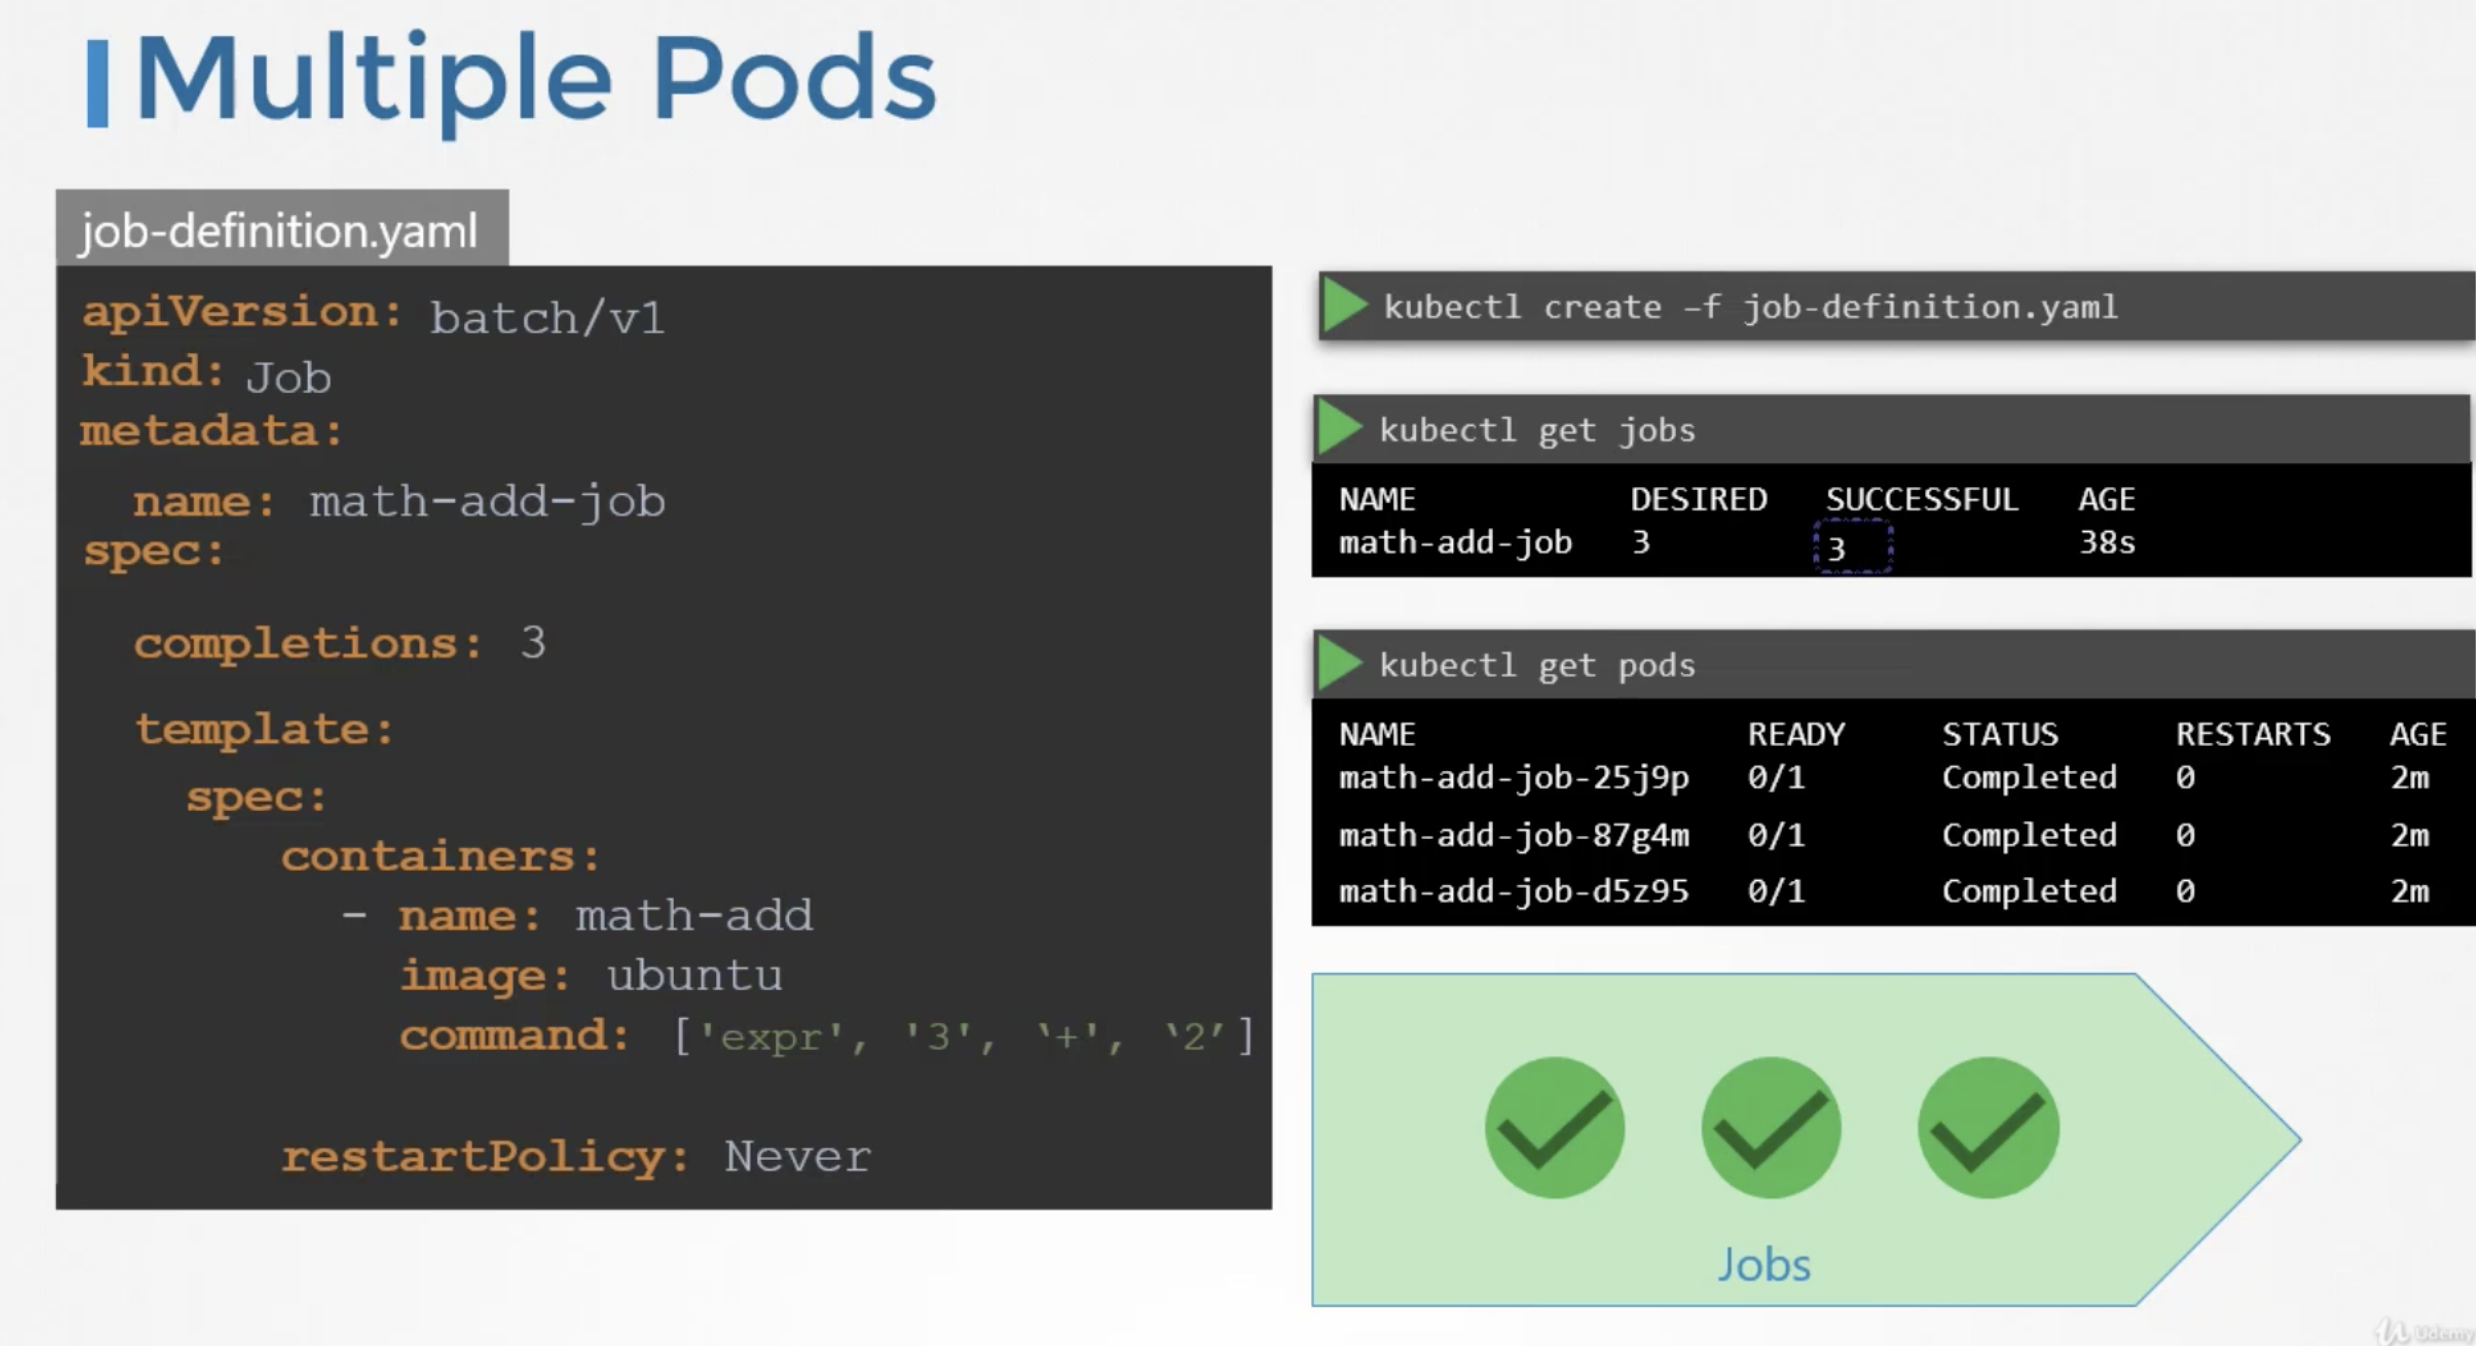
By default, the pods are created one after the other. The second pod is created only after the first is finished.
If the pod fails, the job tries to create new pods until it has three successful completions, and that completes the job.
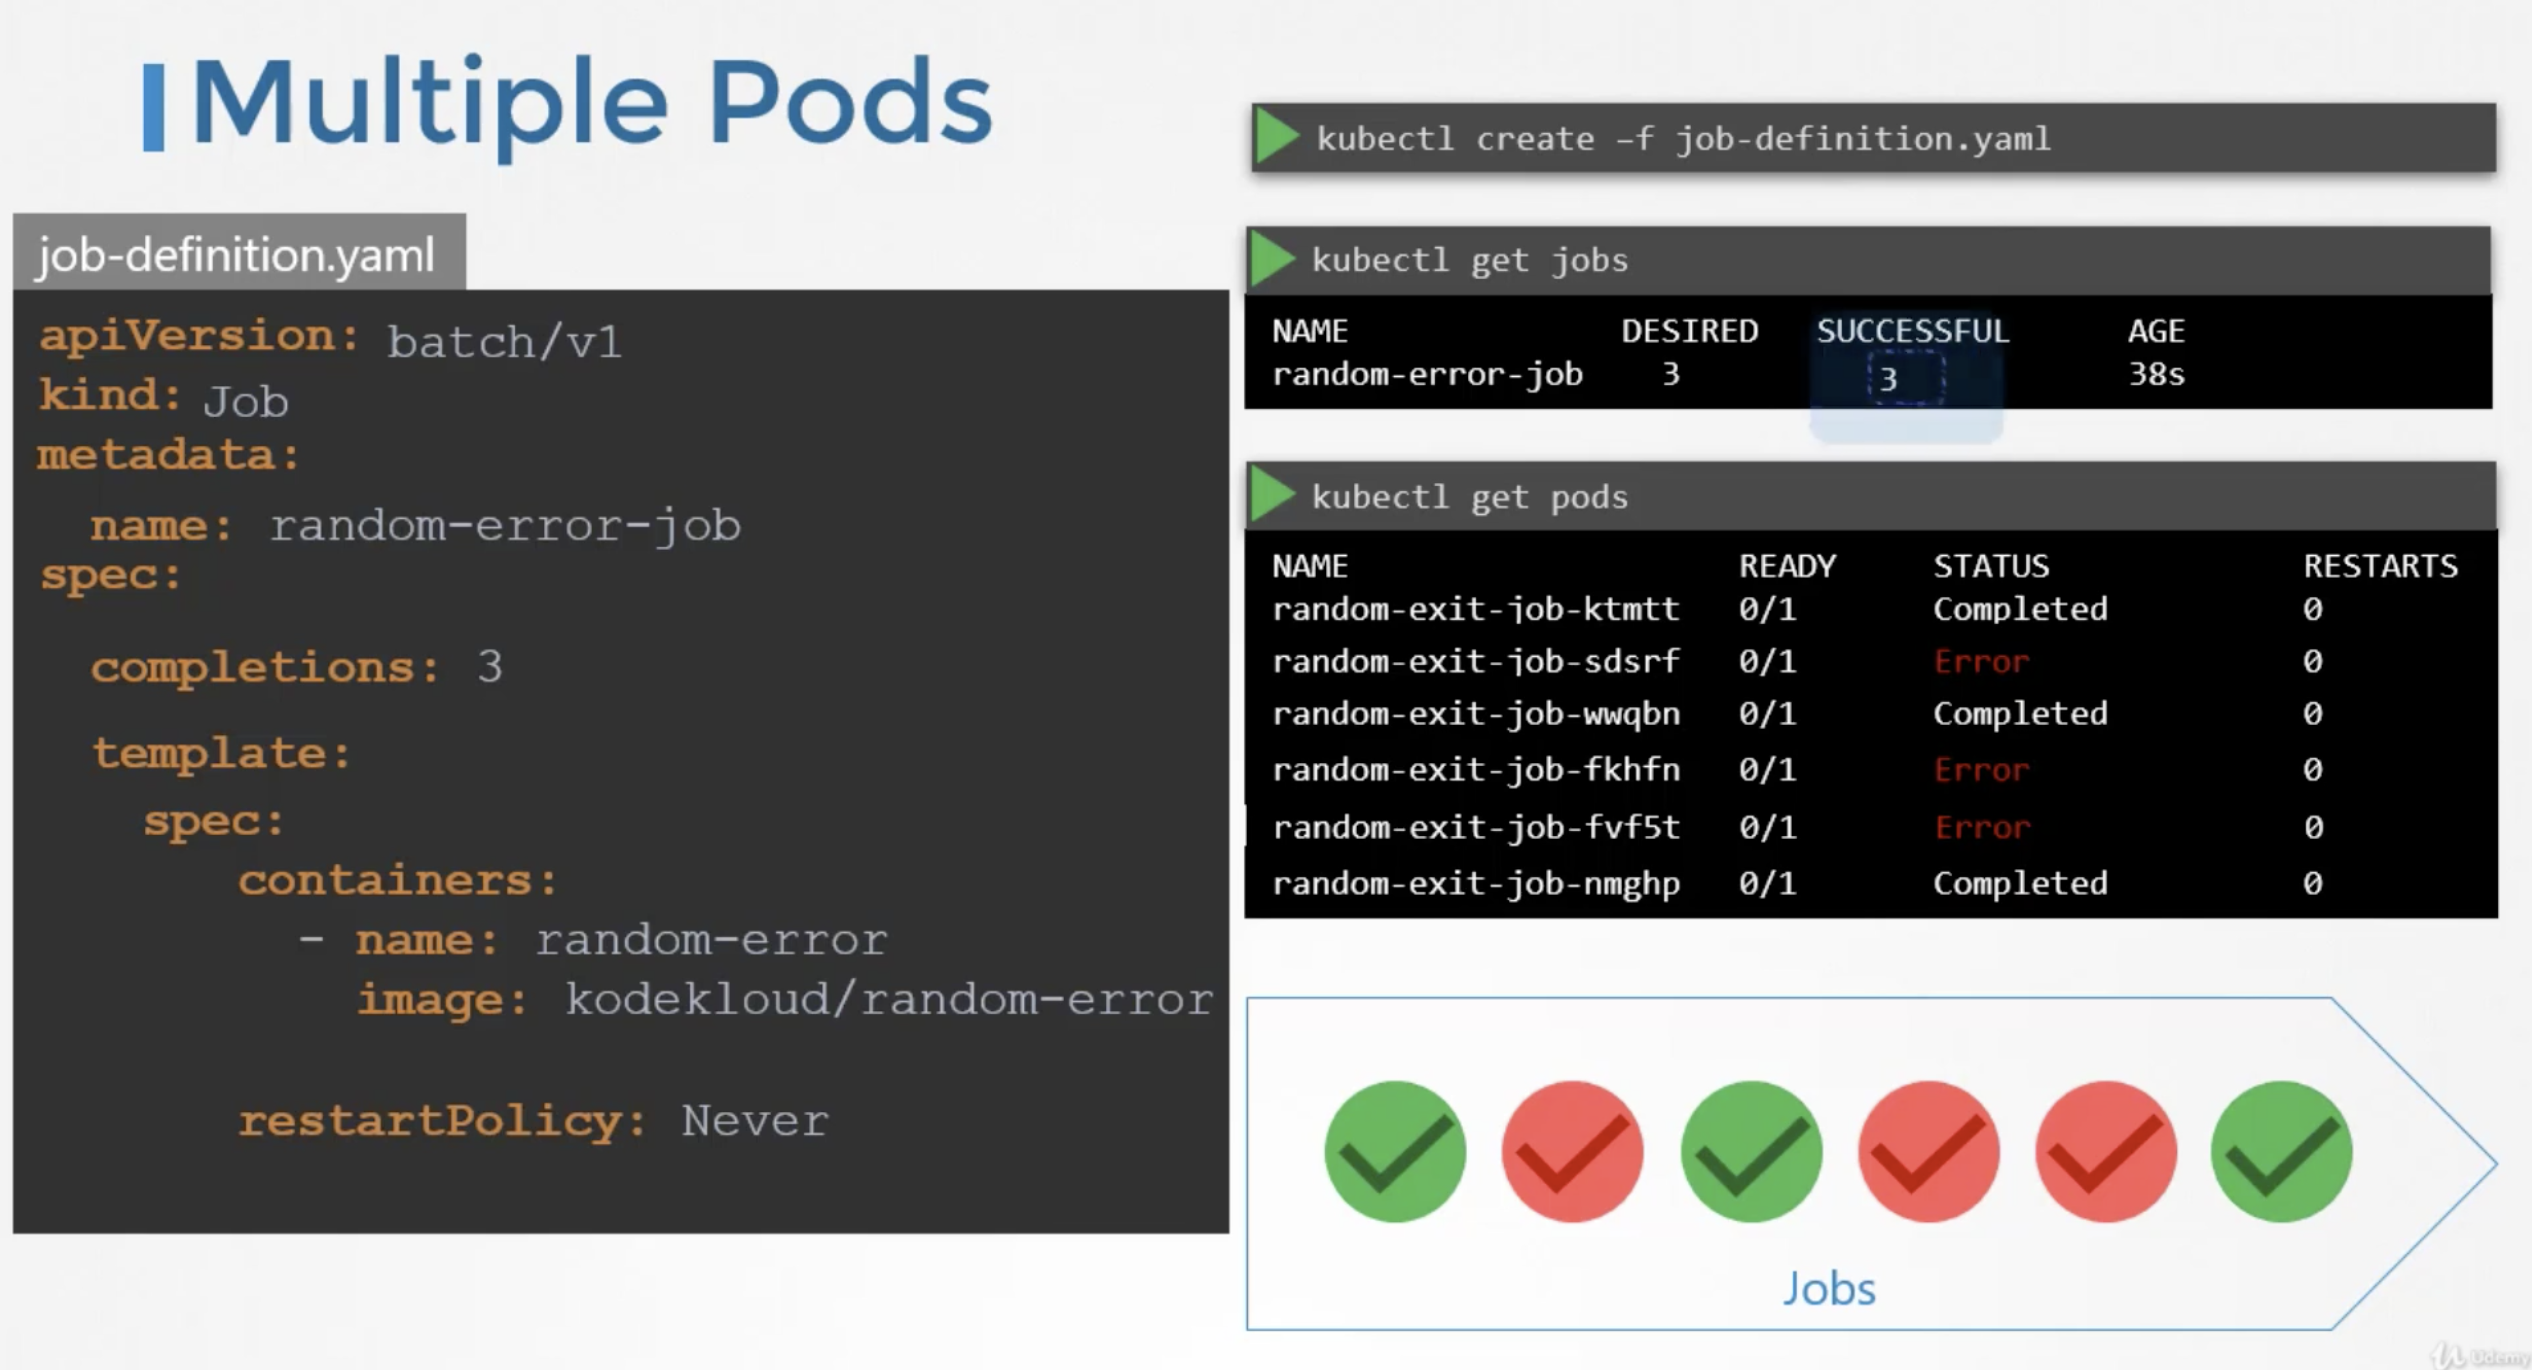
Instead of getting the pods created sequentially, we can get them created in parallel. For this add the property called parallelism to the job specification. We set it to 3, to create 3 pods in parallel
The job first creates 3 pods at once, two of which completes successfully. Now, we only need one more, it is intelligent enough to create one pod at a time, until we get a total 3 successful pods.
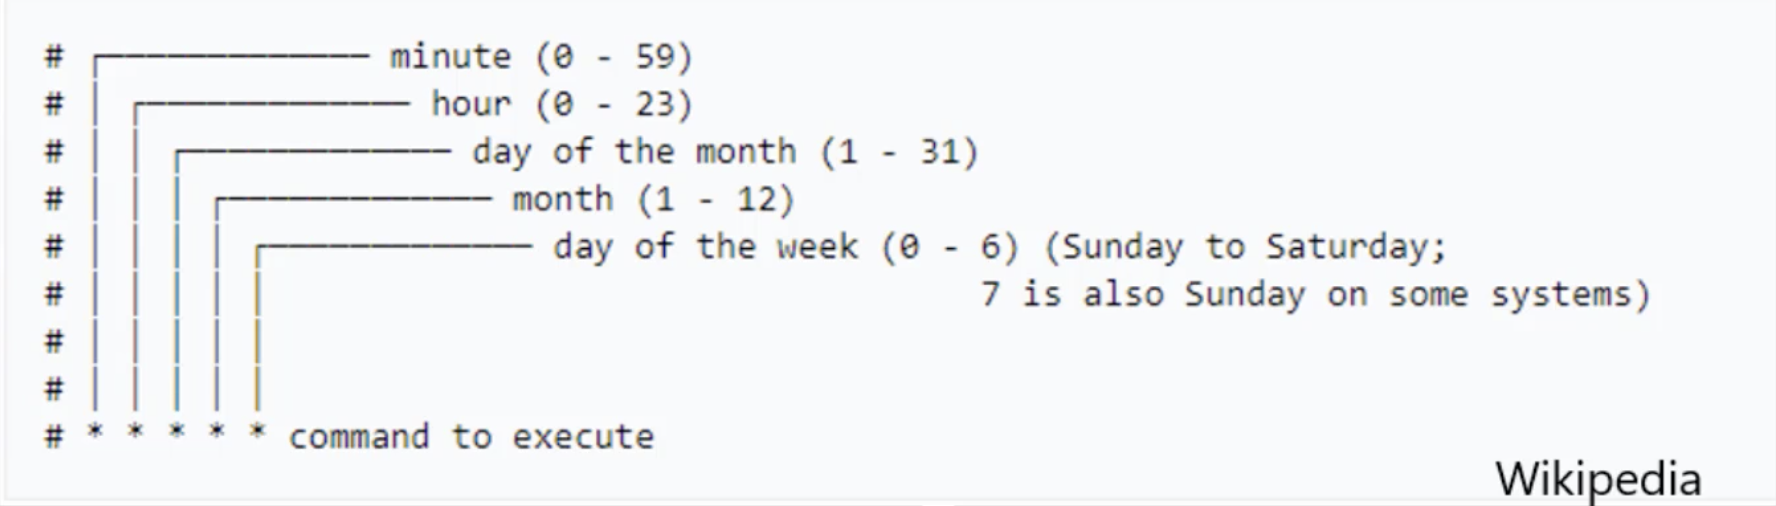
CronJobs
A CronJob is a job that can be scheduled. We can schedule and run a CronJob Periodically. Example: A job to generate a report and send an email.
To create cronjob
kubectl create -f <cronjob-definition-file>
To view the available cronjobs kubectl get cronjob
cronjob-definition file
apiVersion: batch/v1beta1
kind: CronJob
metadata:
name: reporting-cron-job
spec:
# schedule option takes cron like format string, where it takes the time when the job is to be run
schedule: "*/1 * * * *"
jobTemplate:
# Job spec
spec:
completions: 3
parallelism: 3
template:
spec:
containers:
- name: reporting-tool
image: reporting-tool
restartPolicy: Never
Kubernetes servcies enable various communications between various components within and outside of the application.
Kubernetes servcies helps us to connect applications together and for the users.
For Example: Our appliaction has group of pods serving various functions such as a group serving for front end load to users, another group running backend processes and third group connecting external database.
It is services that enable connectivity between these group of pods. Services enable the front end application made available to end users, it helps in communicating backend and frontend pods and helps in connecting to external database.
Thus, servcies enable loose coupling between micro-services in our application.
External communication
We deployed a pod having web application running on it. How do we as an external user access the web page.
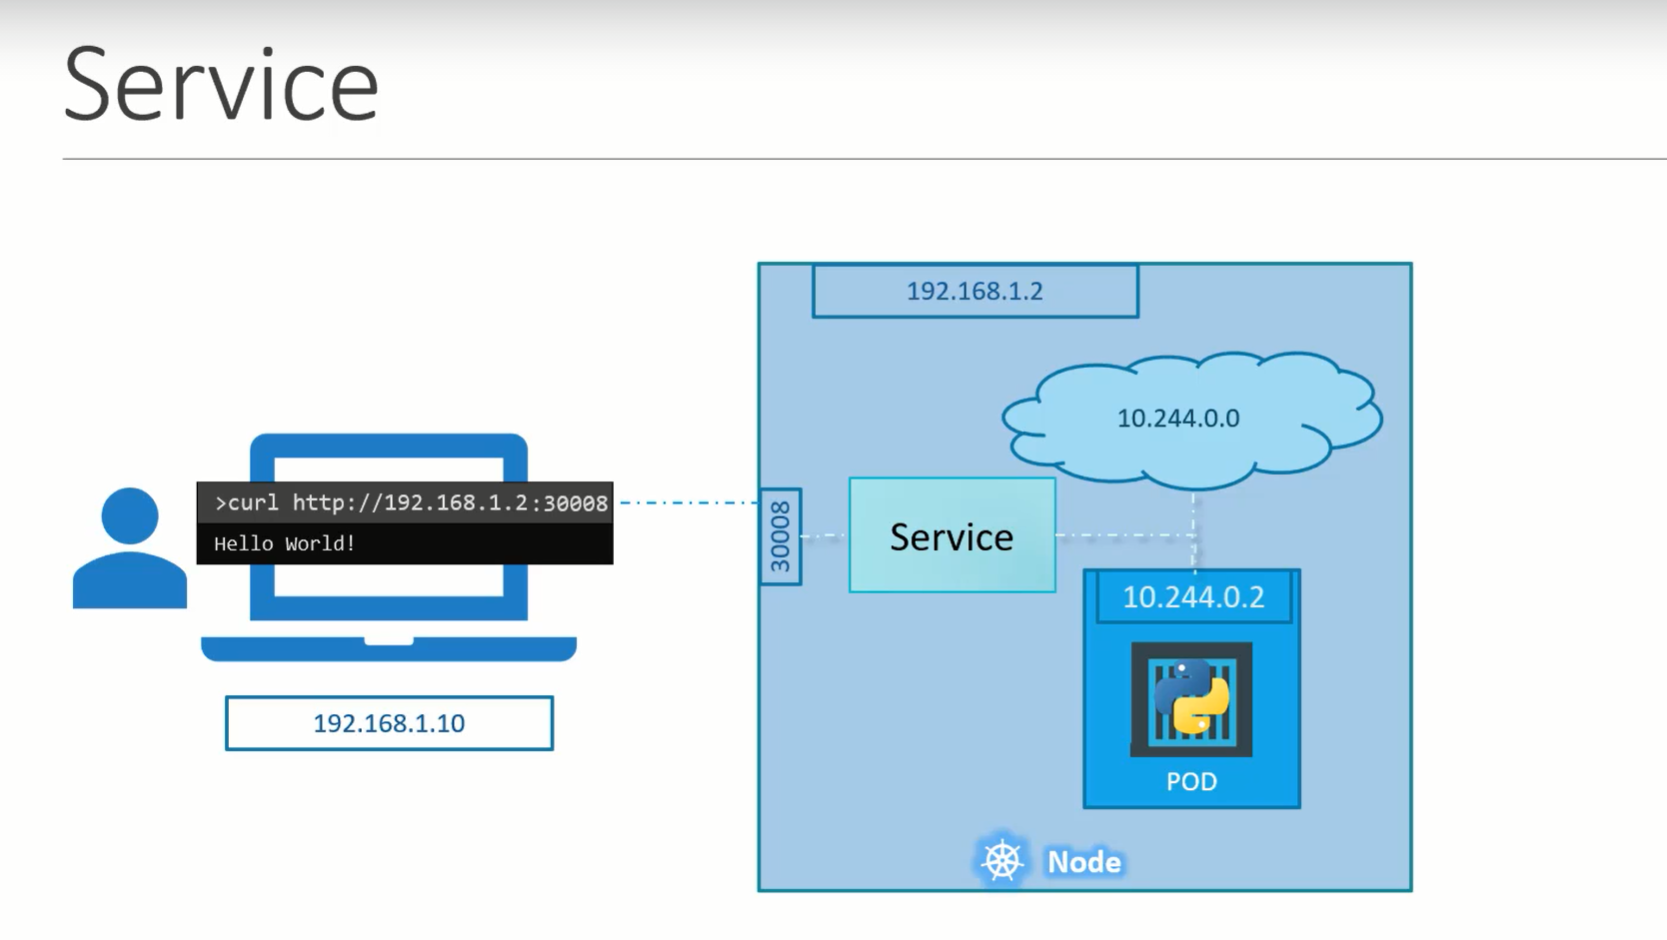
This type of service is called a NodePort Servcie, as service listens to a port on the node and forwards request to POD.
Service Types
NodePort
Nodeport Service makes internal POD accessible on a port on the node.
This servcie helps us by mapping a port on the POD to the port on the node.
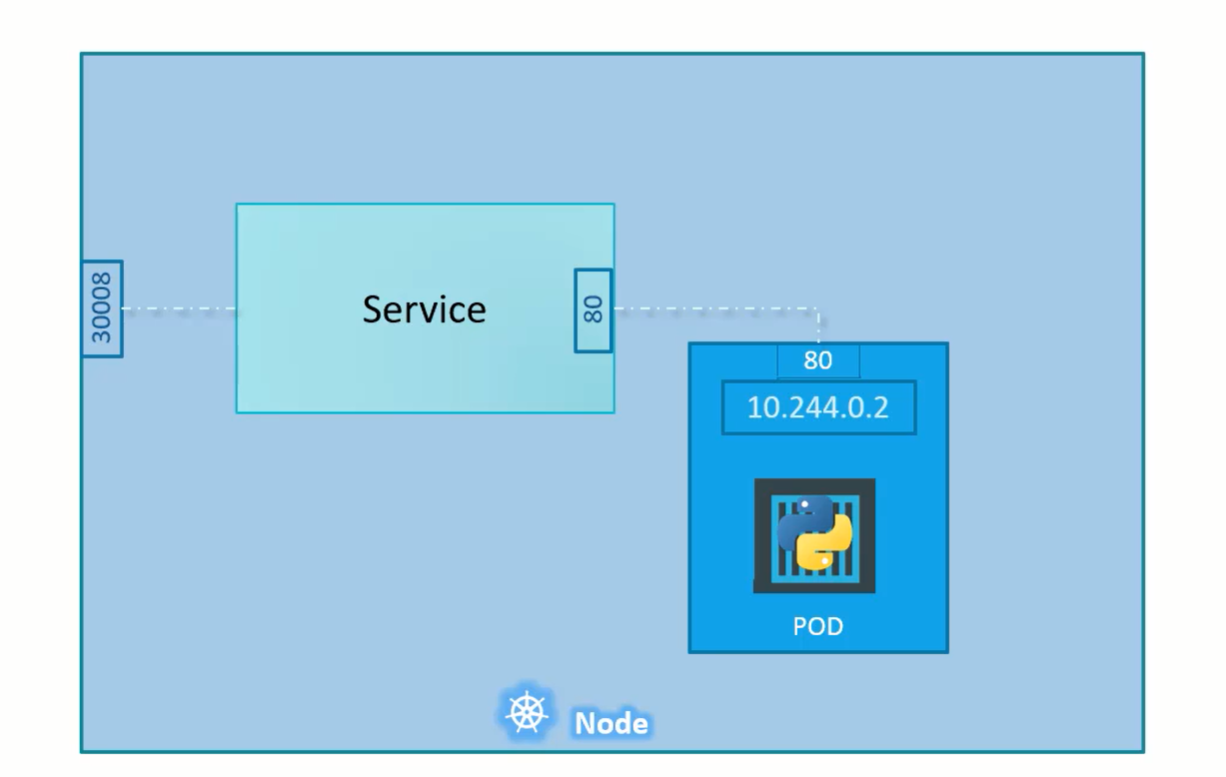
The port on the pod where an actual web server is running is 80 and it is referred to target port as this is the port where service forward the request to.
Second port is the port on the service itself. It is simple referred to port.
This terms are from the view point of the service.
Finally, we have the port on the node itself, which we use to access the webserver externally and that is known as the nodeport. Nodeport can only be in valid range i.e., 30000 to 32767.
service-definition.yaml
apiVersion: v1
kind: Service
metadata:
name: myapp-service
spec:
type: NodePort
ports:
- targetPort: 80 # will assumed to be same as port by default
port: 80 # only mandatory
nodePort: 30008 #if not provided, it will automatically assign the port in the valid range.
selector:
# to identify the pod
app: myapp
type: front-end
To create a service
kubectl create -f servcie-definition.yaml
To get all services
kubectl get services
To access the webservice curl http://<NodeIp>:<nodePort>
For Example: curl http://192.168.1.2:30008
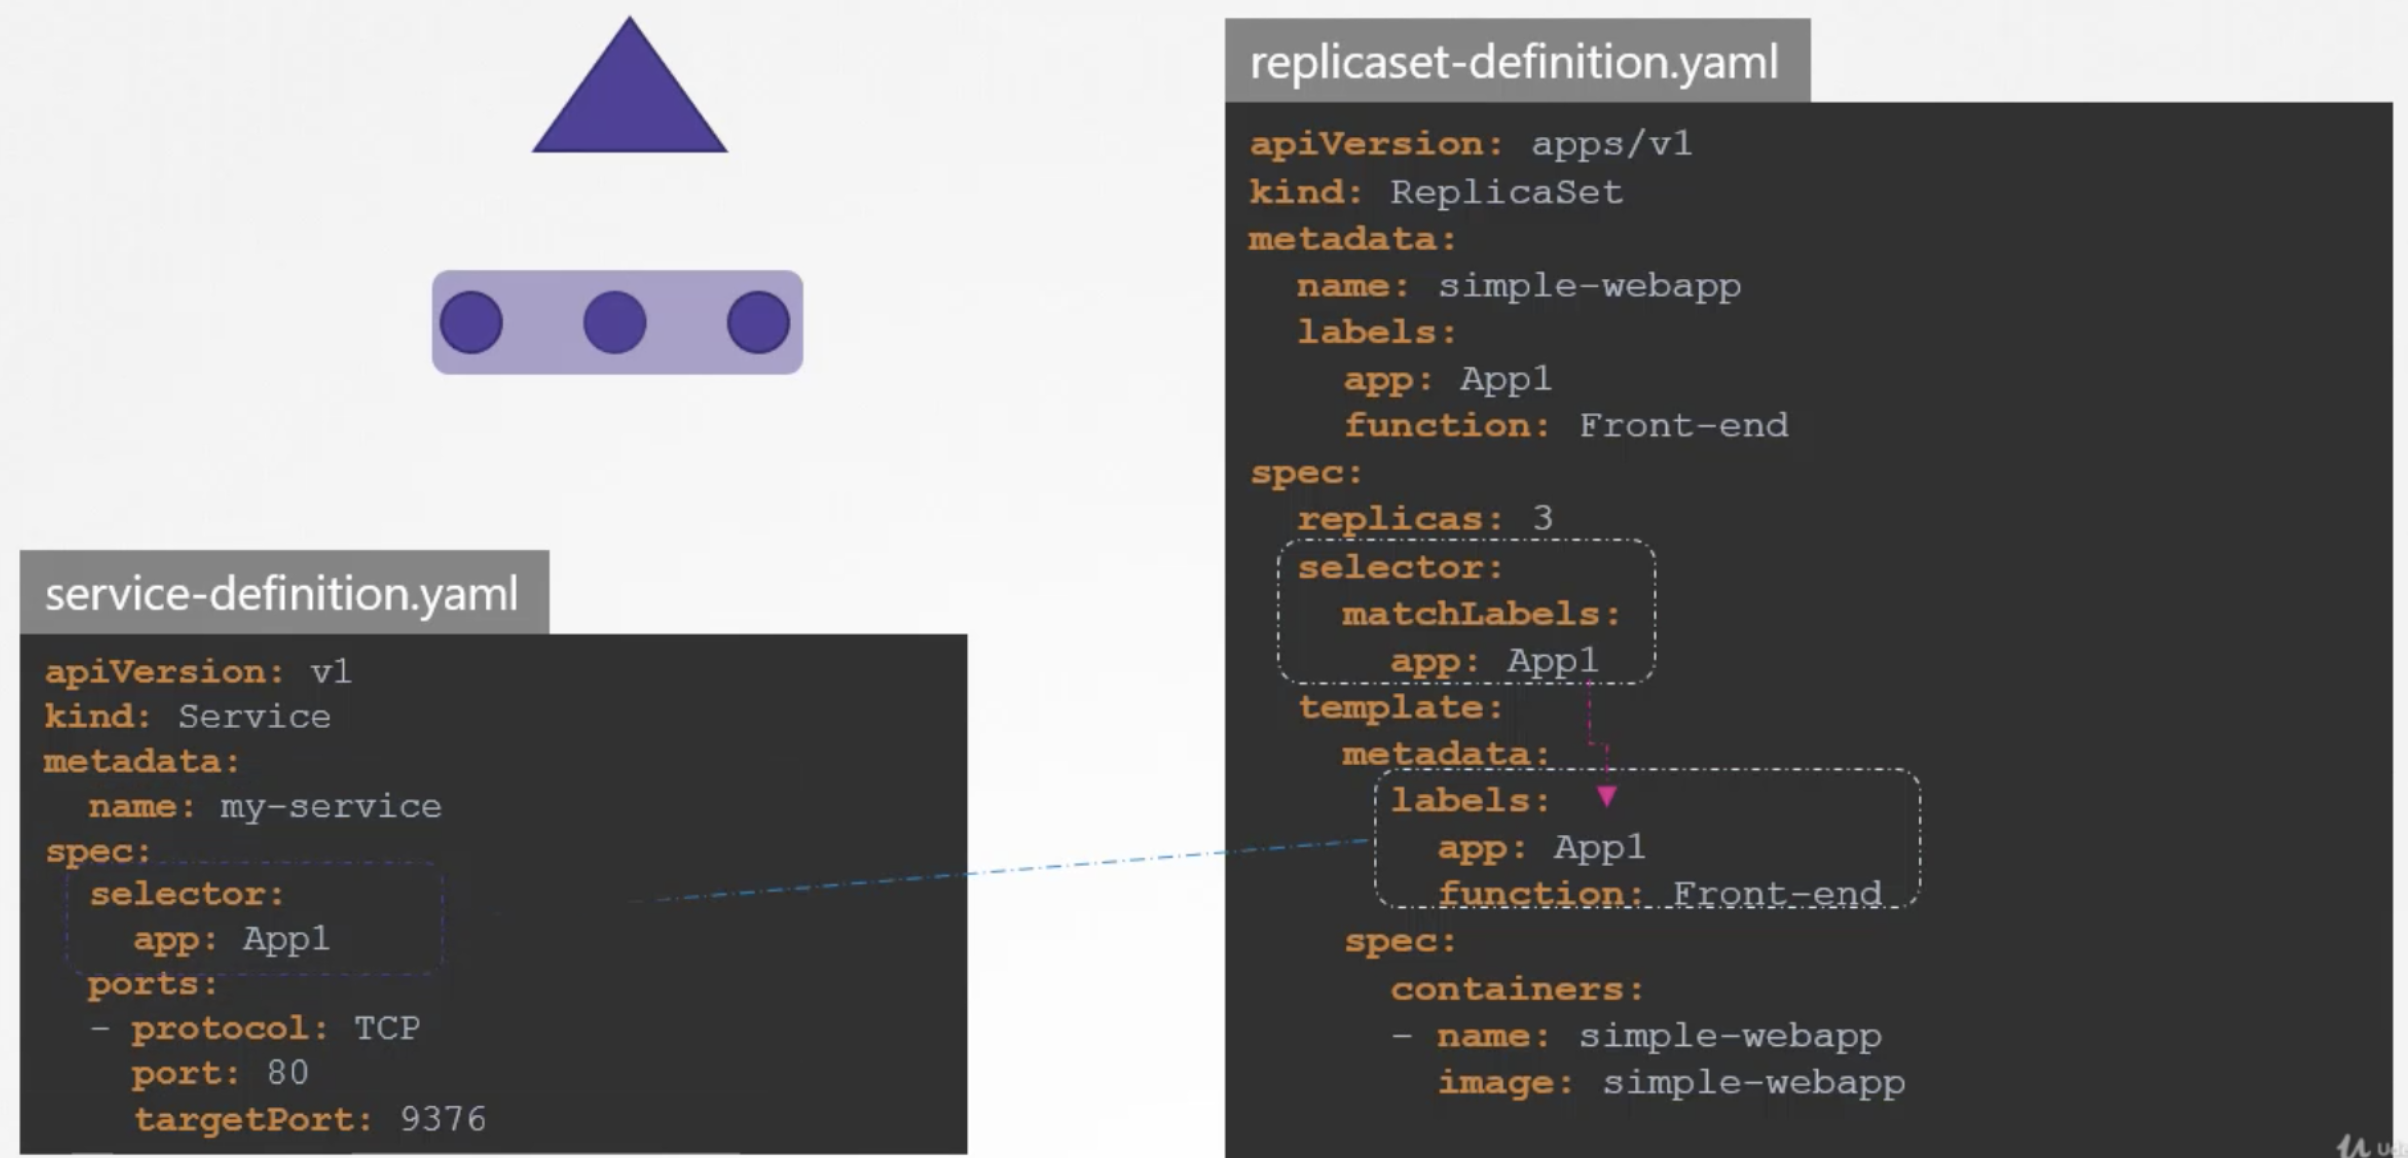
When we have multiple PODs running our web application, they will have the same labels and when we create a service, it will consider all the pods with the particular label as target pods. We don't have to do any additional configuration to access multiple instances of a POD.
To balance the load across the multiple pods, it uses a random algorithm. Thus, service acts as a built-in load balancer to distribute load across different pods.
When the pods are distributed across multiple nodes, in this case a web application on PODs on separate nodes in the cluster.
When we create a service, without any additional configuration. The kubernets automatically creates a service that spans across all the nodes in the cluster and maps the targetport to the same nodePort on all the nodes in the cluster.
This way, we can access the application using the IP of any node in the cluster and using the same port number.
In any case, whether it can be a single pod on the single node, multiple pods on the single node or multiple pods on the multiple nodes, the service will be created exactly the same.
When the PODs are removed or added, the service gets automatically updated making it highly flexible and adoptive. Once created, we won't typically have to make any additional configuration changes.
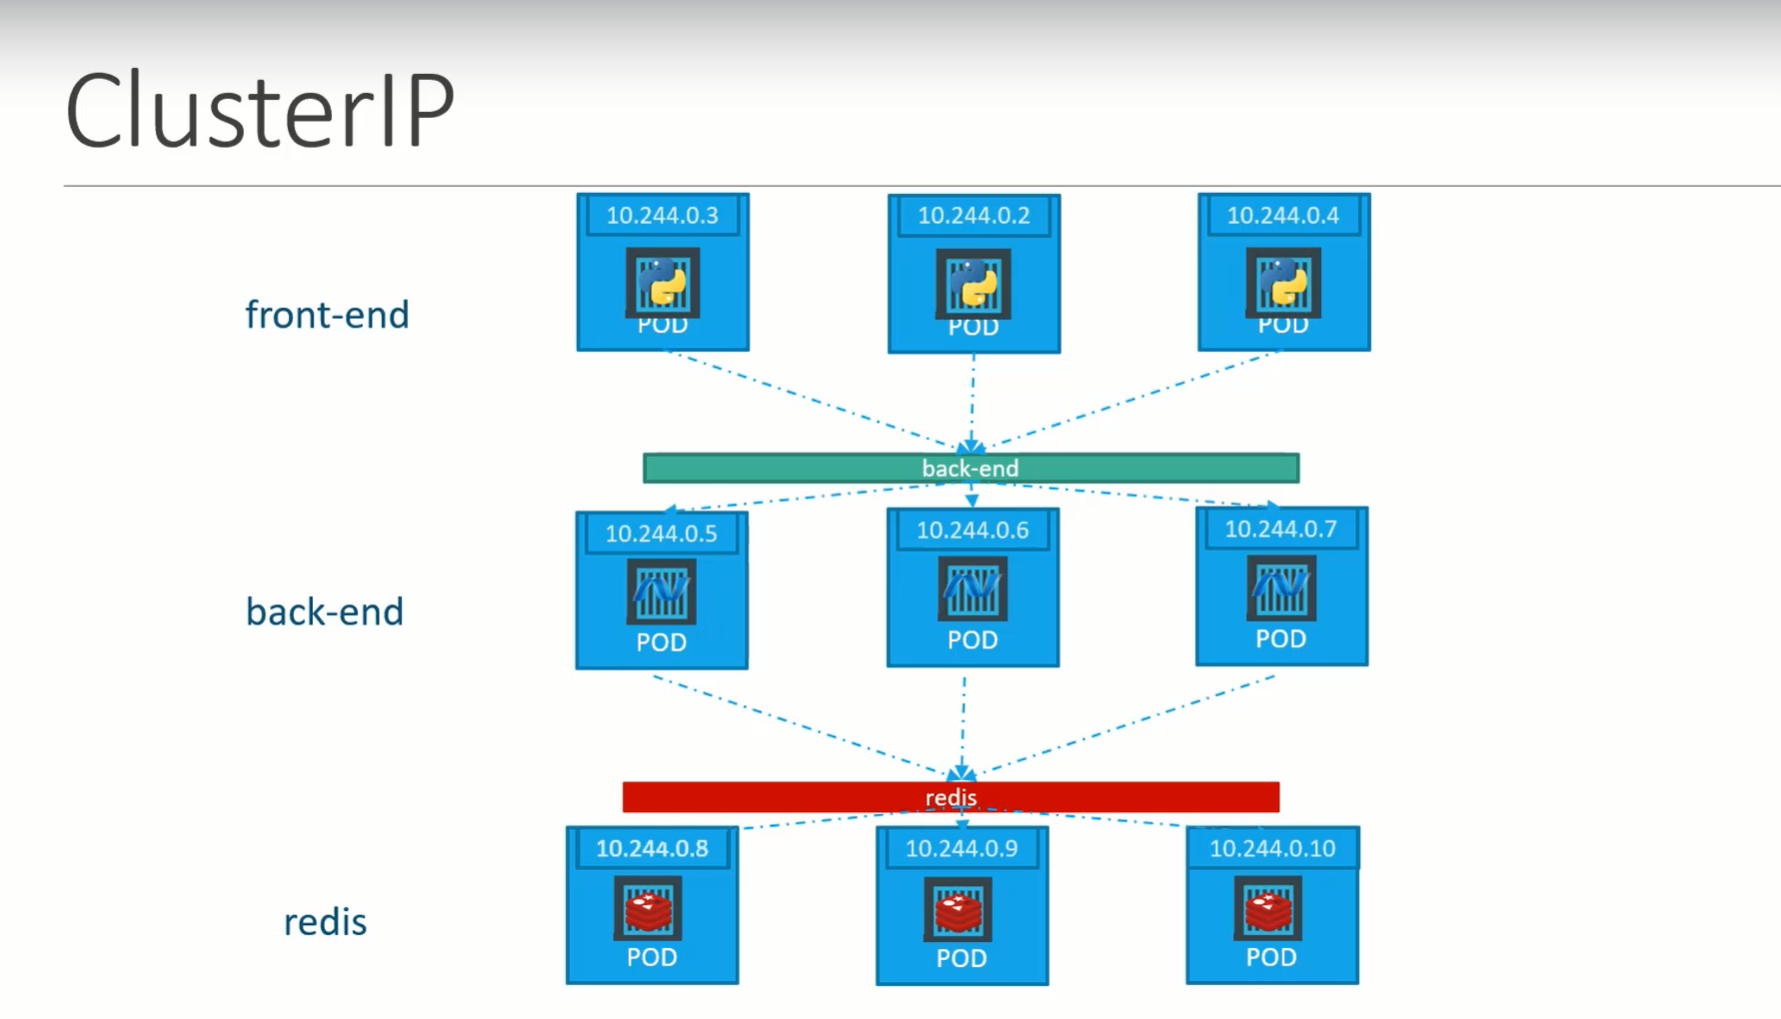
ClusterIP
In this case, servcie creates a virtual IP inside the cluster to enable communication between a set of servers such as a set of front end servers to a set of backend servers.
A service created for the backend pods will help to group all the backend pods together and provide a single interface for other pods to access the service. The requests are forwarded to one of the pods under the service.
service-definition.yaml
apiVersion: v1
kind: Service
metadata:
name: back-end
spec:
type: clusterIp
# clusterIP is the default type, if we didn't specify it, the service will automatically assumes it to be clusterIP.
ports:
- targetPort: 80 # where backend is exposed
port: 80 # where servcie is exposed
selector:
# to link the service to set of pods
app: myapp
type: back-end
To create a service
kubectl create -f servcie-definition.yaml
To get all services
kubectl get services
This service can be accessed by other pods using IP address or service name.
LoadBalancer
This service provisions a load balancer for our application in supported cloud providers.
For Example: To distribute load across the web servers in front end tier.
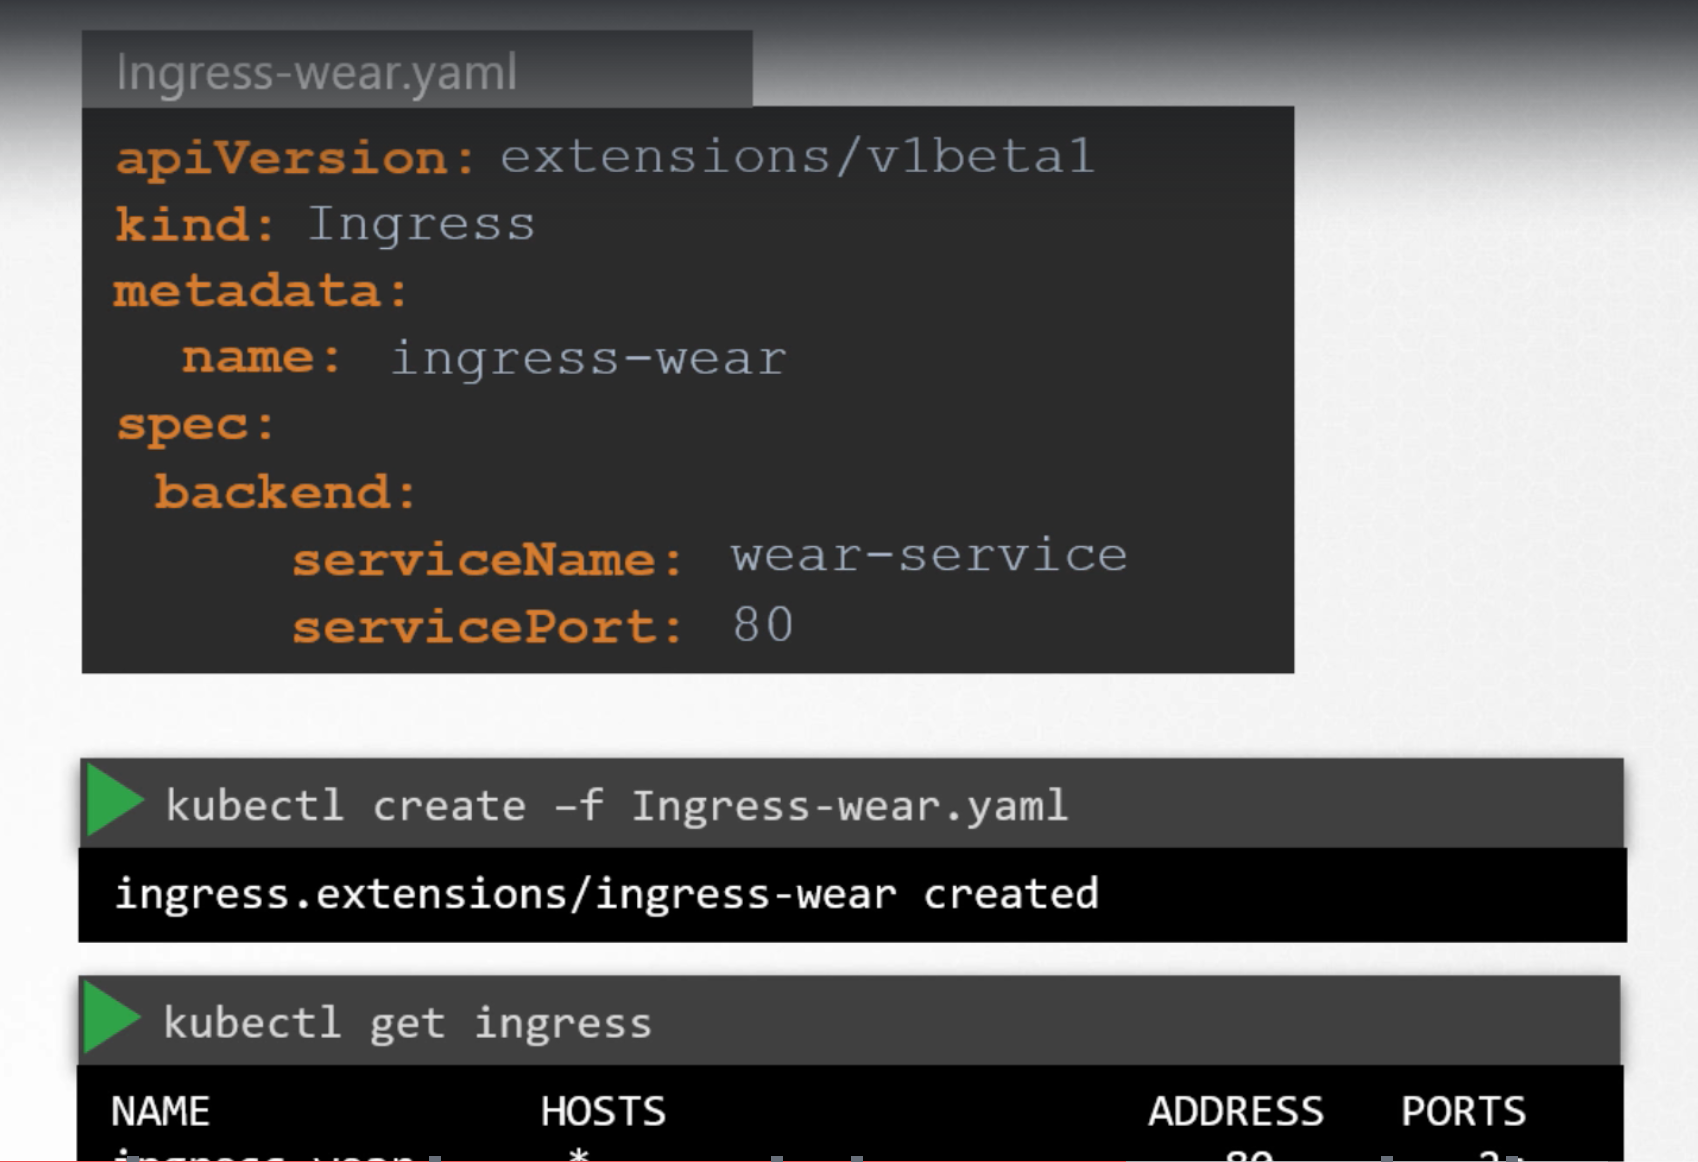
Ingress helps users to access the application using a single externally accessible url that we can configure to route to different services within the cluster based on the url path, at the same time implements SSL security.
Ingress is a layer 7 load balancer built into the kubernetes cluster that can be configured using native kubernetes primitives just like any other object in kubernetes.
Even with ingress, we still need to expose it to make it accessible outside the cluster or we still have to either publish it as NodePort or with a cloud native load balancer. But this is just one time configuration.
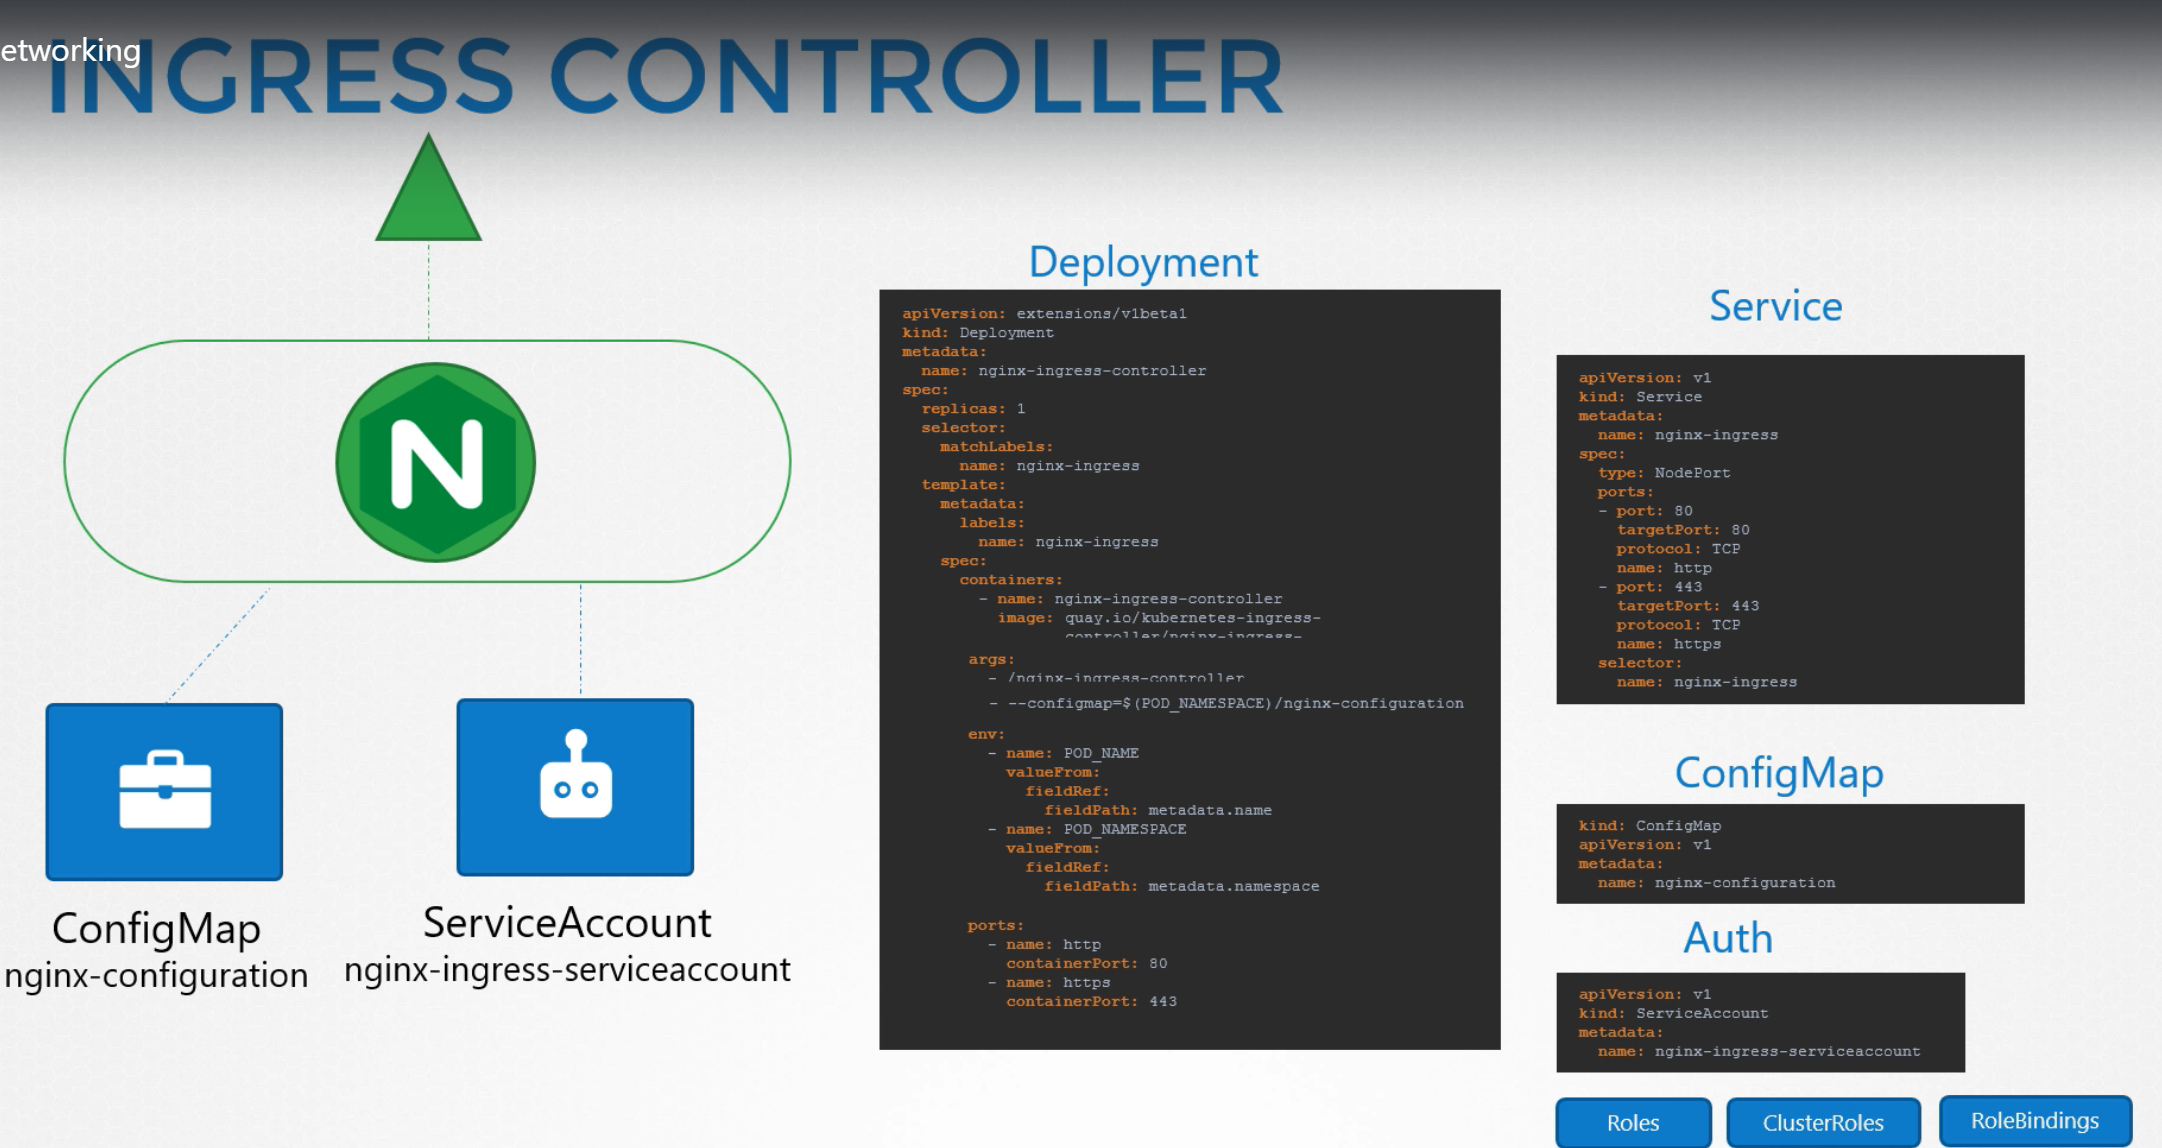
Ingress first deploys a supported solution which can be nginx or HAproxy and then specify a set of rules to configure Ingress.
The soultion we deploy is called as an Ingress Controller and the set of rules we configure are called as Ingress Resources.
Ingress Resources are created using definition files as we created for pod, deployment etc,.
Ingress Controller
A kubernetes cluster does not come with Ingress Controller by default. We must deploy one.
There are number of solutions available for Ingress. A few of them are GCE (Google's layer 7 HTTP Load Balancer), nginx, HAproxy, Contour, traefik and Istio. Out of these, GCE and nginx are currently supported and maintained by kubernetes.
These Ingress Controllers are not just a load balancer or nginx server. The load balancer components are just a part of it. The Ingress Controllers have additional intelligence built into them to monitor kubernetes cluster for new definitions or ingress resources or configure the nginx server accordingly.
An nginx Controller is deployed as just an other deployment in kubernetes.
Ingress Resources
Traffic
For Example, we have a web server serving frontend to users, app server serving APIs and a database server.
The user sends in a request to the weserver at port 80, the webserver then sends request to the API server at port 5000 in the backend. The API server then fetches data from database server at port 3306 and sends the data back to the user.
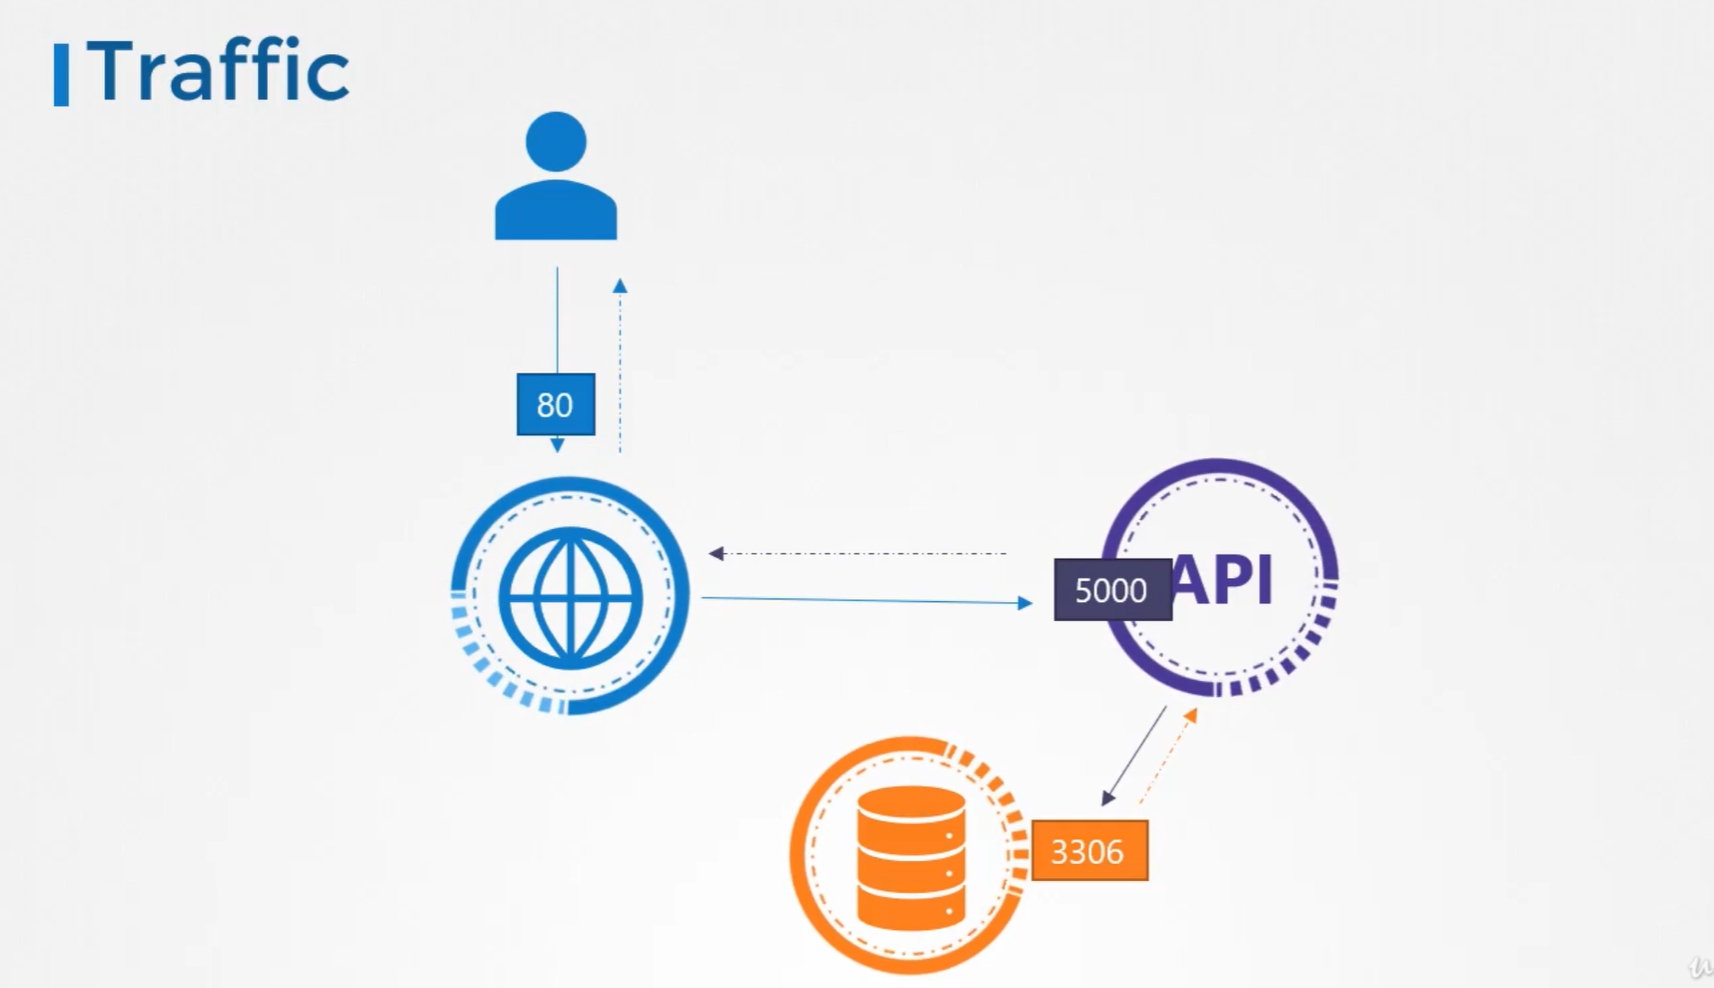
We have two types of Traffic here.
For a webserver, the incoming traffic from the users is an ingress traffic and the outgoing request to the appserver is egress traffic.
While defining ingress and egress, we are just looking at the direction in which the traffic originated. The response to the user do not really matter.
Similarly, in case of the backend API server. it receives ingress traffic at port 5000 and has egress traffic to the port 3306 to the database server.
From the database server prespective, it receives ingress tarffic on port 3306 from the API server.
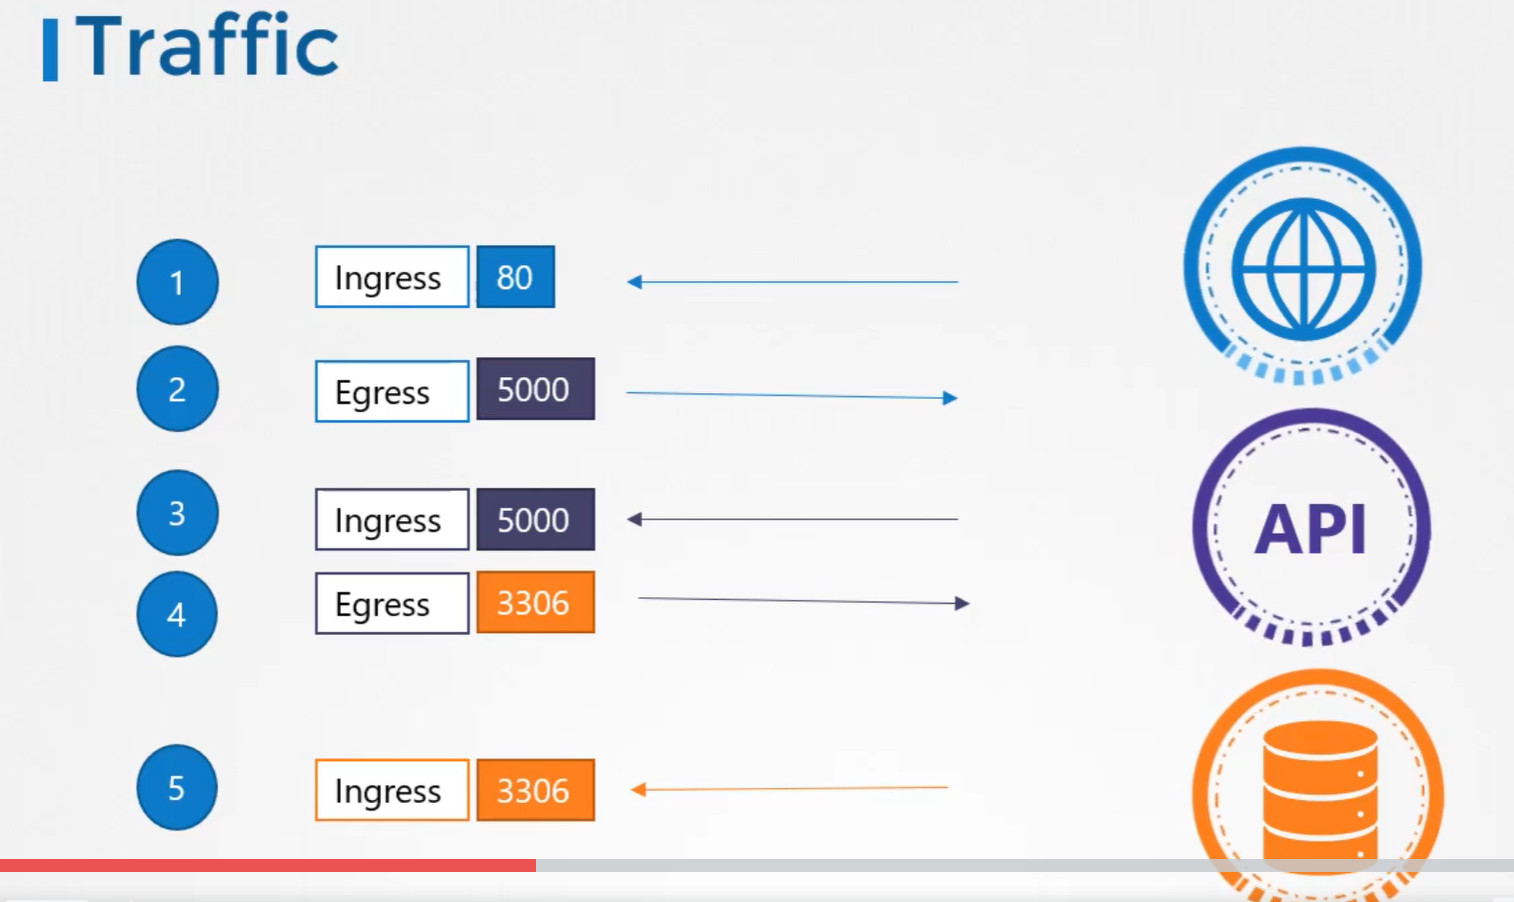
To list the rules to get this working, we will have
Ingress rule that is required to accept HTTP traffic on port 80 on the webserver and
Egress rule to allow traffic from the webserver to the port 5000 on API server. * Ingress rule to accept traffic on port 5000 on API server. * Egress rule to allow traffic to port 3306 on the database server. * Finally, an Ingress rule on the database server to accept traffic on the port 3306.
Network Security
One of the prerequiste for networking in kubernetes is whatever solution we implement, the PODs should be able to communicate with each other without having to configure any additional settings like routes.
Kubernetes is configured by default with an All Allow rule that allows traffic from any POD to anyother POD or services within the cluster.
In the before example, for each component in the application we deploy a POD. one for frontend server, one for API server and one for the database.
We create services to enable communication between the PODS as well as to the enduser. Based on the All Allow policy, all PODs with communicate with each other in the kubernetes cluster.
If we do not want frontend server to be able to communicate with the database server directly. For Example, security teams and audits require us to prevent that from happening.
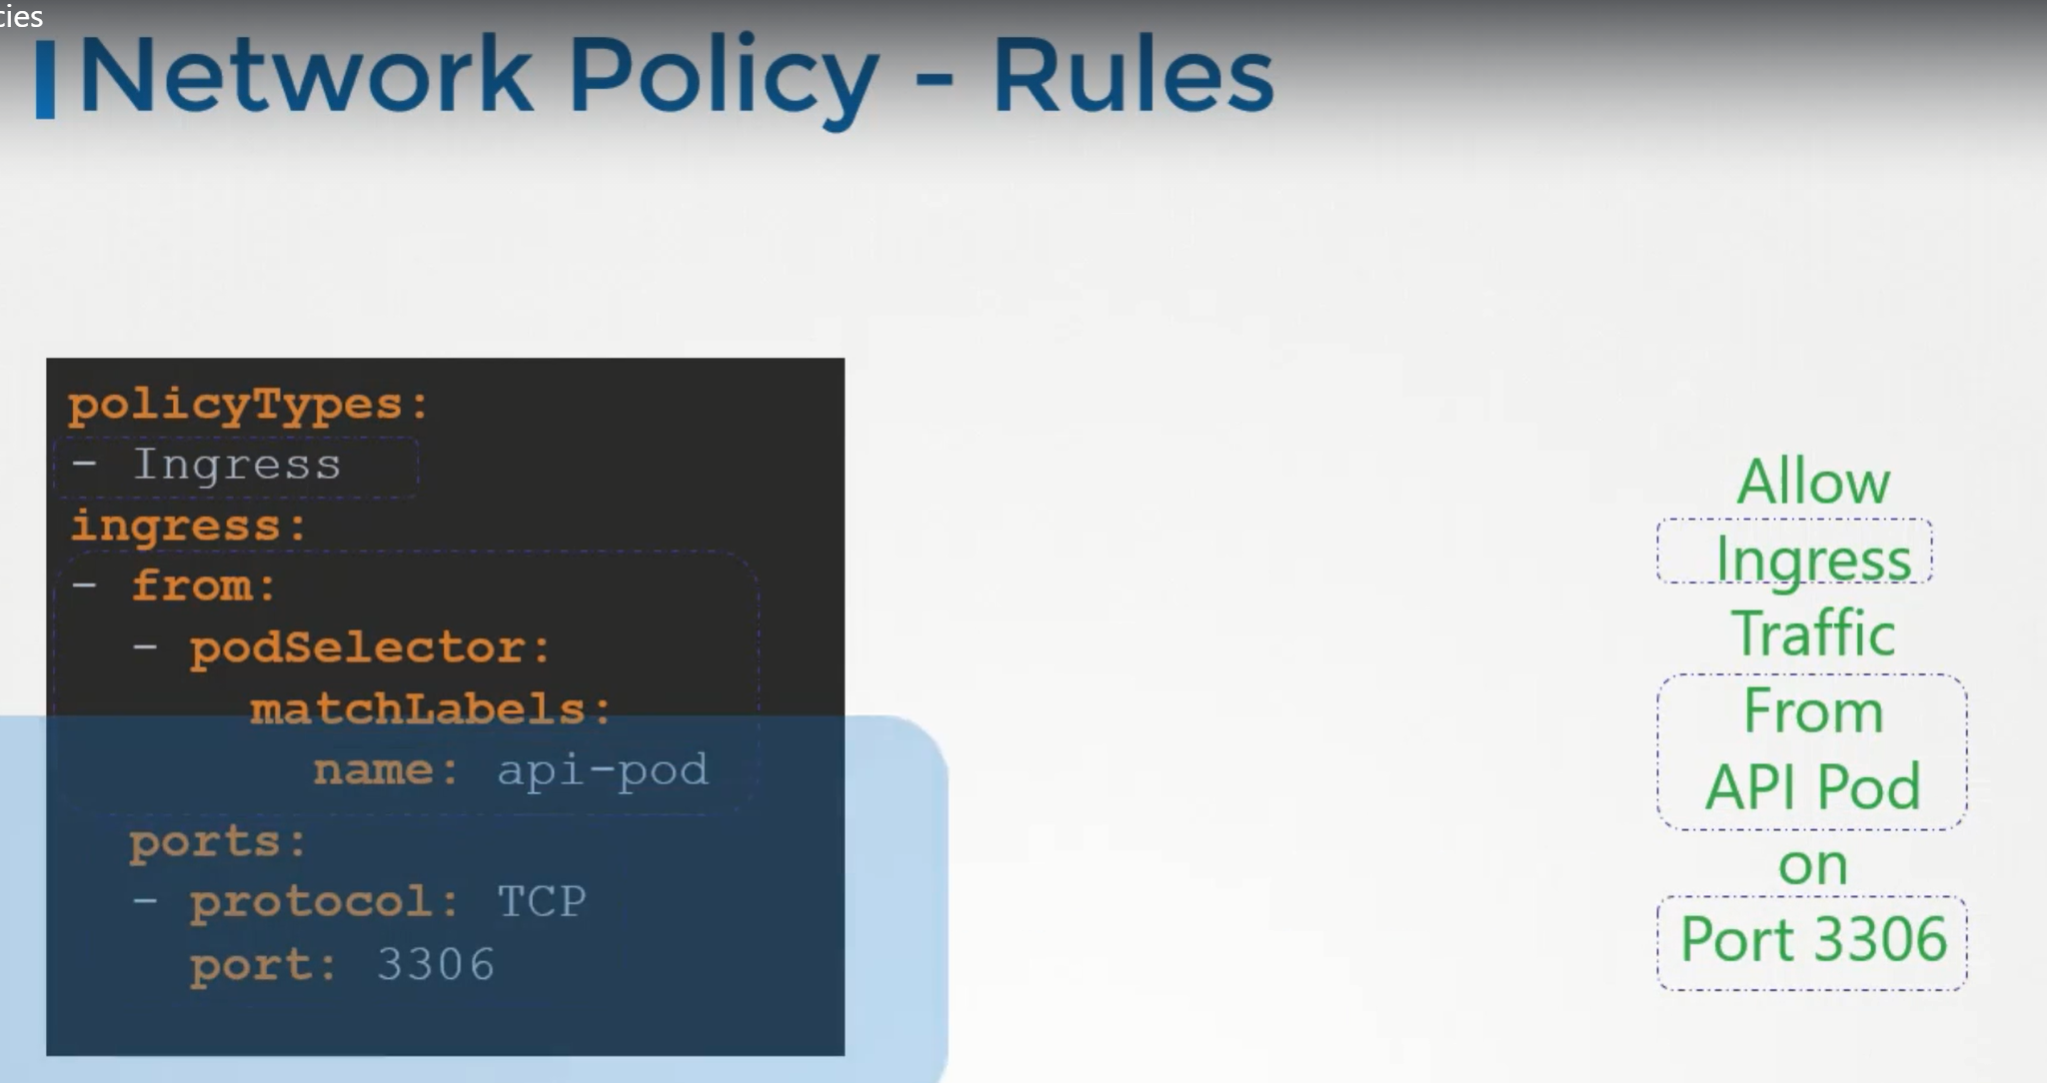
That is where, we would implement Network Policy to allow traffic to the DB server only from the API server.
Network Policy is another object in the kubernetes namespace just like PODS, services. We link a network policy to one or more PODs. We can define rules within the network policy. In this case, we can say, only allow Ingress traffic from the API pod on port 3306.
Once this policy is created, it blocks all other traffic to the pod and only allows the traffic that matches to specified rule.
This is only applicable to the POD on which network policy is applied.
To apply or link a network policy to a pod, we use labels and selectors. We label the pod and use the same labels on the podSelector field in the network policy and then we build our rule.
Under policyType, we can specify to allow Ingress or Egress or both.

To create a network policy
kubectl create -f <policy-definition file>
To get the network policies
kubectl get networkpolicy
Note:
Network policies are enforced by the network solution implemented on kubernetes cluster. Not all network solutions support network policy.
A few of them that are supported are:
- kube-router
- Romana
- Calico
- Weave-net
If we use Fannel as the networking solution, it does not support network policies.
Even in a cluster configured with a solution that does not support network policies, we can still create the policies, but just that they will not enforced. We will not get the error message saying that network solution does not support network policies.
Volumes in Docker
Docker Containers are meant to be transient in nature i.e., they are meant to last only for a short period of time.
They are called upon when required to process data and destroyed once finished.
The same is true, for the data within the container. The data is destroyed along with the container.
To Persist data processed by the containers, we attach a volume to the containers when they are created. The data processed by the container is now placed in this volume there by retaining it permanently.
Even if the container is deleted, the data generated or processed by it remains.
Volumes in Kubernetes
Just as in docker, the PODs created in kubernetes are transient in nature, when a POD is created to process data and then deleted. The data processed by it gets deleted as well. for this, we attach a volume to the POD.
The data generated by the POD is now stored in the volume and even after the POD is deleted, the data remains.
Implementation
We have a single node kubernetes cluster. We create a simple POD that generates a random number between 1 and 100 and writes that to a file at /opt/number.out. It then gets deleted along with the random number.
To retain the number generated by the POD, we create a volume and a volume needs a storage.
When we create a volume, we can choose to configure its storage in different ways.
Now we simple configure it to use a directory on the host.
This way any files created in the volume, will be stored in the directory data on my node.
Once the volume is created, to access it from a container we mount the volume to a directory inside the container.
We use volumeMounts field in each container to mount the data volume to the directory /opt within the container.
The random number will now be returned to /opt mount inside the container, which happens to be on the data volume which infact the data directory on the host.
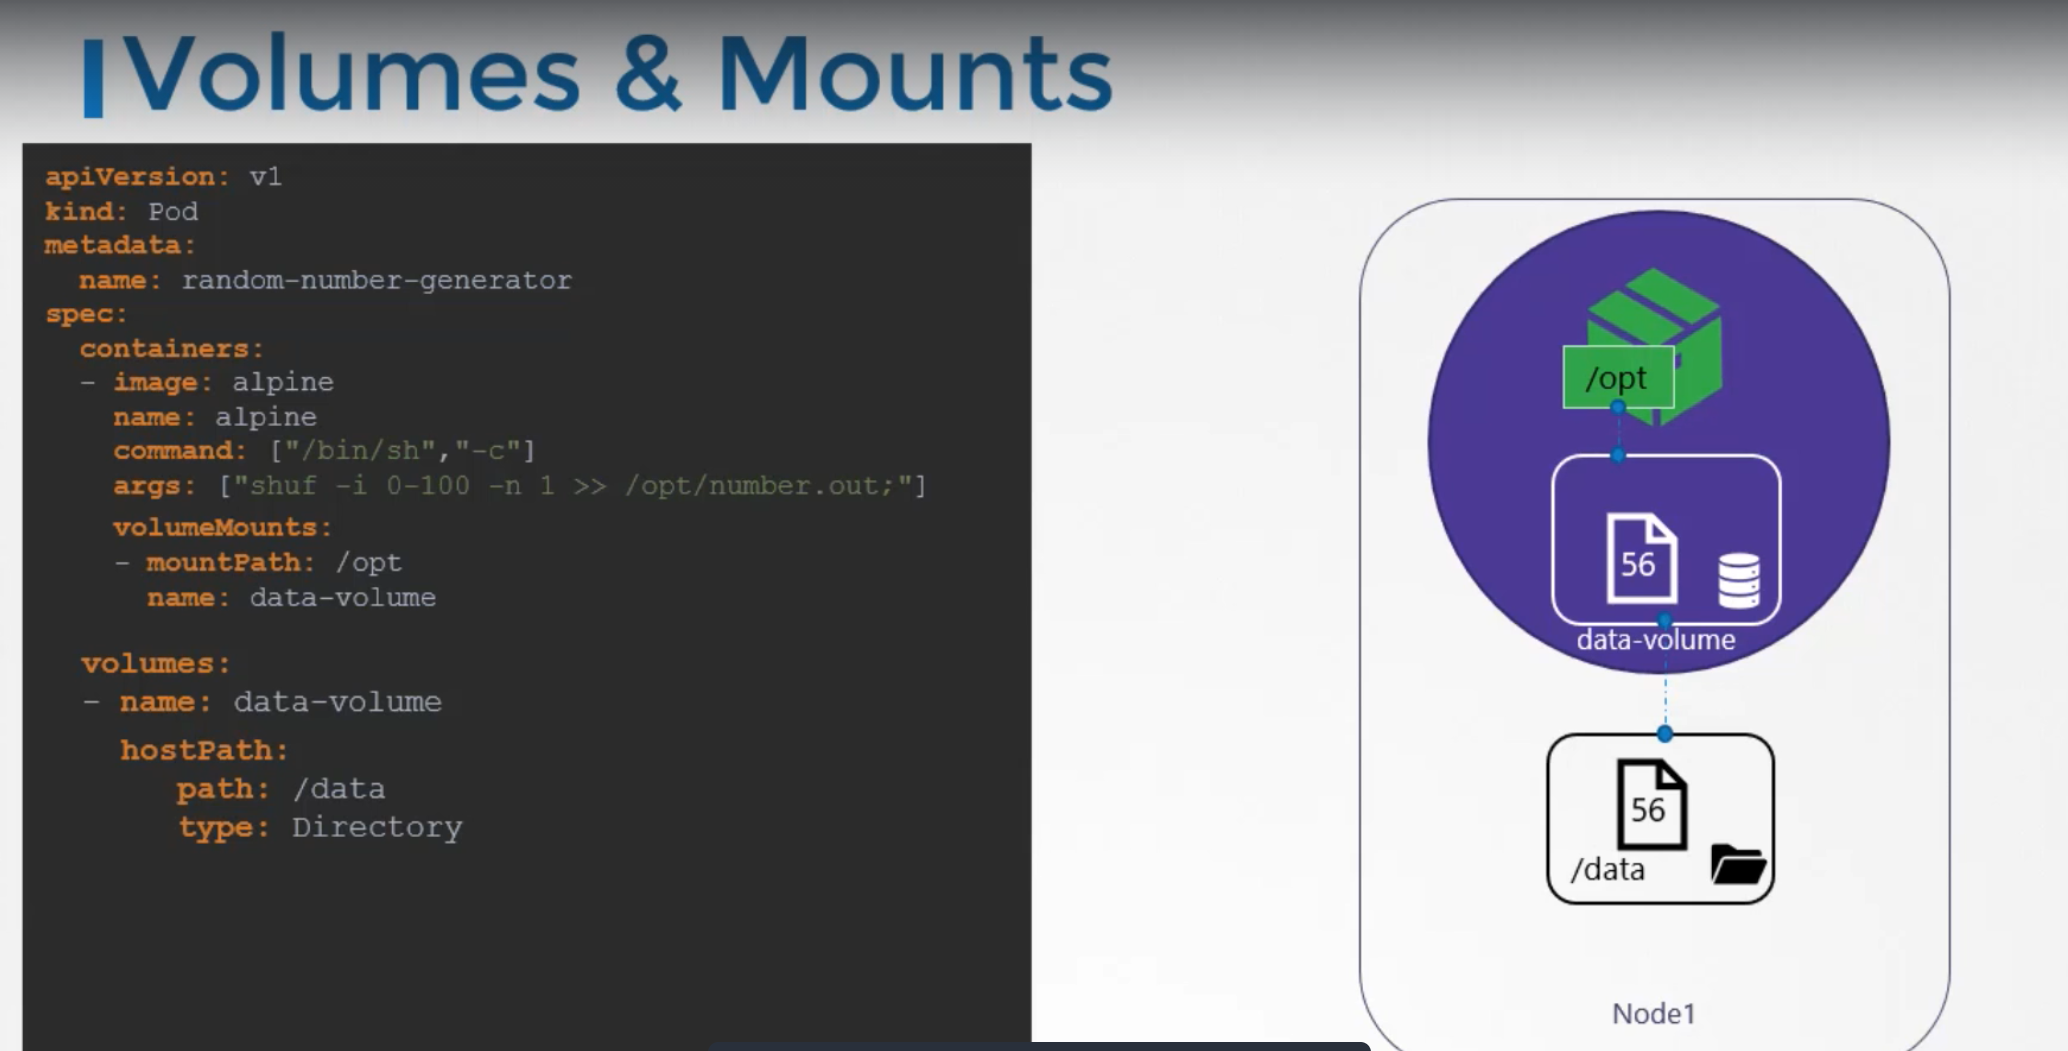
When the POD gets deleted, the file with the random number still lives on the host.
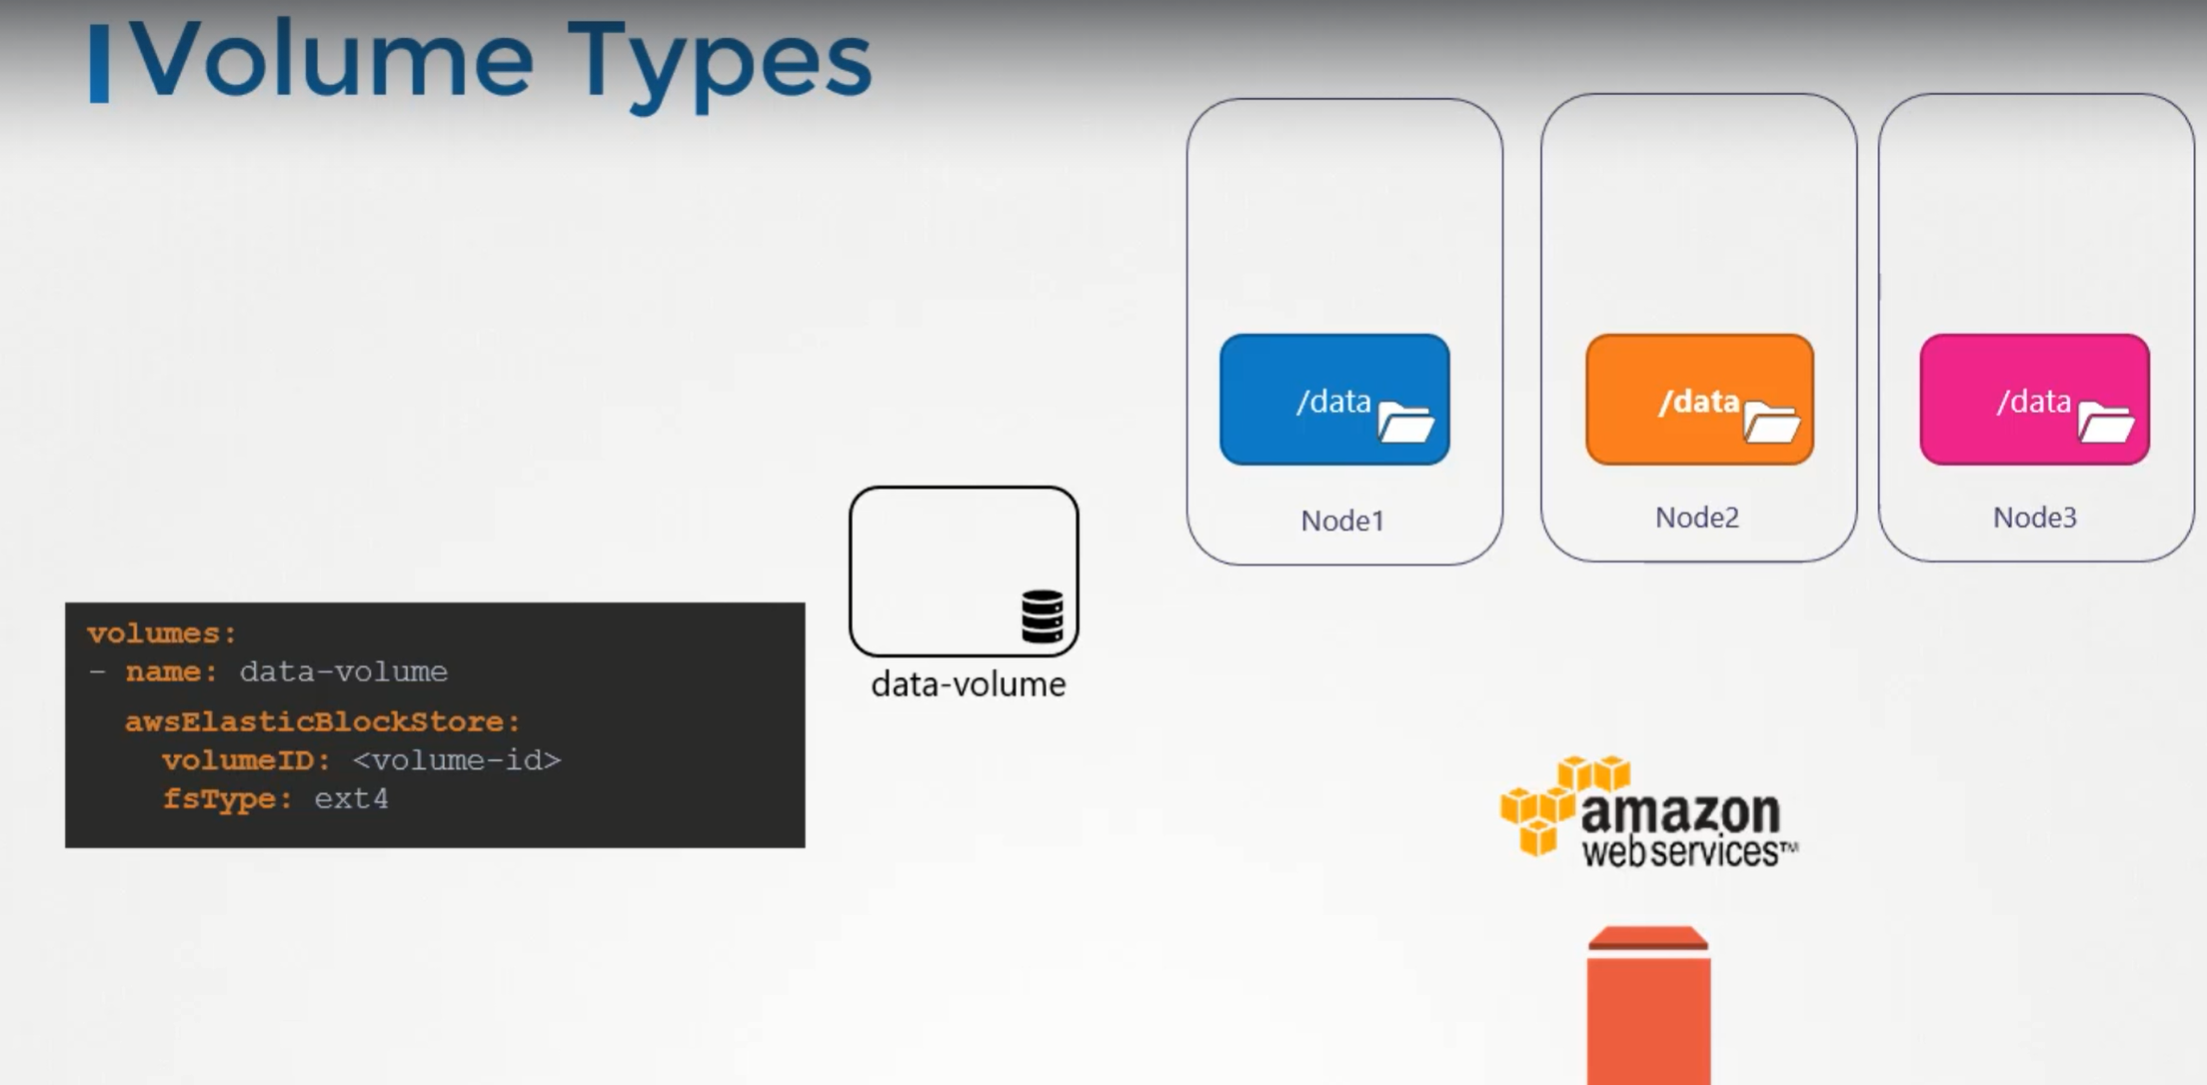
Volume Storage options
We can use hostpath option to configure a directory on the host as storage space for the volume. This works fine on a single node.
This is not recommended to use on multi-node cluster.
Volume storage on AWS
Persistent Volumes
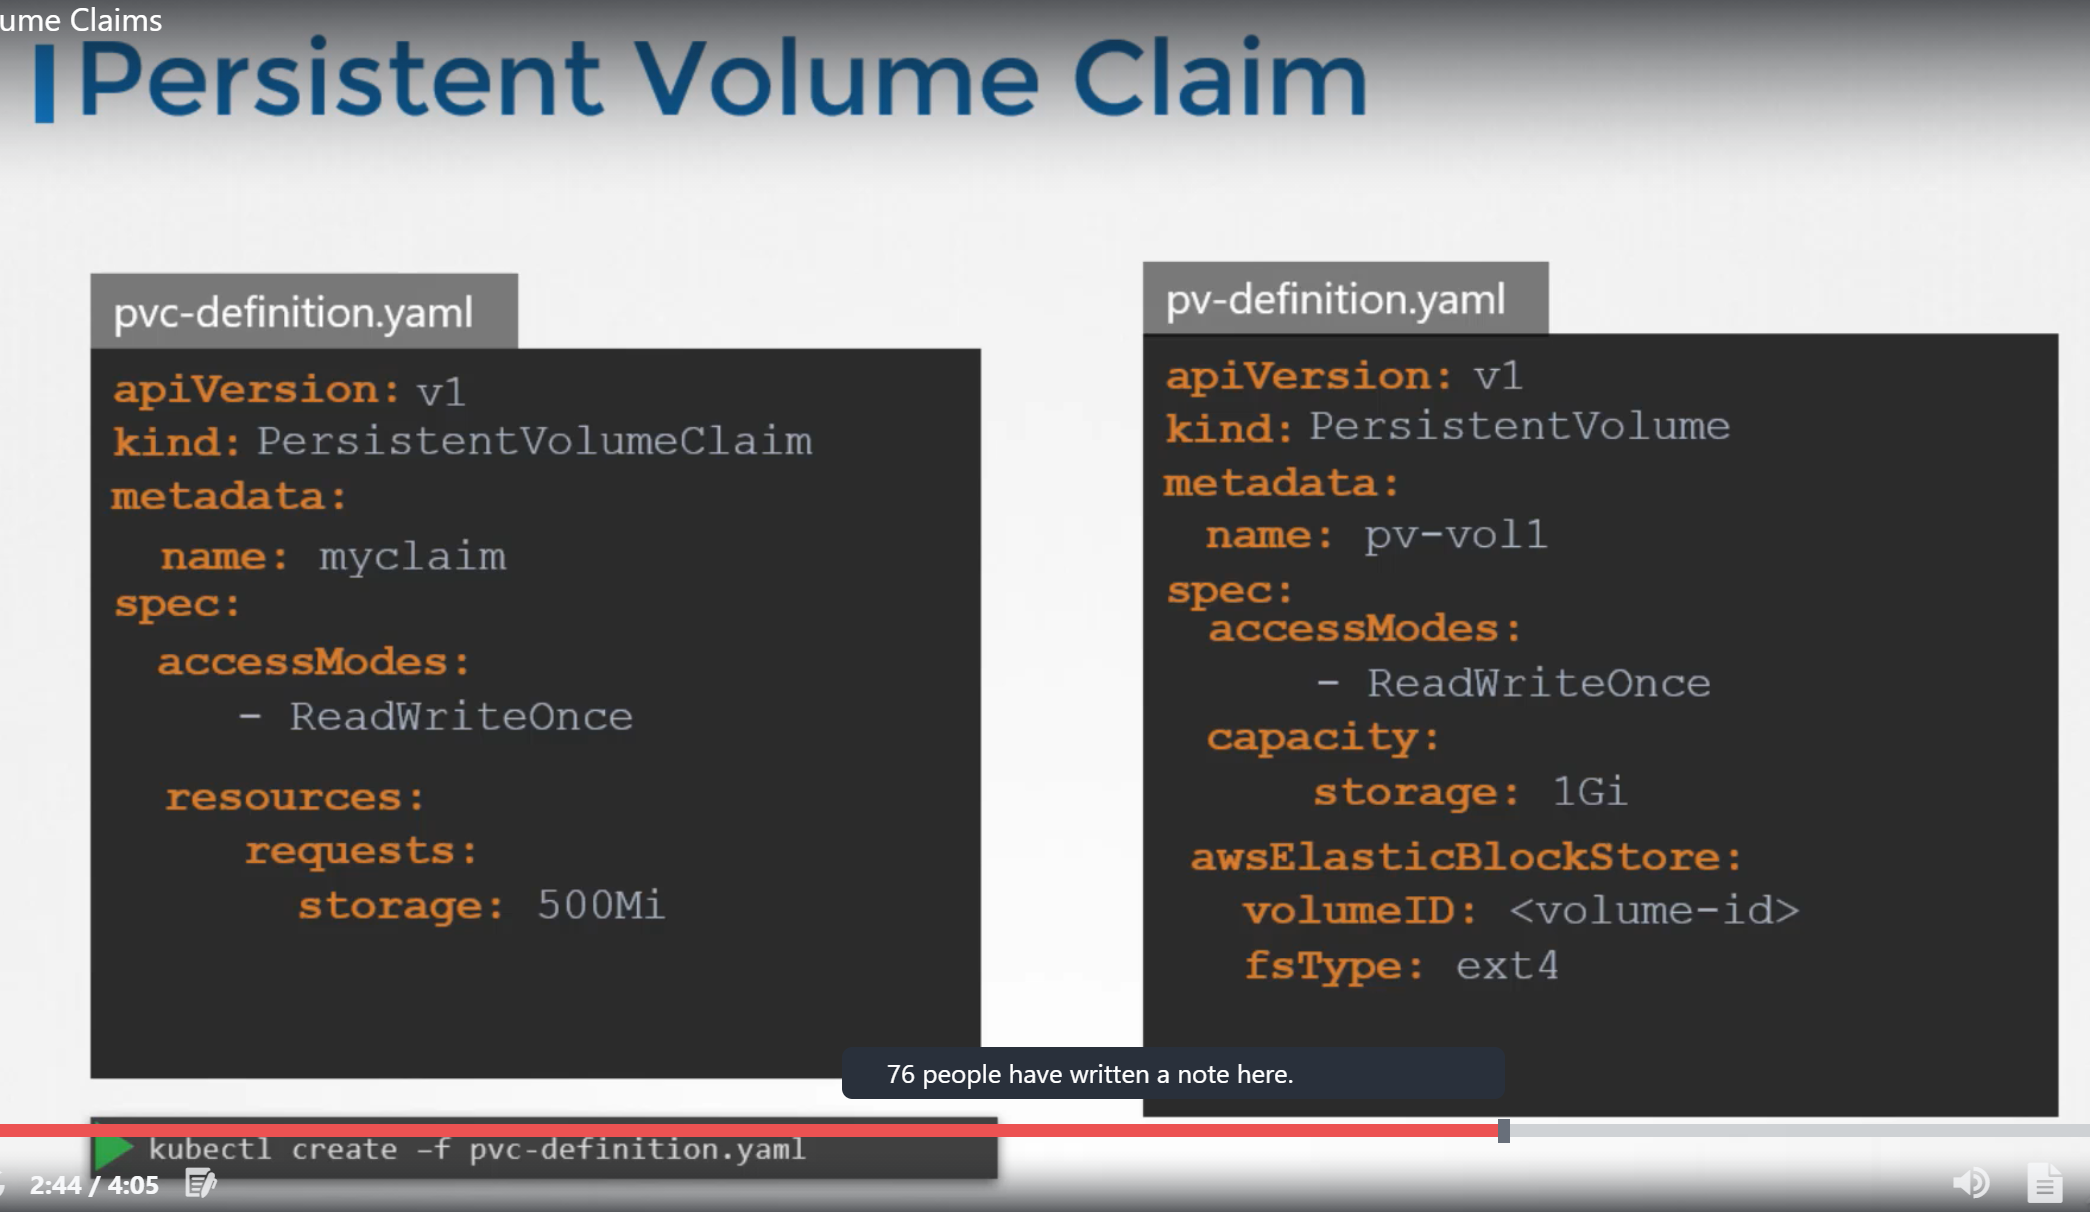
When we created volumes, we configured volumes within the pod definition file.
Every configuration information required to configure storage for the volume goes within the pod definition file.
When we have large environment, with lot of users deploying a lot of PODs, the users would have to configure storage everytime for each POD.
To manage storage centrally or configured in a way that an administrator can create a large pool of storage and then have users carve out pieces from it as required.
This is where persistant volumes can help us..
A Persistent volume is a cluster wide pool of storage volumes configured by an adminstrator to be used by users deploying applications on the cluster.
The users can now select storage from this pool using persistent volume claims.

Accessmode defines how a volume should be mounted on the host whether in a read only mode, read write mode.
The supported values are
- ReadOnlyMany
- ReadWriteOnce
- ReadWriteMany
Under capacity, specify the amount of storage to be reserved to this persistent volume.
next comes the volume type, we use host path for this.
Persistent Volume Claims
We create Persistent Volume Claim to make the storage available to a node.
Persistent Volumes and Persistent Volume Claims are two separate objects in the kubernetes namespace.
An administrator creates a set of persistent volumes and a user creates persistent volume claims to use storage.
Once the persistent volume claims are created, kubernetes binds the persistent volumes to claims based on the request and properties set on the volume.
Every persistent volume claim is bound to a single persistent volume. During the binding process, kubernetes tries to find a persistent volume that has sufficient capacity as requested by the claim and any another request property such Acess Modes, Volume Modes, Storage Class etc,.
If there are multiple matches for a single claim, and you would like to select a particular volume, we can use labels and selectors to bind to the right volumes.
There is a one to one relationship between claims and volumes. So, no other claims can utilize the remaining capacity in the volume.
If there are no volumes available, the persistent volume claim will remain in pending state, until the newer volumes are made available to the cluster. Once newer volumes are made available, the claim will automatically bound to the newly available volume.
Creation
To get the persistentVolumeClaim
kubectl get pvc
To delete the persistentVolumeClaim
kubectl delete persistentvolumeclaim <claimname>
We can choose what should happen to persistent volume, once pvc gets deleted.
Bydefault persistentVolumeReclaimPolicy is set to Retain i.e., persistent volume retains until it is manually deleted by the administrator. It is not available to use by any other claim.
With Delete option, PV will be deleted as soon as PVC gets deleted.
With Recycle option, the data in the persistent volume will be scrubbed before making it available to other claims.
Persistent volumes and persistent volume claims
To inorder to bind pvc with a pv, accessMode and storageClassName of both should be same.
PV:
spec:
hostPath:
path:
PODS
labels
show all the labels of pods
kubectl get pods --show-labels
Change the labels of pod 'nginx' to be app=v2
kubectl label pod nginx app=v2 --overwrite
Get the label 'app' for the pods
kubectl get pods --label-columns=app
Get only the 'app=v2' pods
kubectl get pods --selector=app=v2
Remove the 'app' label from the nginx pod
kubectl label pod nginx app-
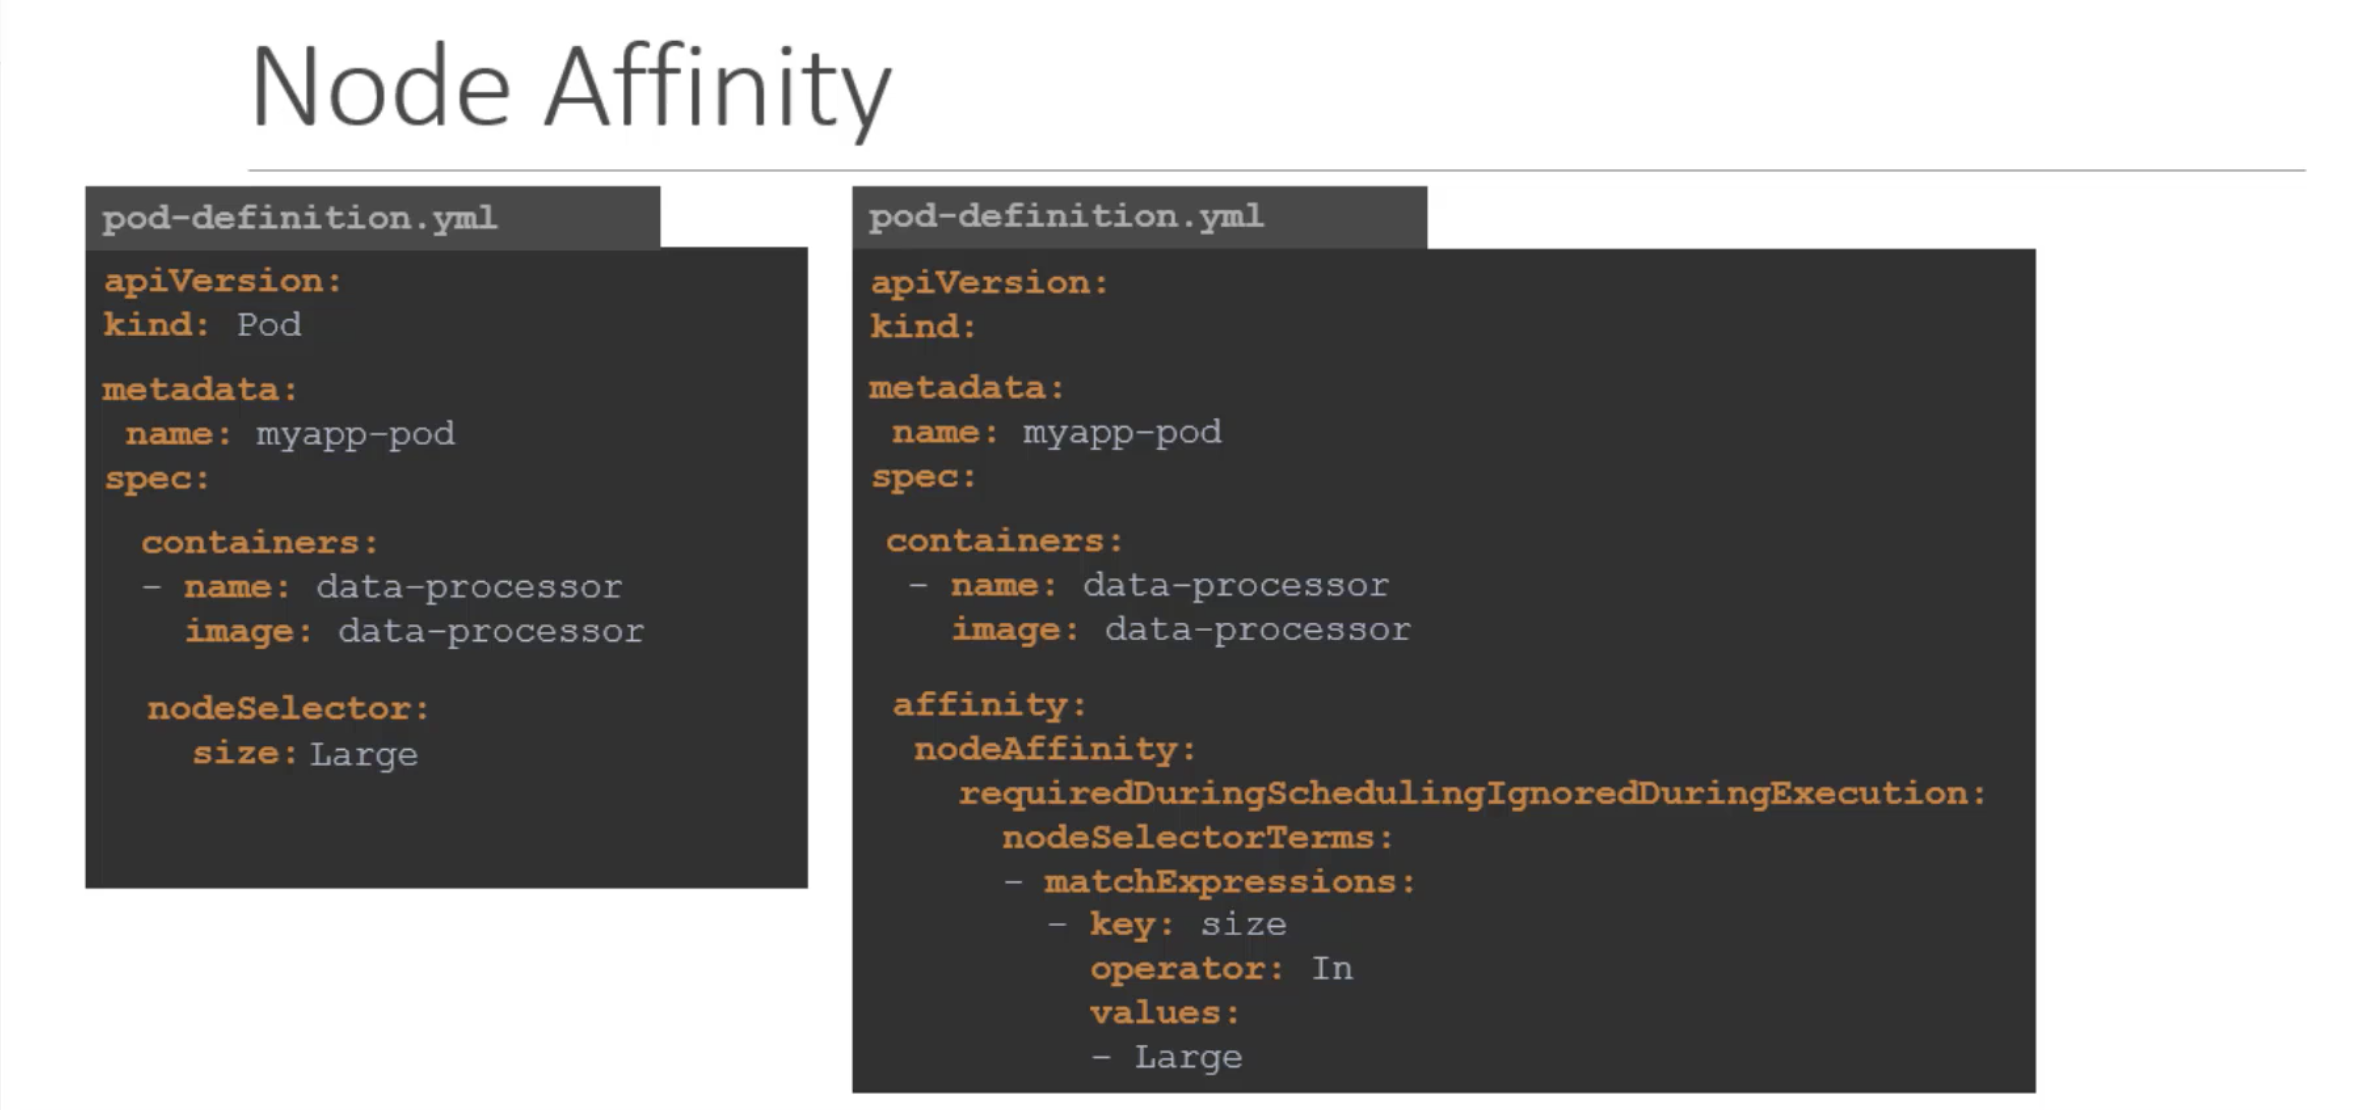
Create a pod that will be deployed to a Node that has the label 'accelerator=nvidia-tesla-p100'
First add the label to the node
kubectl label node <nodename> accelerator=nvidia-tesla-p100
use the 'nodeSelector' property on the Pod YAML. under nodeSElector give the label.
To know where to write nodeSelector in the yaml file.
kubectl explain po.spec
Annotate pod nginx with "description='my description'" value
kubectl annotate pod nginx description='my description'
check the annotations for pod nginx
kubectl describe pod nginx | grep -i 'annotations'
remove the annotation
kubectl annotate pod description-
check how the deployment rollout is going
kubectl rollout status deploy <deploymentname>
check the rollout history
kubectl rollout history deploy <deploymentname>
undo the latest rollout
kubectl rollout undo deploy <deploymentname>
Return the deployment to the second revision (number 2)
kubectl rollout undo deploy <deploymentname> --to-revision=2
Check the details of the fourth revision
kubectl rollout history deploy <deploymentname> --revision=4
Autoscale the deployment, pods between 5 and 10, targetting CPU utilization at 80%
kubectl autoscale deploy <deploymentname> --min=5 --max=10 --cpu-percent=80
pause the rollout of the deployment
kubectl rollout pause deploy <deploymentname>
Create Horzontal pod autoscaler for deployment nginx that maintains between 1 and 10 replicas of the Pods, targetting CPU utilization at 80%
kubectl autoscale deploy nginx --min=1 --max=10 --cpu-percent=80
Delete the deployment and the horizontal pod autoscaler you created
kubectl delete deploy nginx
kubectl delete hpa nginx
or
kubectl delete deploy/nginx hpa/nginx
Create a job with image perl
kubectl create job pi --image=perl
Create a job with image perl that runs the command with arguments "perl -Mbignum=bpi -wle 'print bpi(2000)'"
kubectl create job pi --image=perl -- perl -Mbignum=bpi -wle 'print bpi(2000)'
Create a job but ensure that it will be automatically terminated by kubernetes if it takes more than 30 seconds to execute
kubectl create job busybox --image=busybox --dry-run=client -o yaml -- /bin/sh -c 'while true; do echo hello; sleep 10; done'
Add activeDeadlineSeconds=30 under job spec section in yaml file and create the job.
configmaps
from literals
kubectl create cm map1 --from-literal=var1=val1
from file
echo -e 'var1=val1\nvar2=val2' > config.txt
kuebctl create cm map2 --from-file=config.txt
from env file
echo -e 'var1=val1\nvar2=val2' > config.env
kuebctl create cm map3 --from-file=config.env
from a file, giving the key special
kubectl create cm map4 --from-file=special=config.txt
Create a configMap called 'options' with the value var5=val5. Create a new nginx pod that loads the value from variable 'var5' in an env variable called 'option'
kubectl create cm options --from-literal=var5=val5
kubectl run nginx --image=nginx --dry-run=client -o yaml > pod.yaml
Add
env:
- name: option
valueFrom:
configMapkeyRef:
name: options
key: var5
under spec.containers
Secrets
Create a secret with the values password=mypass
kubectl create secret generic mysecret --from-literal=password=mypass
from file
kubectl create secret generic mysecret --from-file=finename
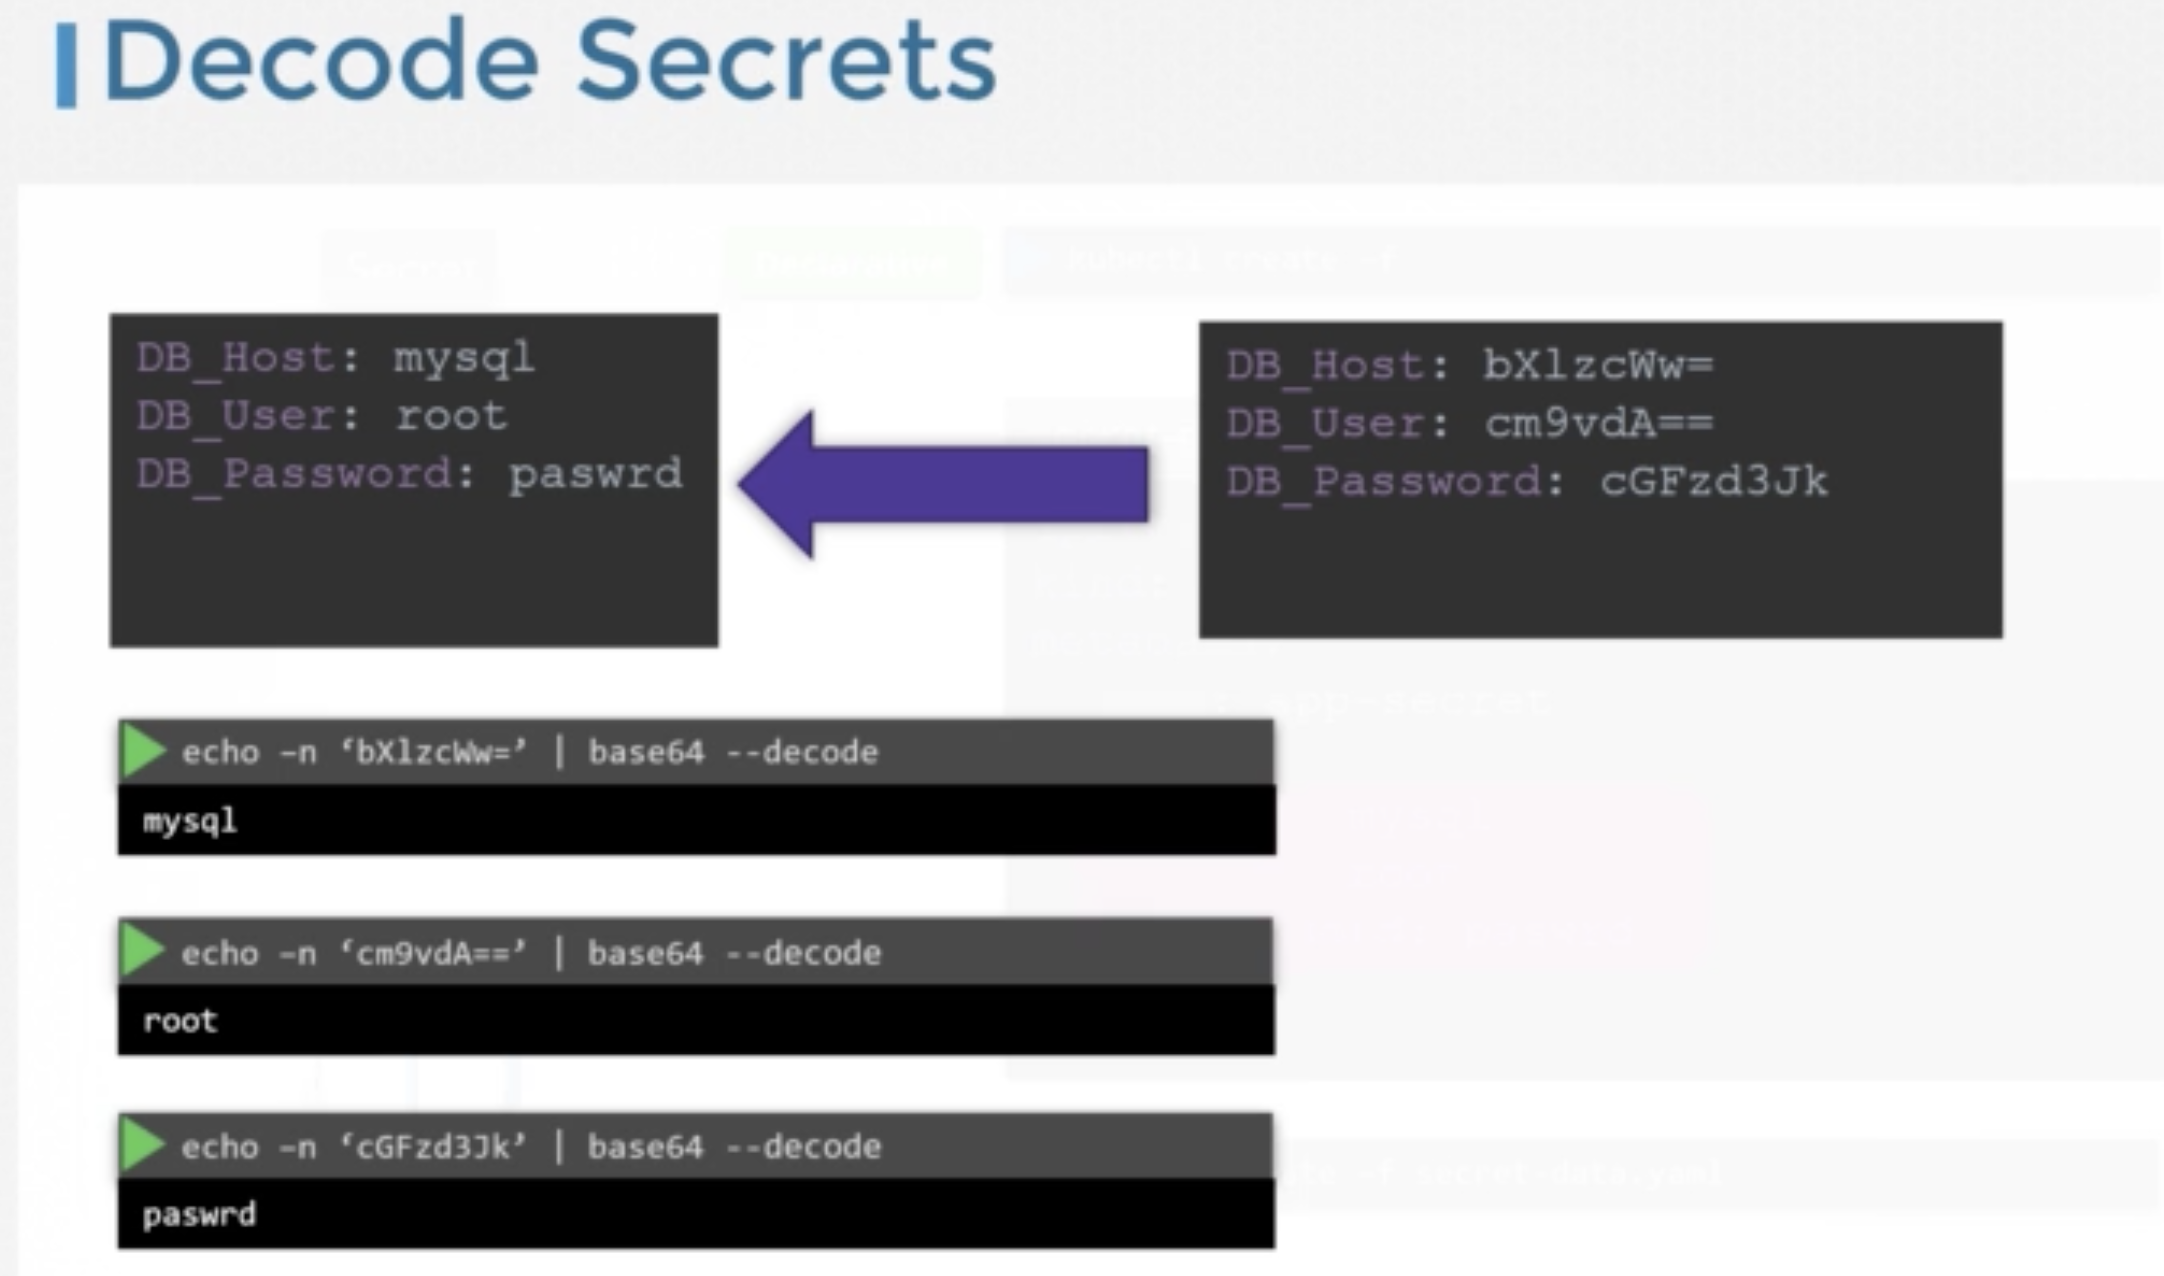
To get the value of the secret
echo <data.username> | base64 -D
Comments
Post a Comment